One of the short comings of most RV’s is the hot water. There just isn’t enough sometimes and if you have masses of hair (which I don’t) and want to shampoo that could be a real problem. So when I read about funpilot installing the Truma end-less hot water heater I thought this was a good idea…accept for the price. Truma is REALLY proud of their hot water heater at over $1,000! So that idea went out the window…that is until I discovered that there was a “hot water on demand system” that could be had for about $600! 400 bucks…that’s a very good savings on hot water and put it back into my budget parameters.
The system is made by Green Products and it’s called the Girard GSWH-2 Tank-less Hot water Heater. Trailmanor should offer this as an option to the limited Suburban. Don’t get me wrong, the Suburban dose a good job…if you don’t mind waiting for the hot water to recharge so one can take those limited showers. Green Products has been making these for a while and the -2 is the third generation water heater in their line. They have made several improvements and now have a unit that is fully automated. All you have to do is have the master switch on the heater itself turned on, turn on the propane, push the “on” switch on the user control panel and turn on the hot water faucet. As you might not know, this is a propane only run device with the electronics being 12v DC. However, it uses a way lot less propane than the Suburban 6 gallon hot water heater because the burner does not light until you turn on the faucet. The Girard has a flow switch that only ignites the burner when it senses the presence of water flowing thru it, so it’s not constantly burning propane with a pilot light or trying to keep a tank of water constantly hot. Smart eh?
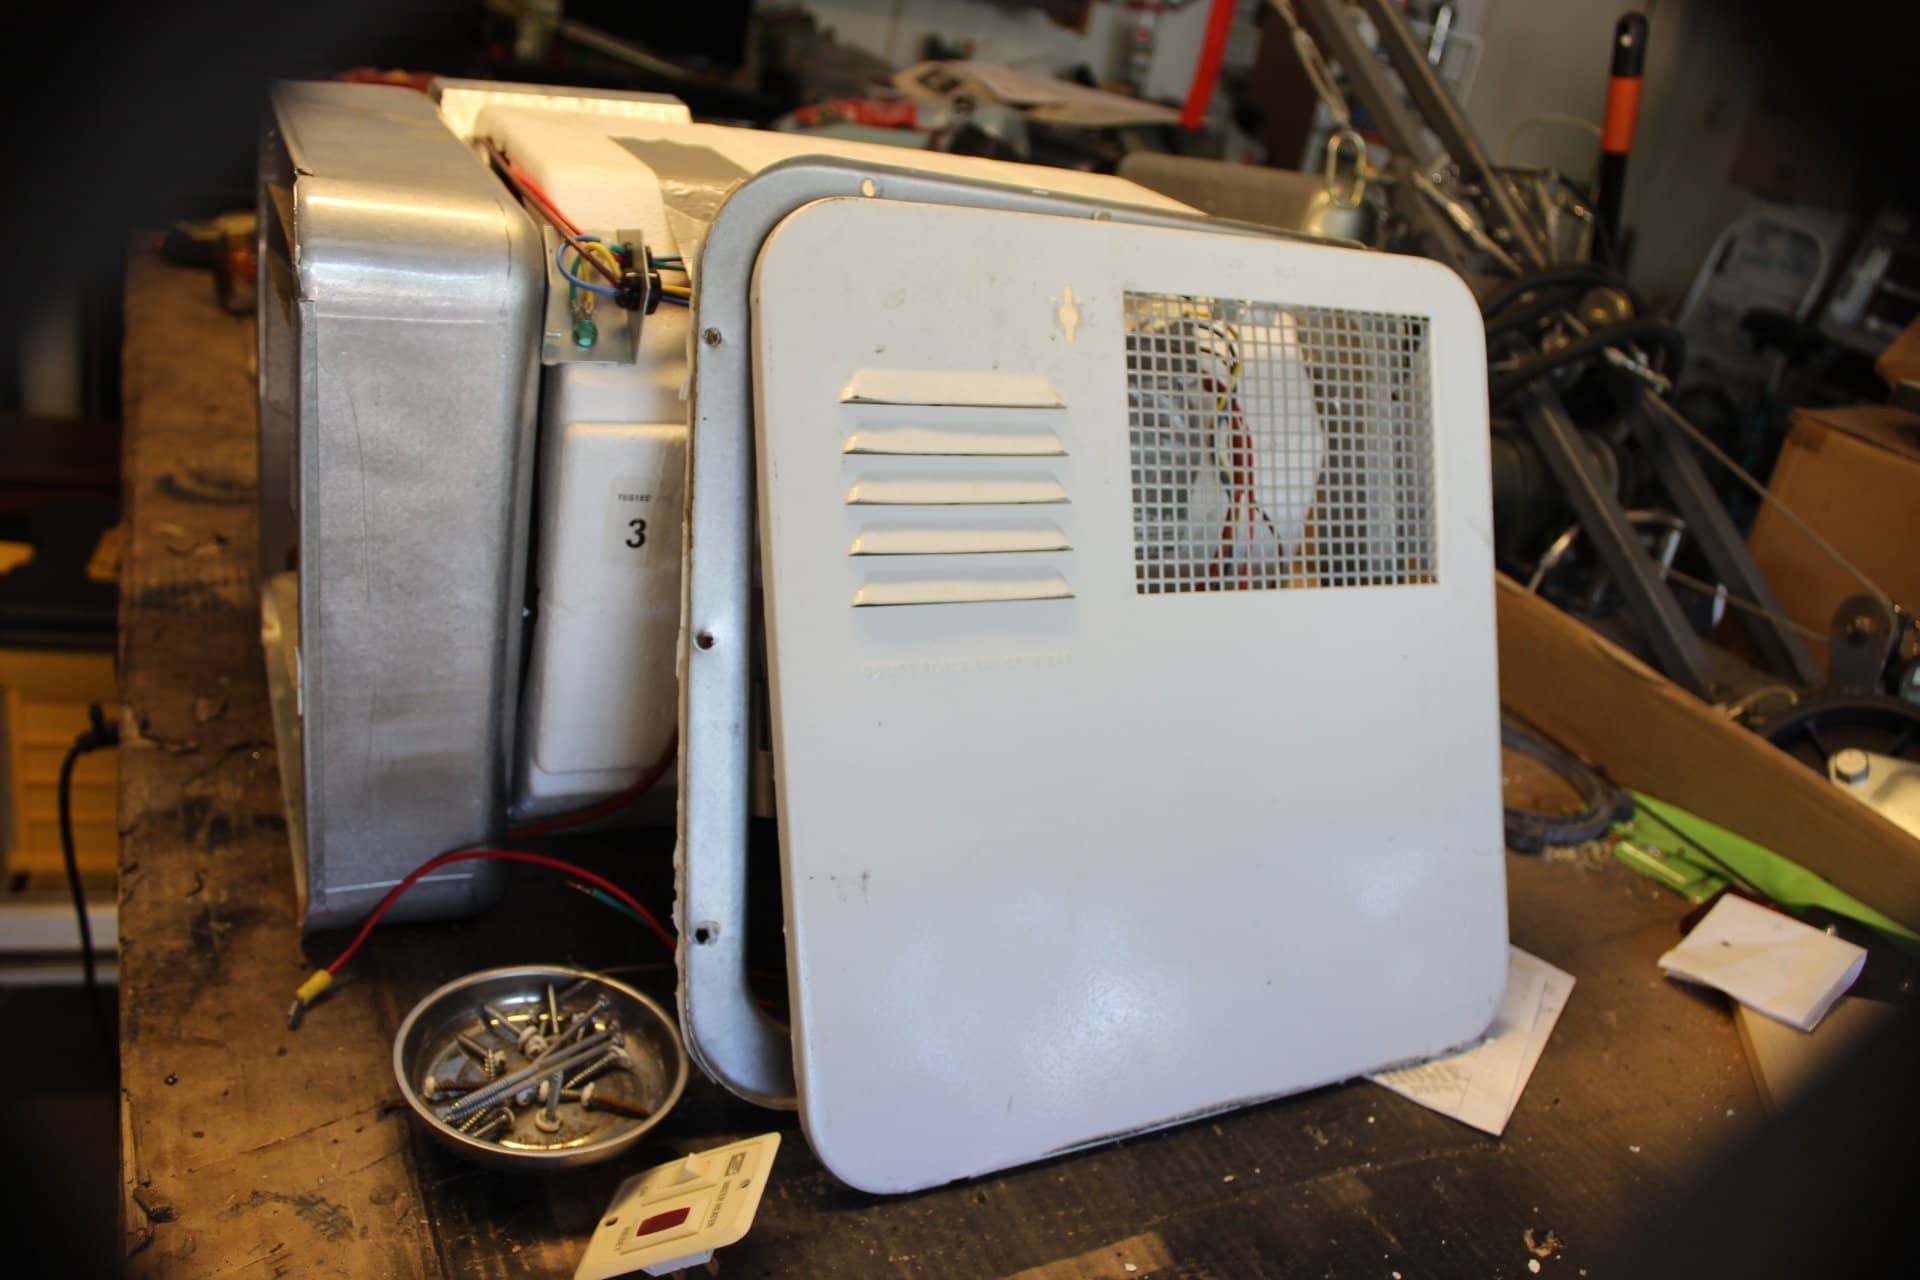
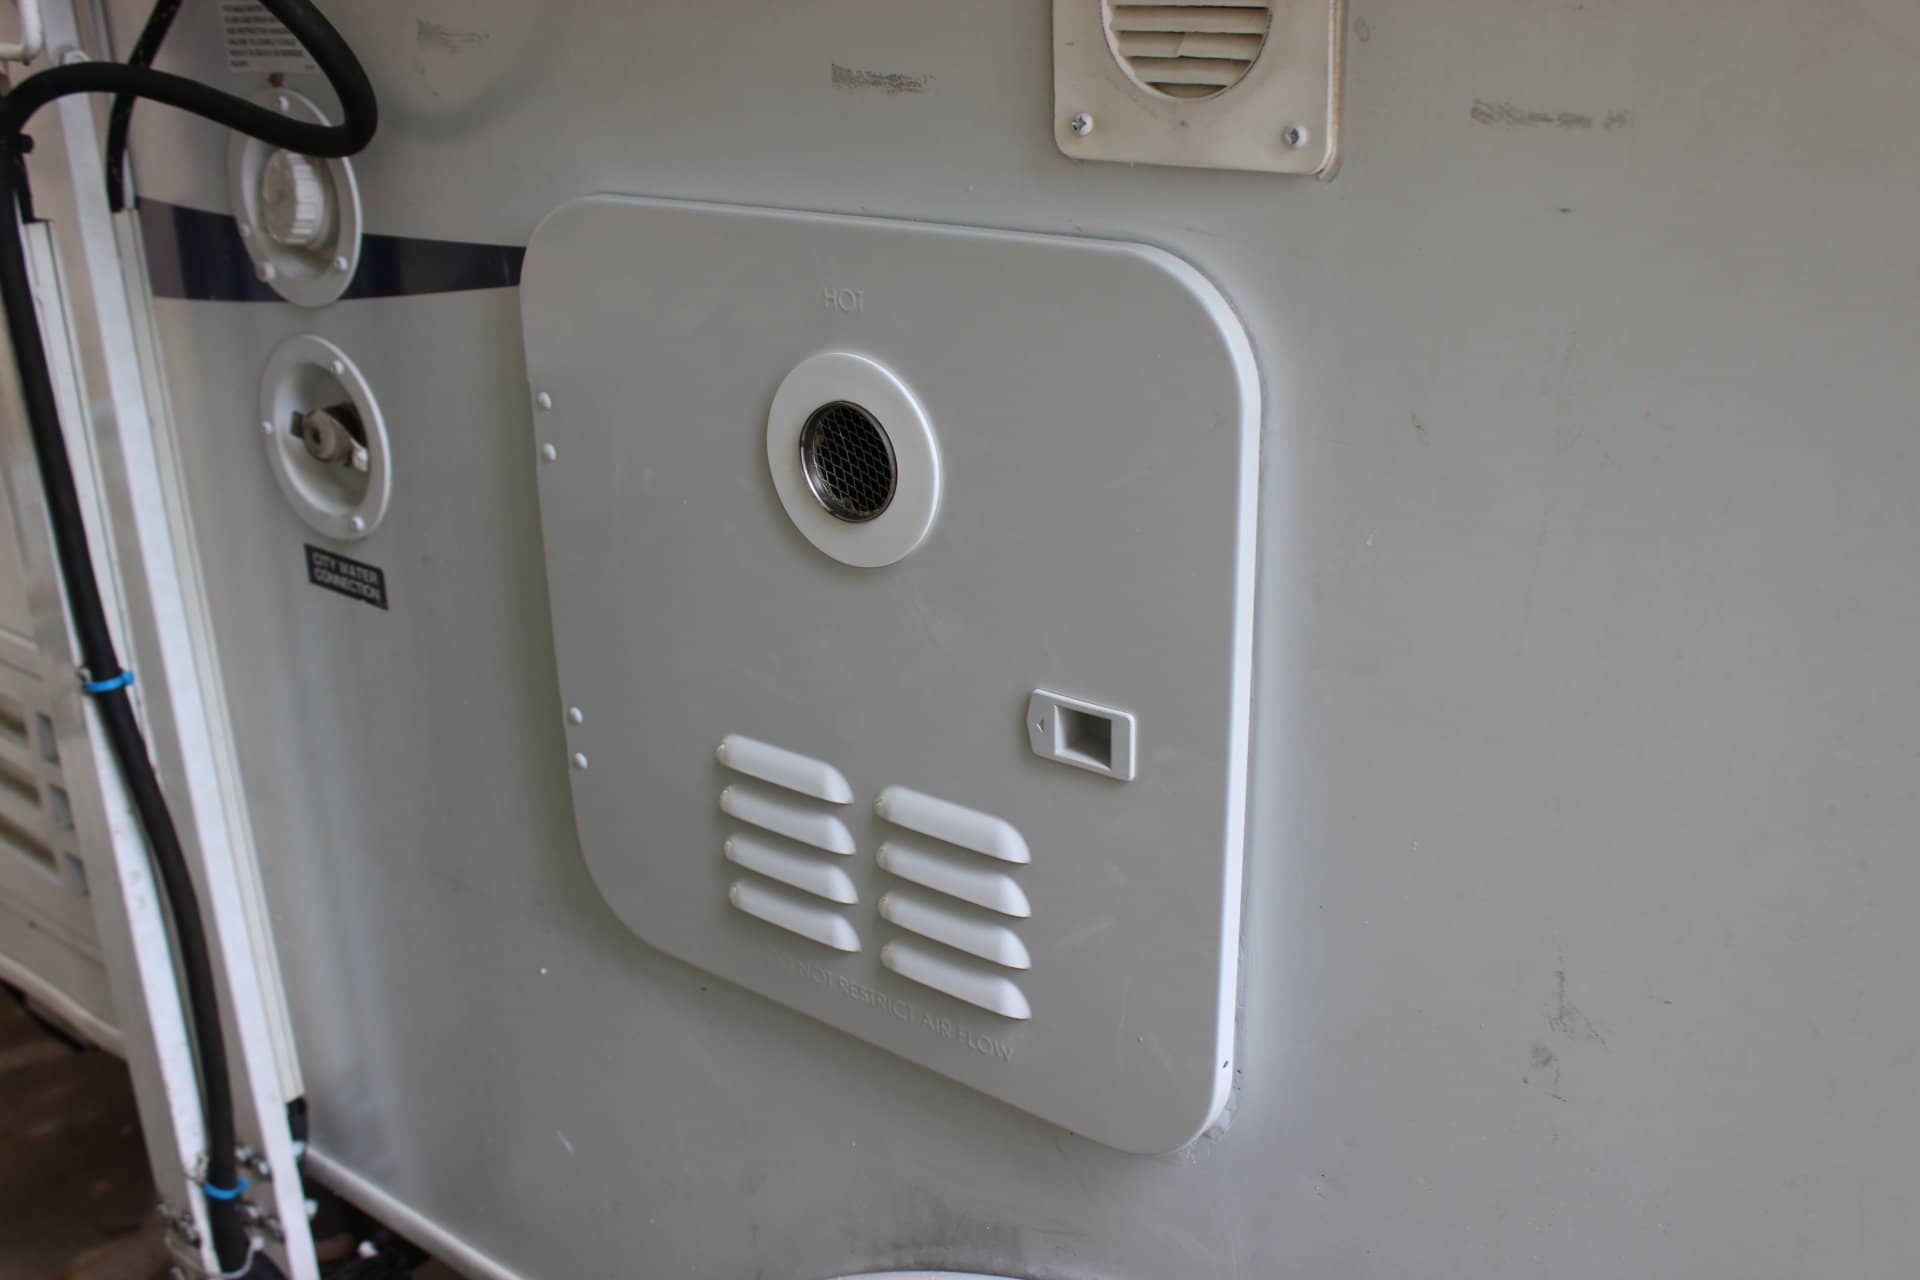
The Girard is made to fit into the space where an Atwood or Suburban hot water heater would go. Not included in the water heater is the outside access door. Since there are 3 different applications (Atwood, Suburban 6 gallon and 10 gallon) the doors are all different sizes, so they offer a door for each application. I got the door for the Suburban 6 gallon and the fit was perfect! The door has a sliding latch instead of the flip up twist latch of the Suburban and it swings open to the left instead of dropping down. I like these two features.
So I purchased my Girard from Campers Paradise in Charlotte NC. (704 395 6015) for $575.00 and with the door the total was $613.00…a very good price for this unit with no sales tax and free shipping! It arrived in two days from a warehouse in Houston (NTP Distribution) and I was a happy boy….until I discovered it had NO user control panel or manual in either box! Without them it’s useless. The door box was perfect with the flange and the door. So I called up Campers Paradise and they told me to box it back up and the UPS folks would bring me another one and pick up the one missing the parts. So…another two days later I find my new water heater on my front porch…only to discover that it still did NOT have instructions or the user control panel! I blew a gasket and call up CP angain and read them the riot act and did the same with Green Products! Well it seems that the NTP folks had gotten a shipment of water heater that had these parts missing. So in the end, Green Products (Girard) next day aired me the control panel and owner’s manual. The moral to this story is this: If you order this form CP, make sure they understand the problem I had about the missing pieces and have them check to MAKE SURE that they are IN THE BOX with the hot water heater!
Other than me pulling out the last of my hair, everything went well. So unless you have done this before, here is the process for removing your Suburban 6 gallon hot water heater.
This is how you remove the Suburban 6 gallon hot water heater.
Make sure all the 110v AC electrical service to your trailer is off and also that the 12v DC is off too. Likewise make sure the water heater is cool, the switch is off and that the propane is off as well. You don’t want to work with hot water, live wires or open propane gas flowing. Especially at the same time!
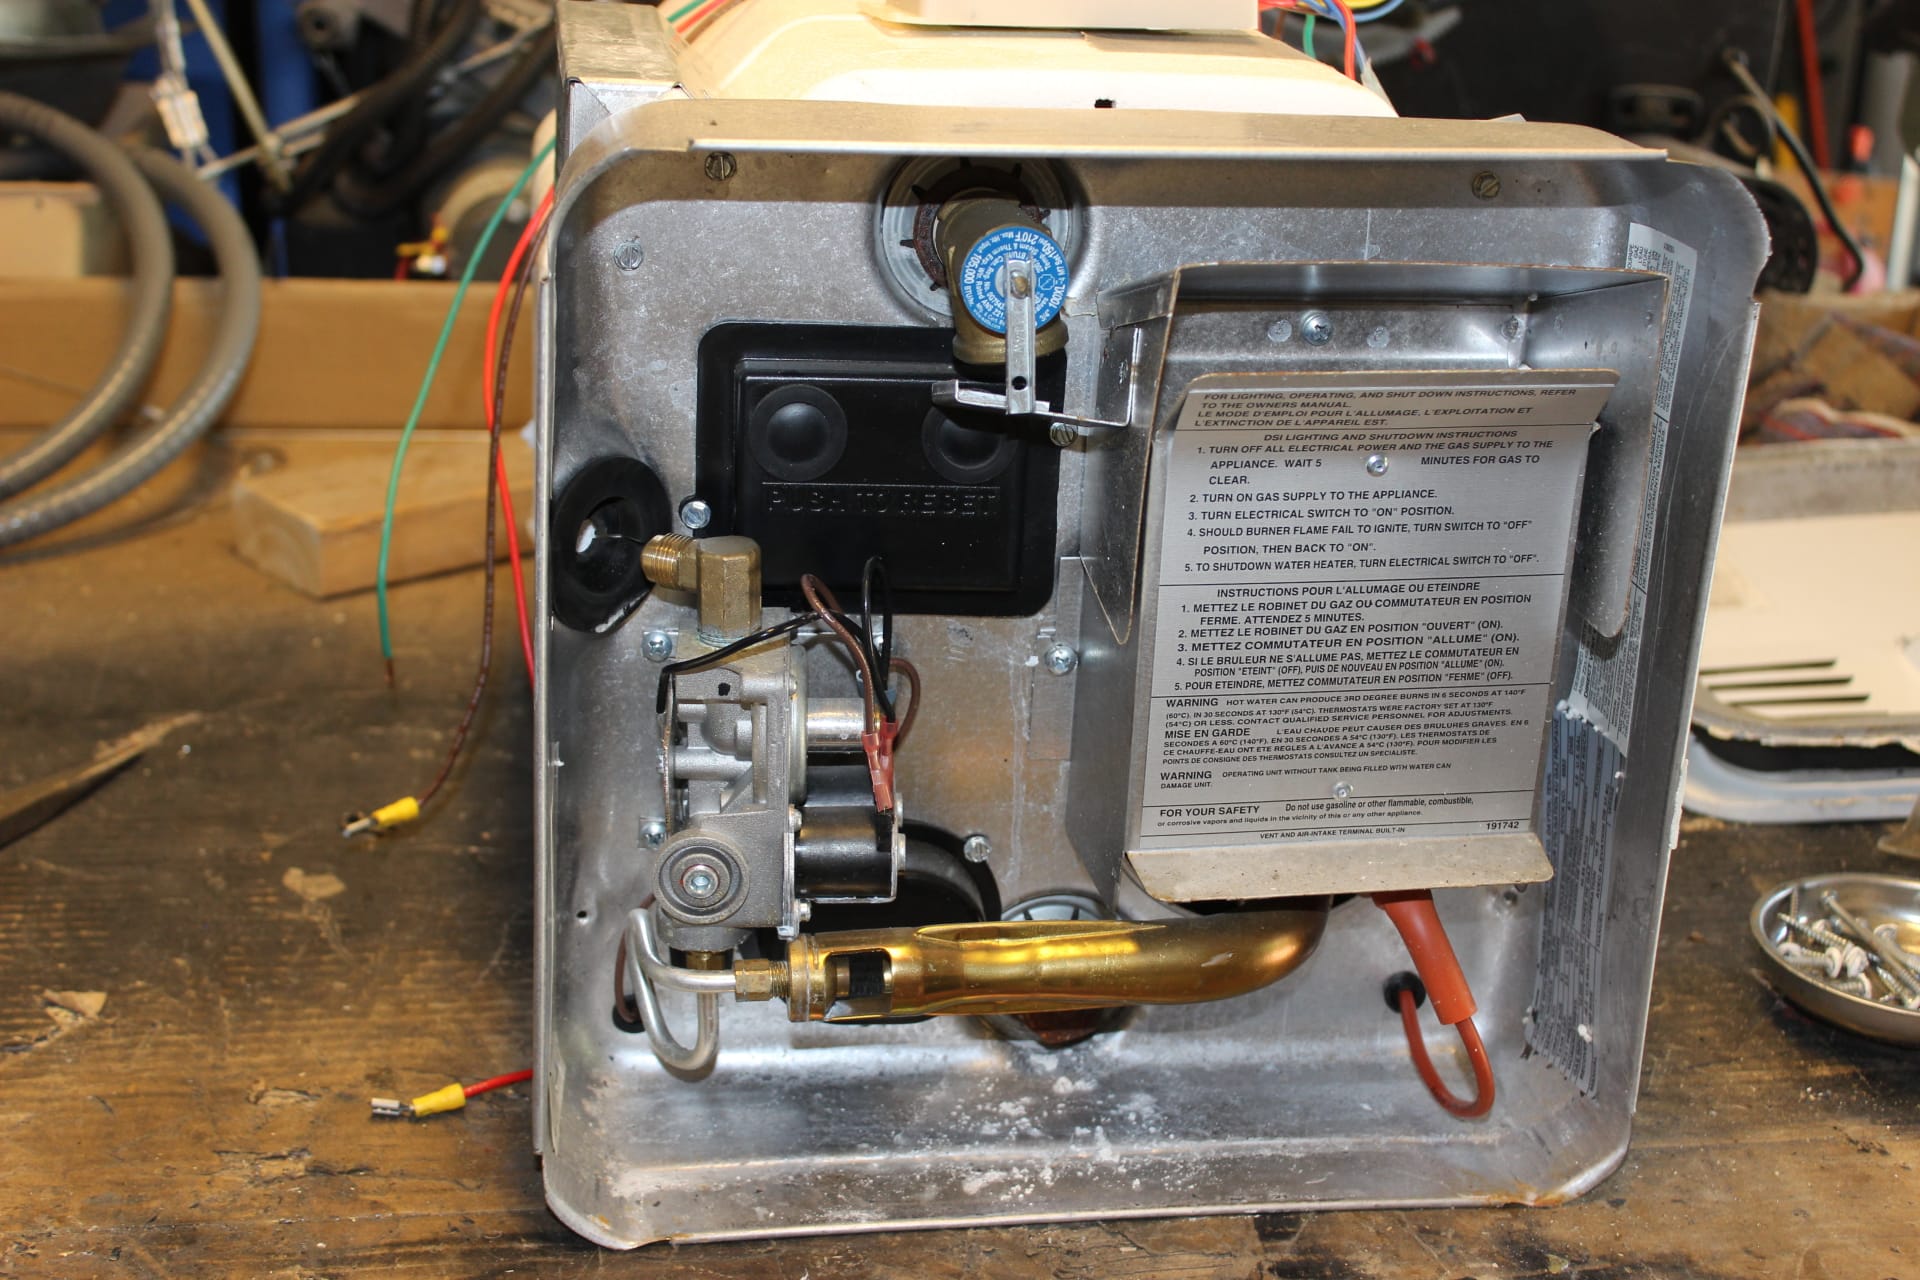
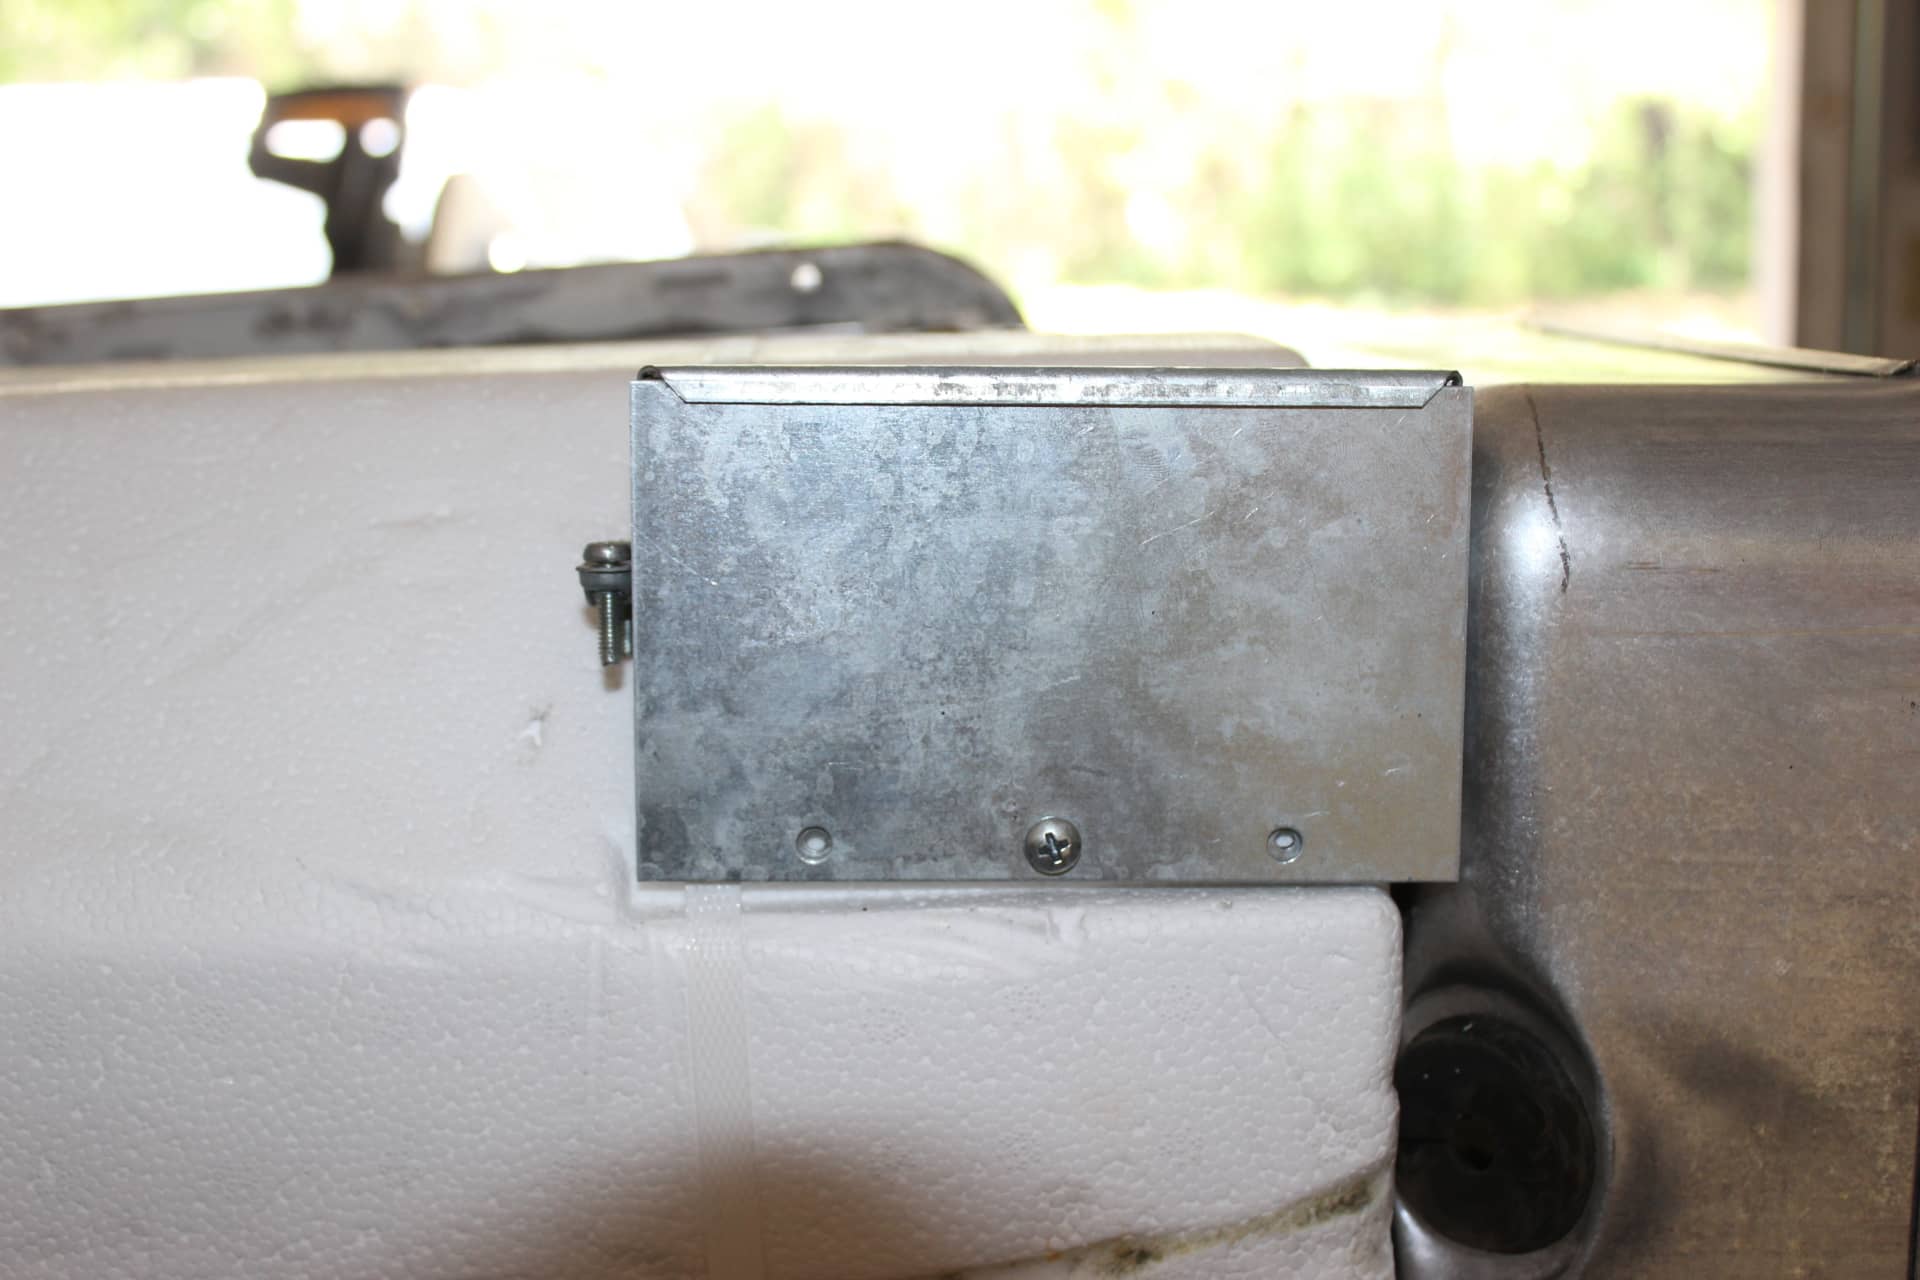
On the outside, open the access door to the water heater and at the front of the water heater at the bottom in the center you will see a large bolt head behind the brass colored horizontal burner tube (image 1836). For those who don’t know, this is the anode rod that is in the inside of the water heater. It is there to dissolve instead of your tank walls. By removing this (1 1/16” socket) you can drain the water from the heater. Wait for all the water to drain out and replace the anode rod. A new rod should be the replacement if the old rod shows wear.
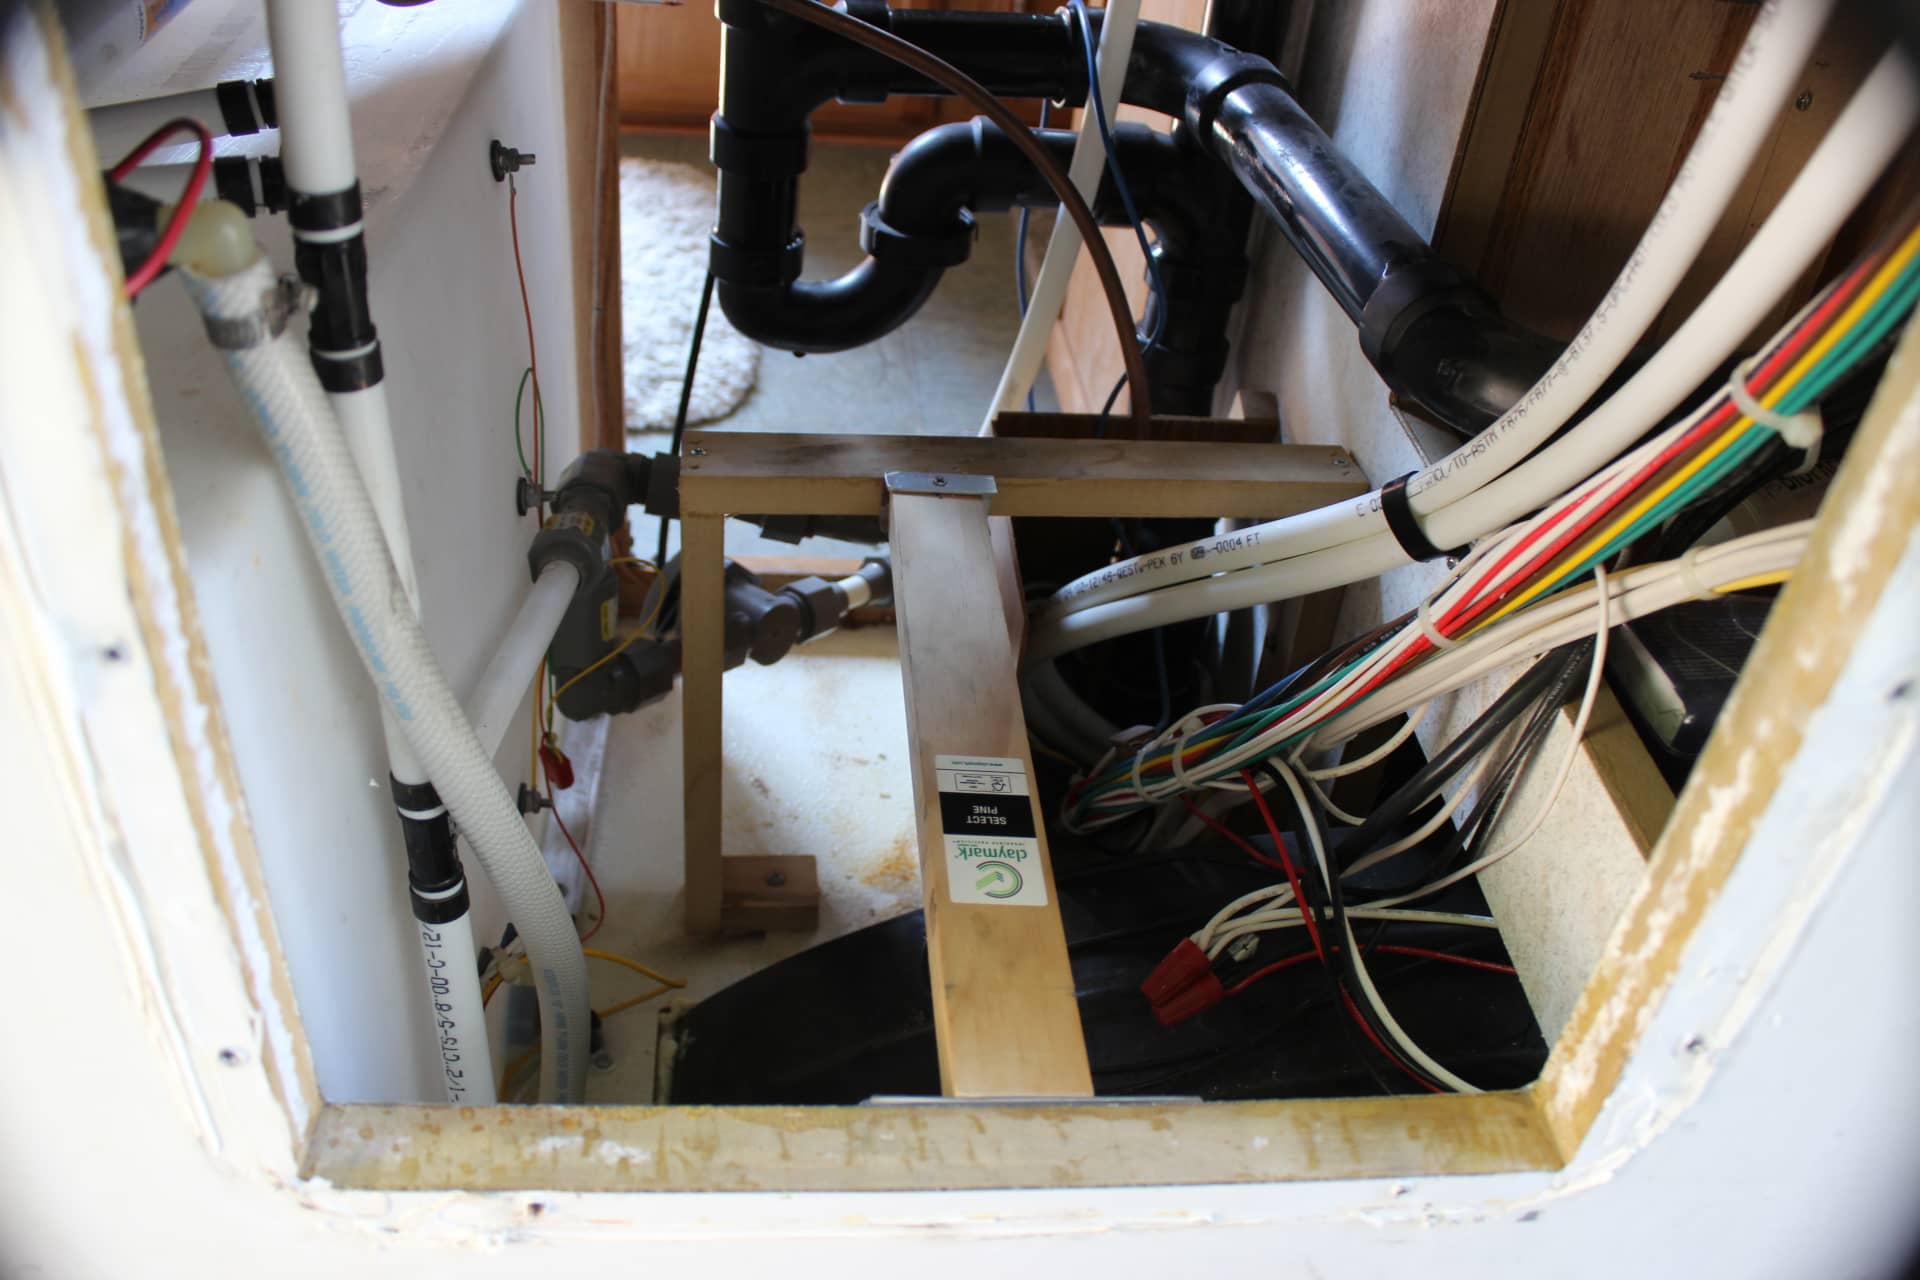
On the inside under the sink you will see the back side of the water heater with the two water connections. One on the top (hot water out) and another on the bottom (cold water in). Disconnect both of these and have a cup and sponge ready to catch any left over water inside the tank. Go back outside and take the door (images 1840, 1841) off by removing the two lower screws on the front of the flange. The flange is screwed directly into the trailer outside wall on every side. Remove all of the remaining screws on the flange including 3 very long screws (image 1838) that are attached to the water heater itself thru three tabs that are bent out from the flange (image 1839) towards the inside. Pull on the flange and it will come straight out. You might need a putty knife to loosen the silicon seal around the flange. Next disconnect the propane gas feed line (image 1844) from the fitting in the front lower left corner (image 1842) and push it thru the split grommet if you can. You will have to pull the water heater out slightly to work the gas line thru the grommet and thru the water heater front. Once it clears, you can pull the water heater out more from the trailer wall. This will expose the 110v electrical service box for the water heater (image 1845). There is one Phillips head screw on the side of the box. Remove this and slide the steel plate down. This will expose all of the 110v electrical connections. Unscrew and disconnect these three wires and unscrew the two screws on the pinch retainer for the wire itself on the back of the box and slide the three wires out (image 1843). This is the 110v feed for the water heater that I will use somewhere else. I decided on the inside near the sink area. I could disconnect it but why waste a good circuit?
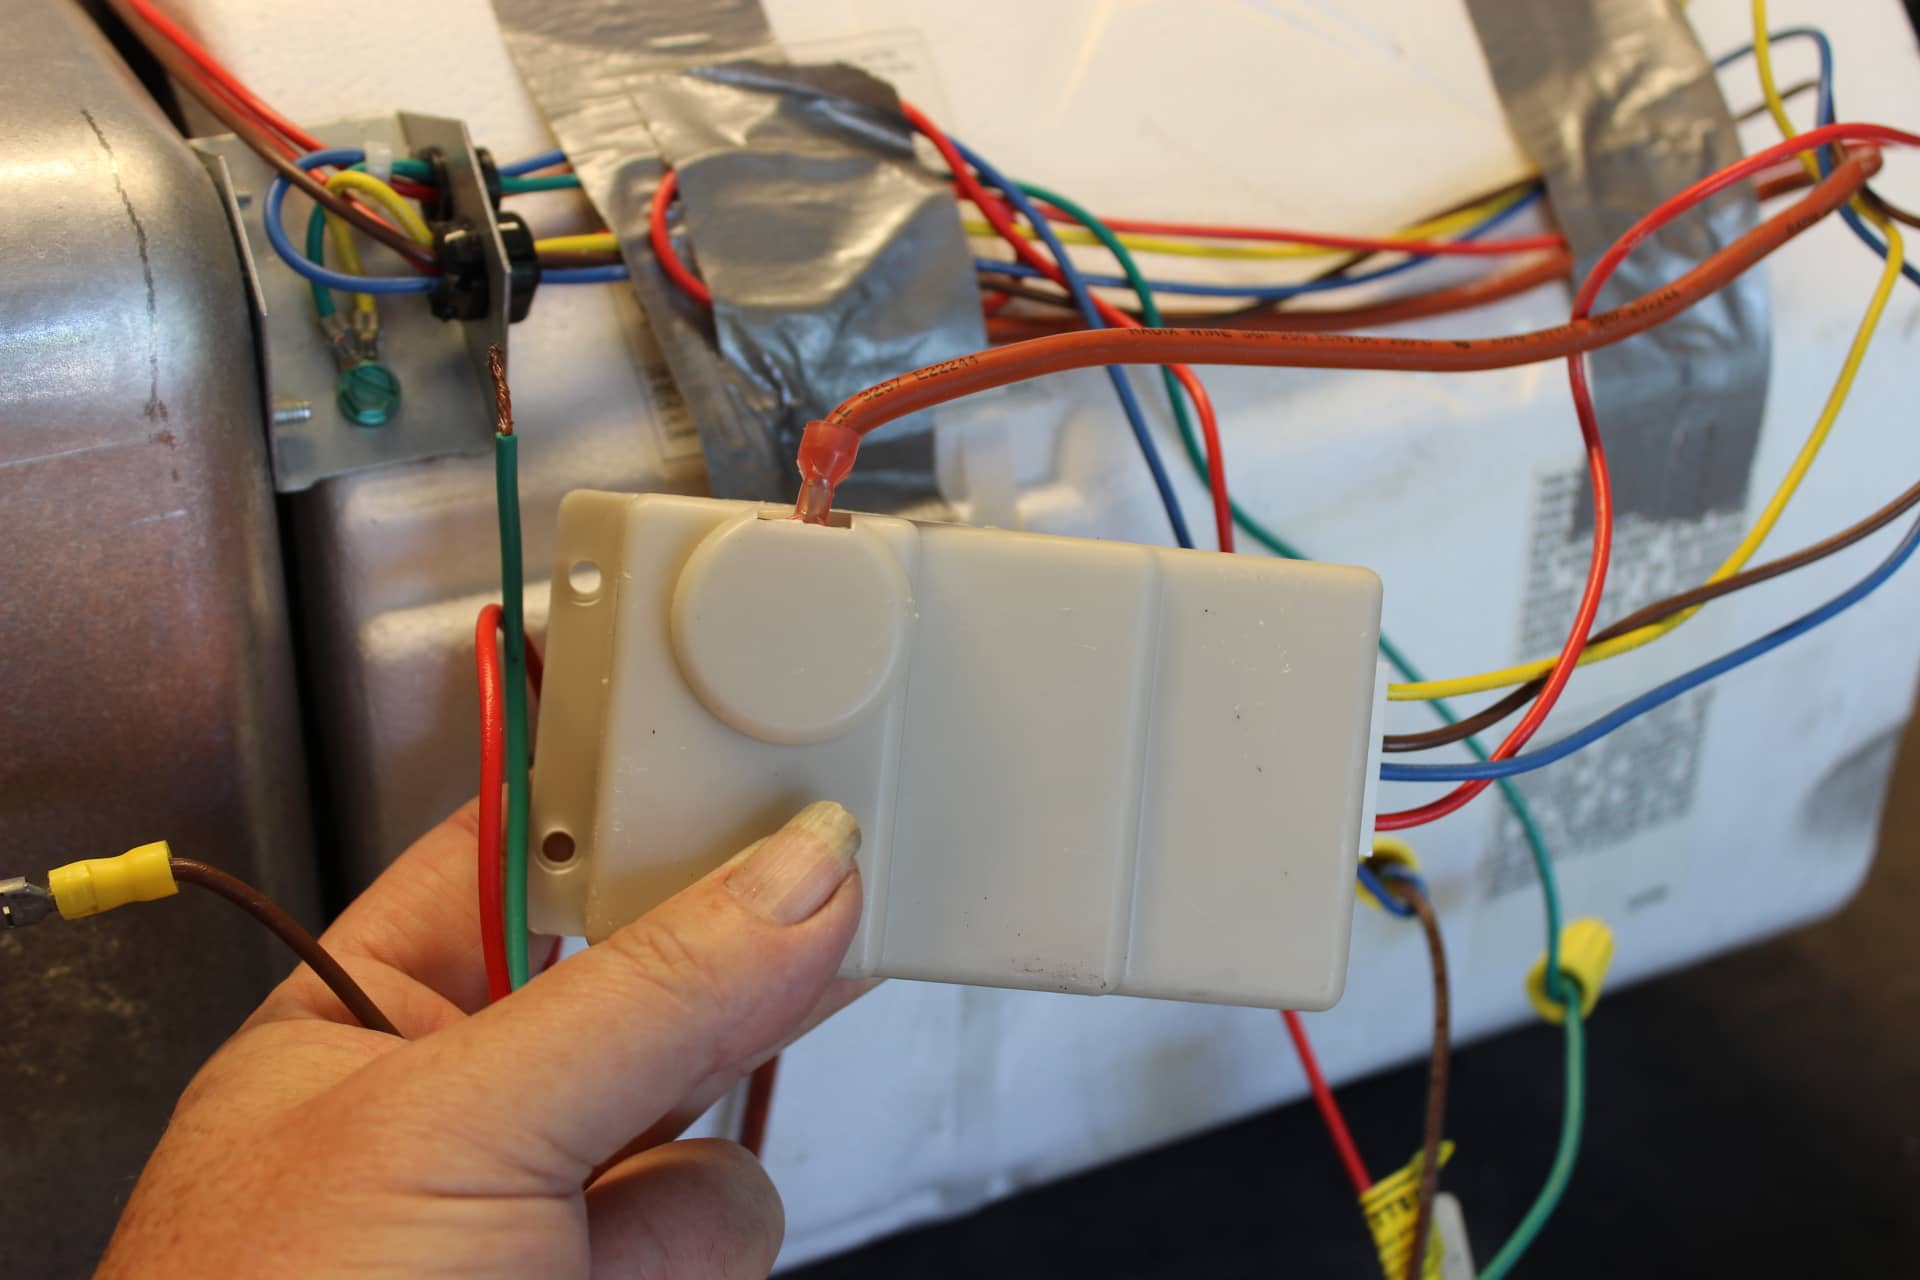
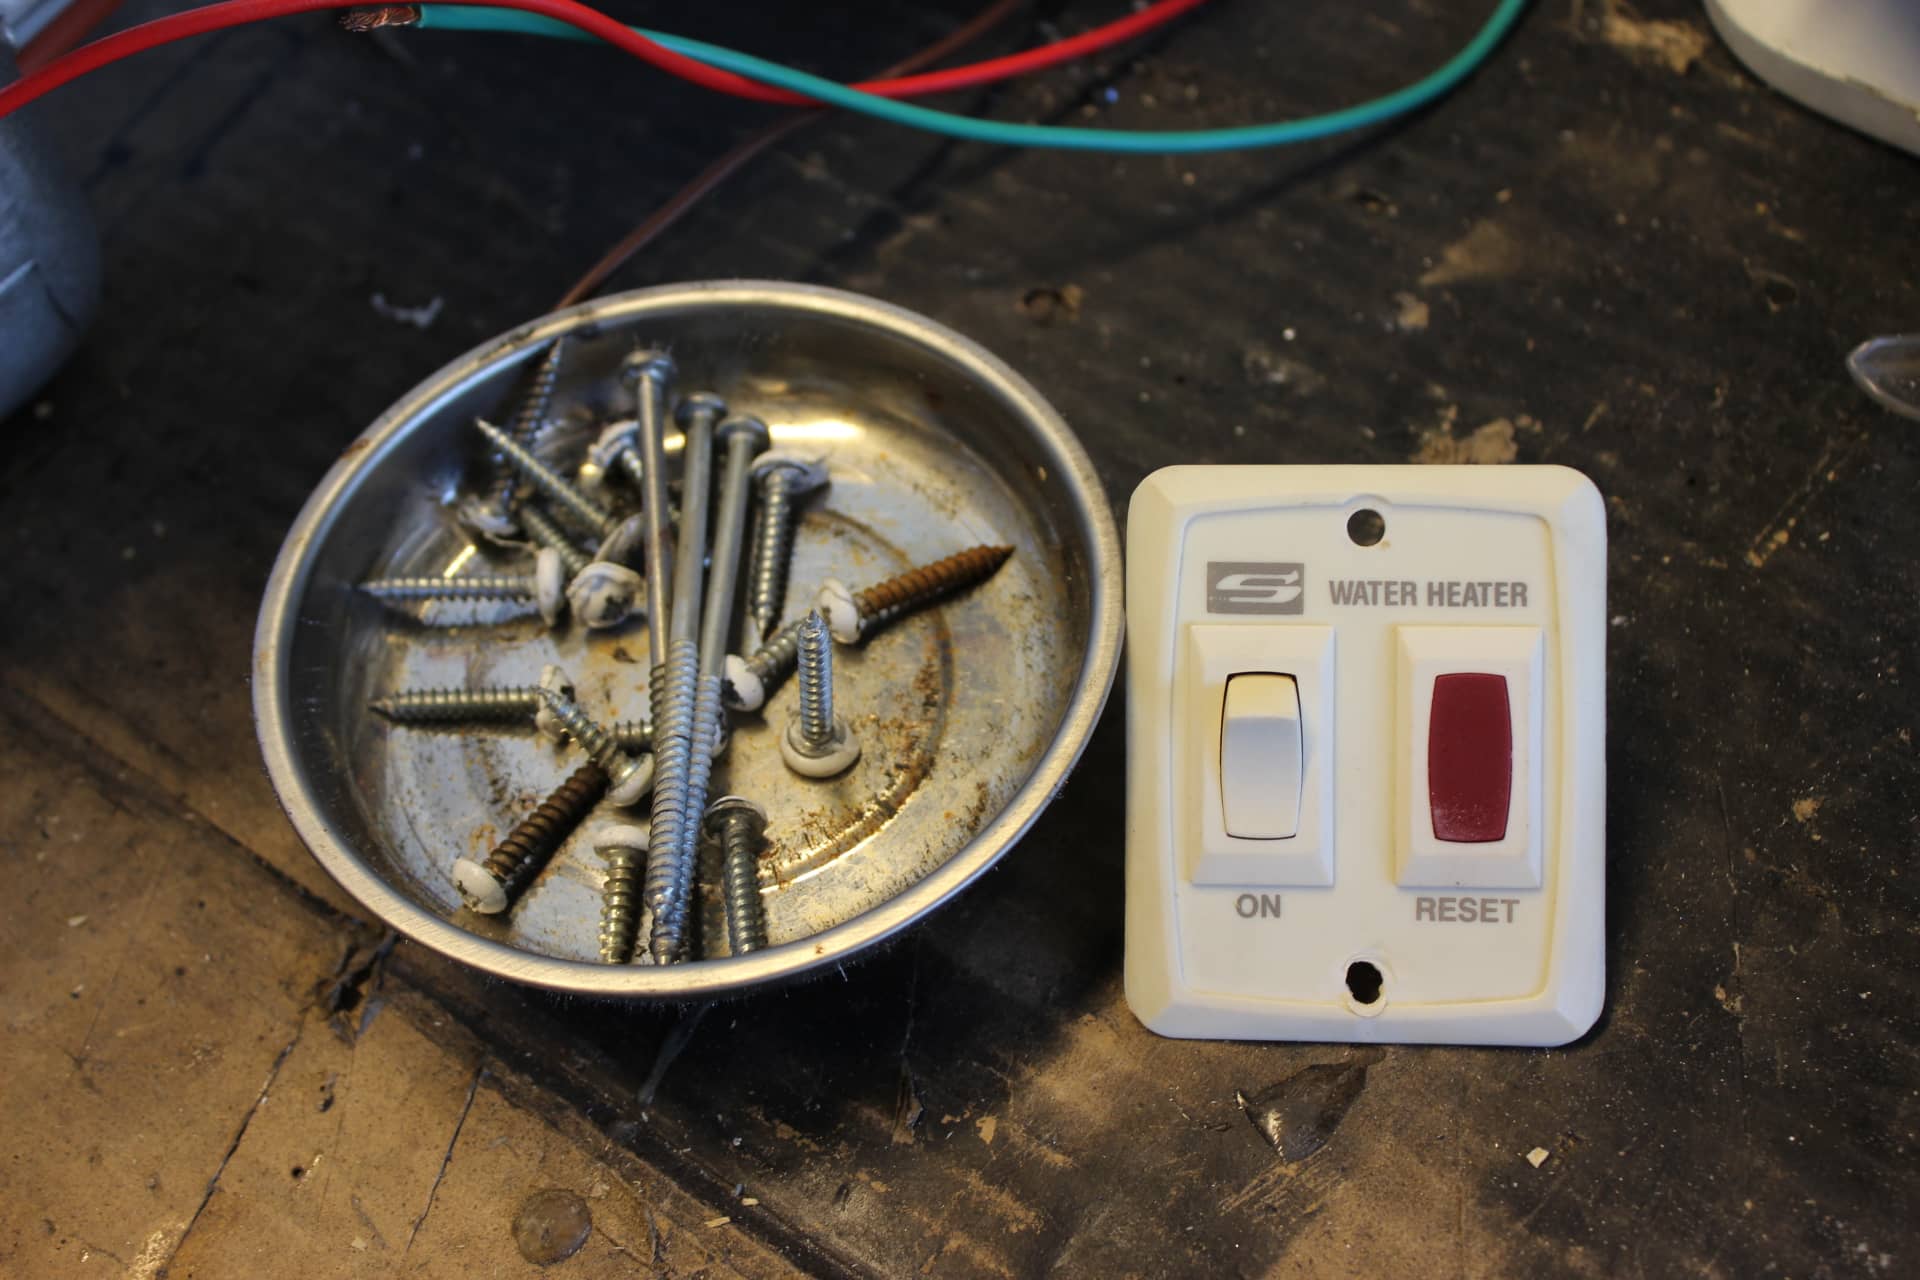
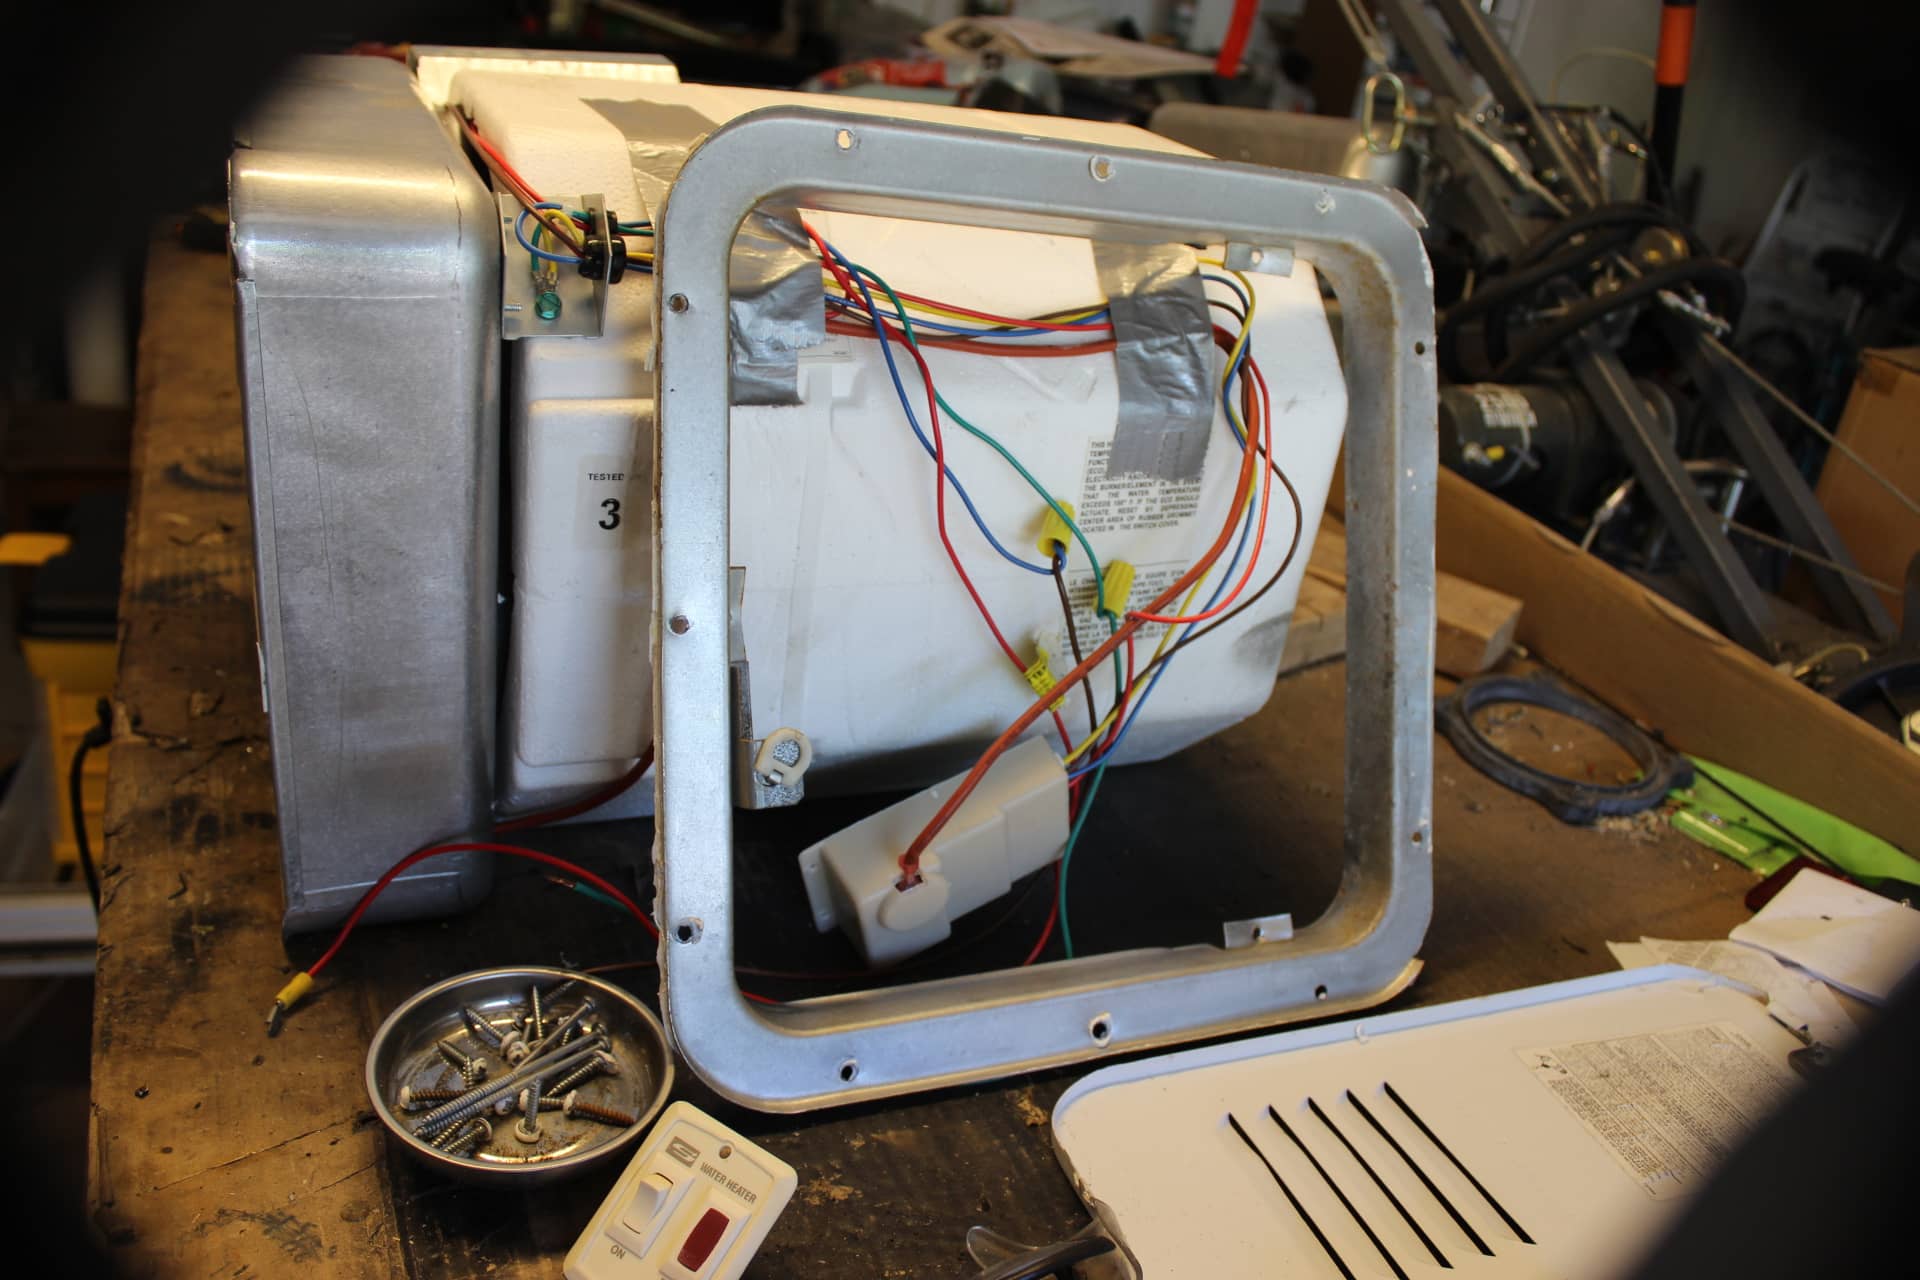
Go back inside and unscrew the two screws holding the switch panel (for propane service) on the front side under the lip of the sink and pull it out so you can unhook the 4 wires from the back for the switch and indicator light (image 1838). If you are replacing your water heater with another Suburban, make a note of which color wires go where. There will be a light blue wire on the switch. This is the 12v DC hot wire. Set it aside for later if you are replacing the hot water heater with something other than the Suburban. There will be a white wire on the indicator light that is also connected to a second wire. This is a ground wire and the second wire goes to ground the Suburban. If you are replacing your Suburban with a different water heater (Girard), disconnect the second wire (the one that grounds the Suburban) and set aside the white ground wire for later use. Now go and look inside under the sink for the control box for the hot water heater (image 1837). It should be mounted on the wall next to the bathroom with two screws. Remove them. Now all connections to the Suburban hot water heater have been disconnected and the hot water heater will now freely slide out. Go back outside and pull the hot water heater out being careful not to damage any wires or the control box. Set this aside somewhere safe and out of the way.
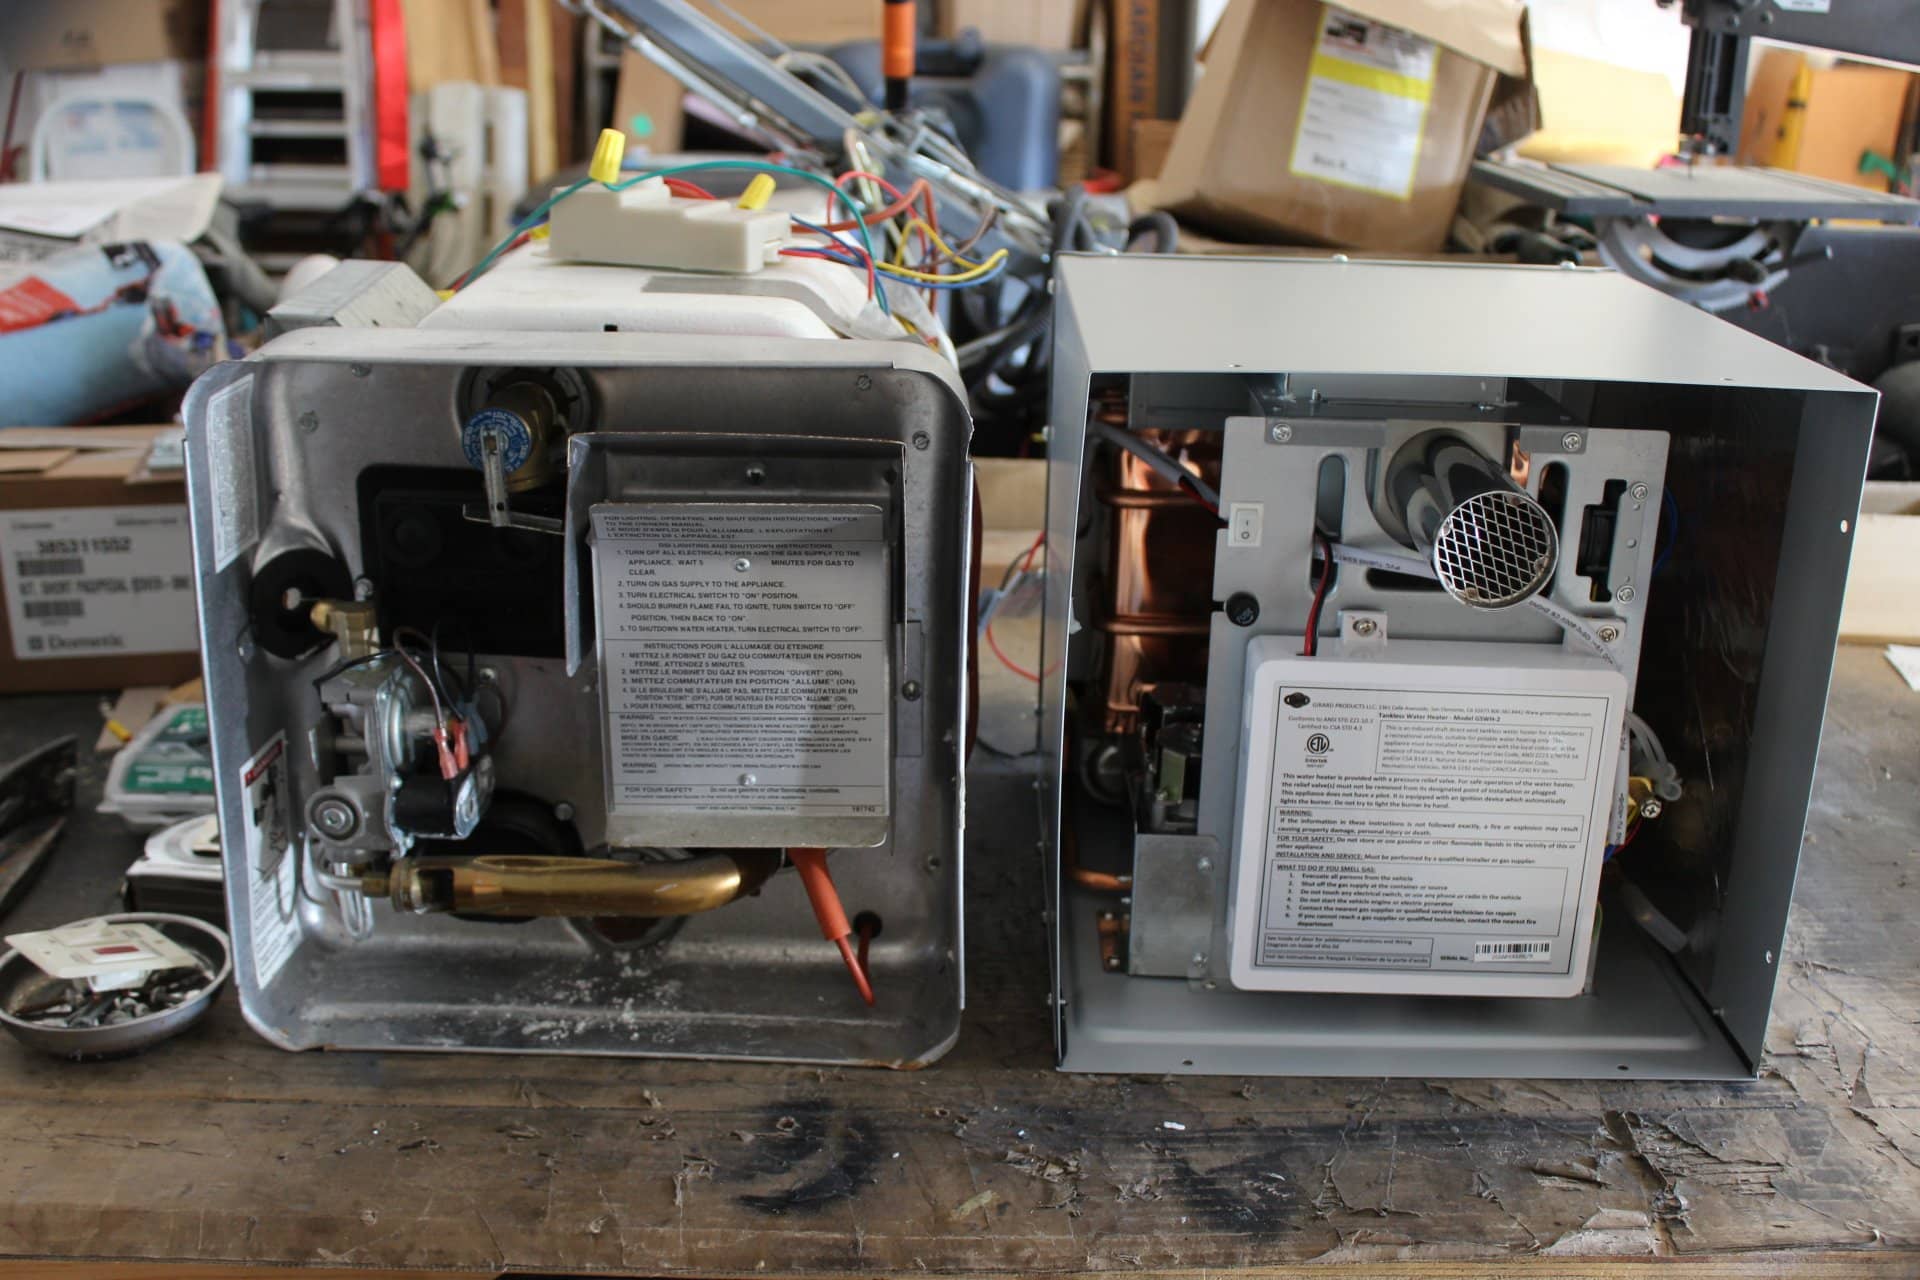
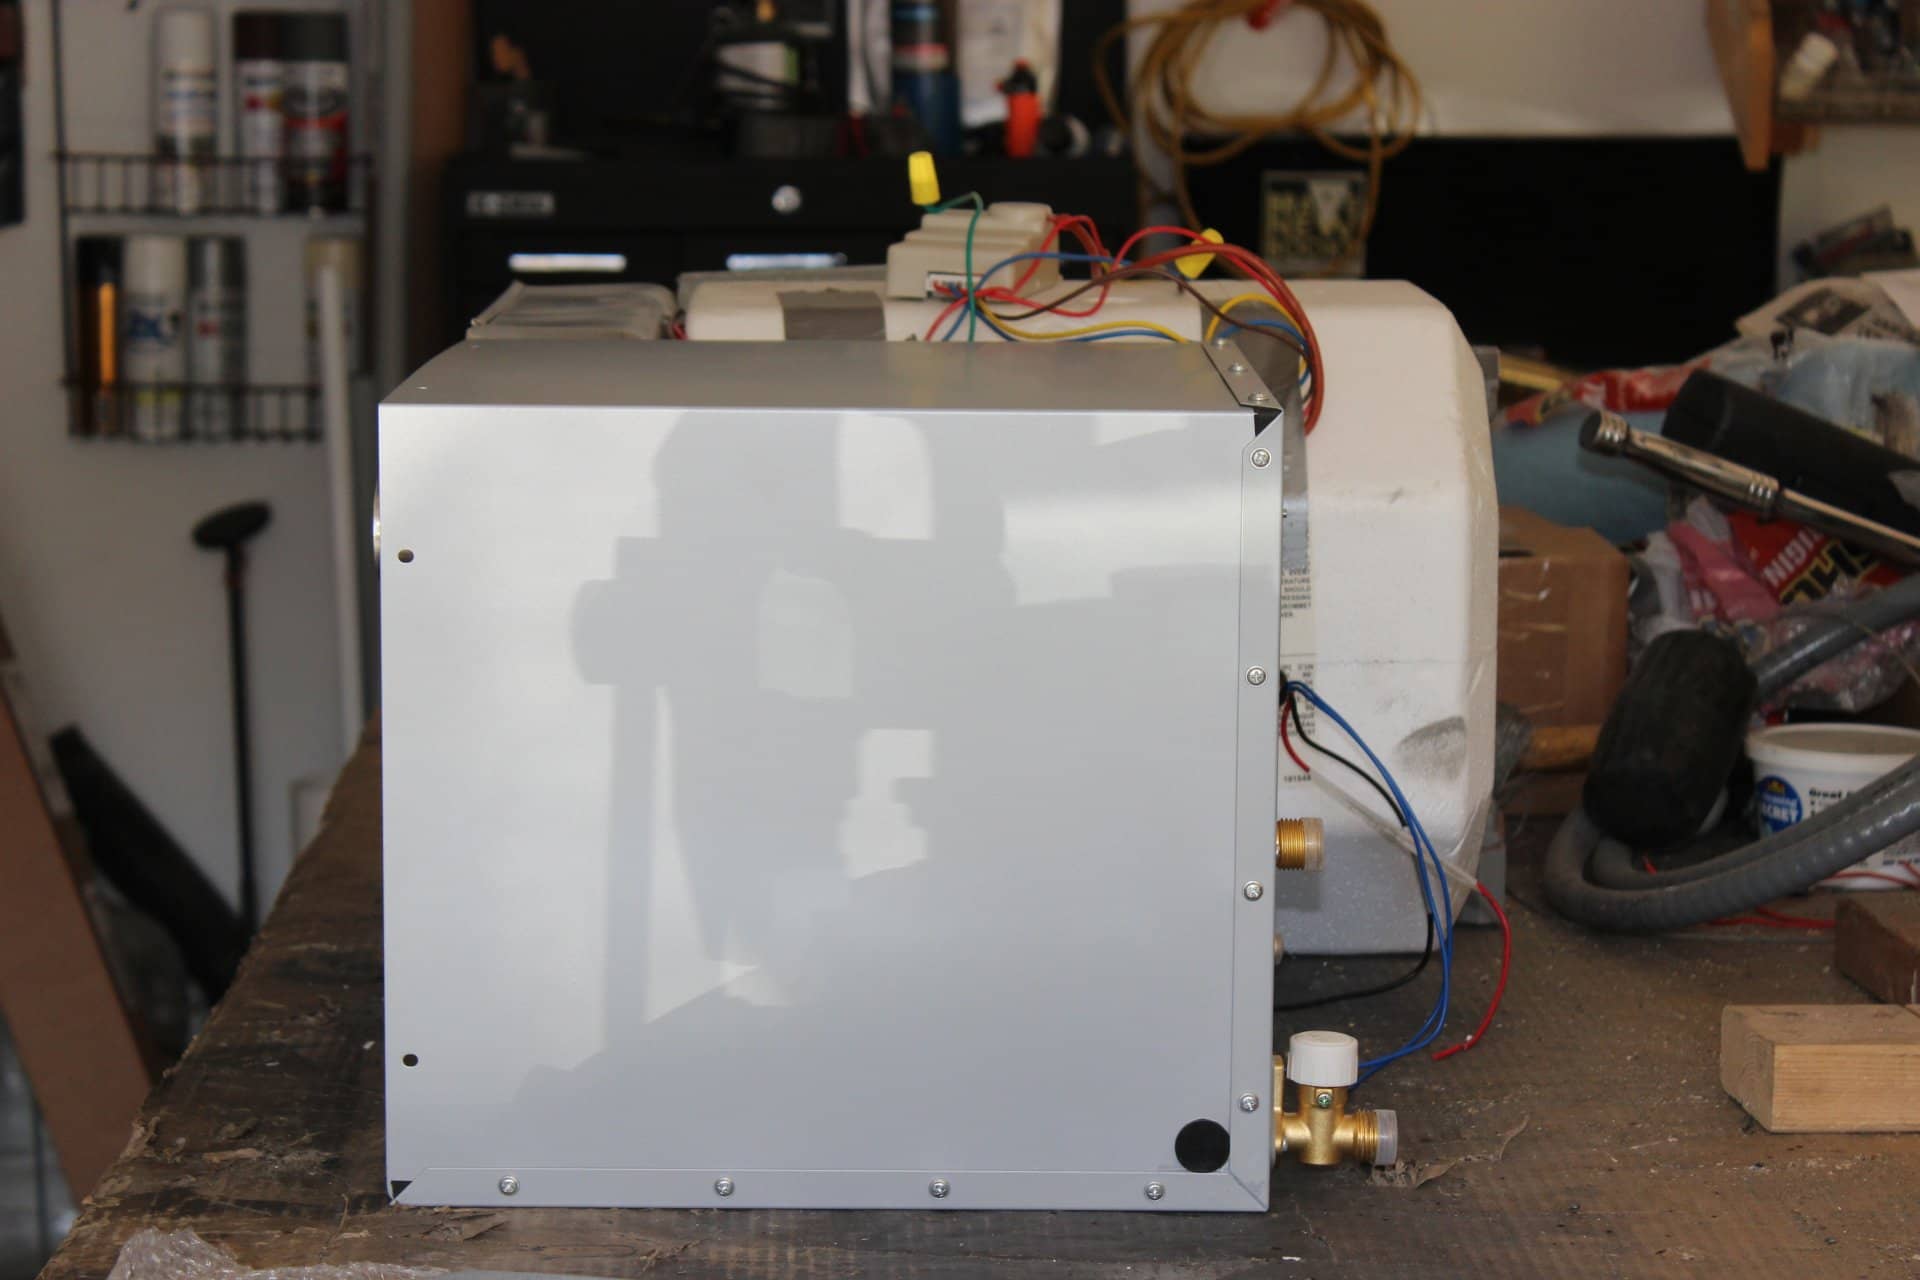
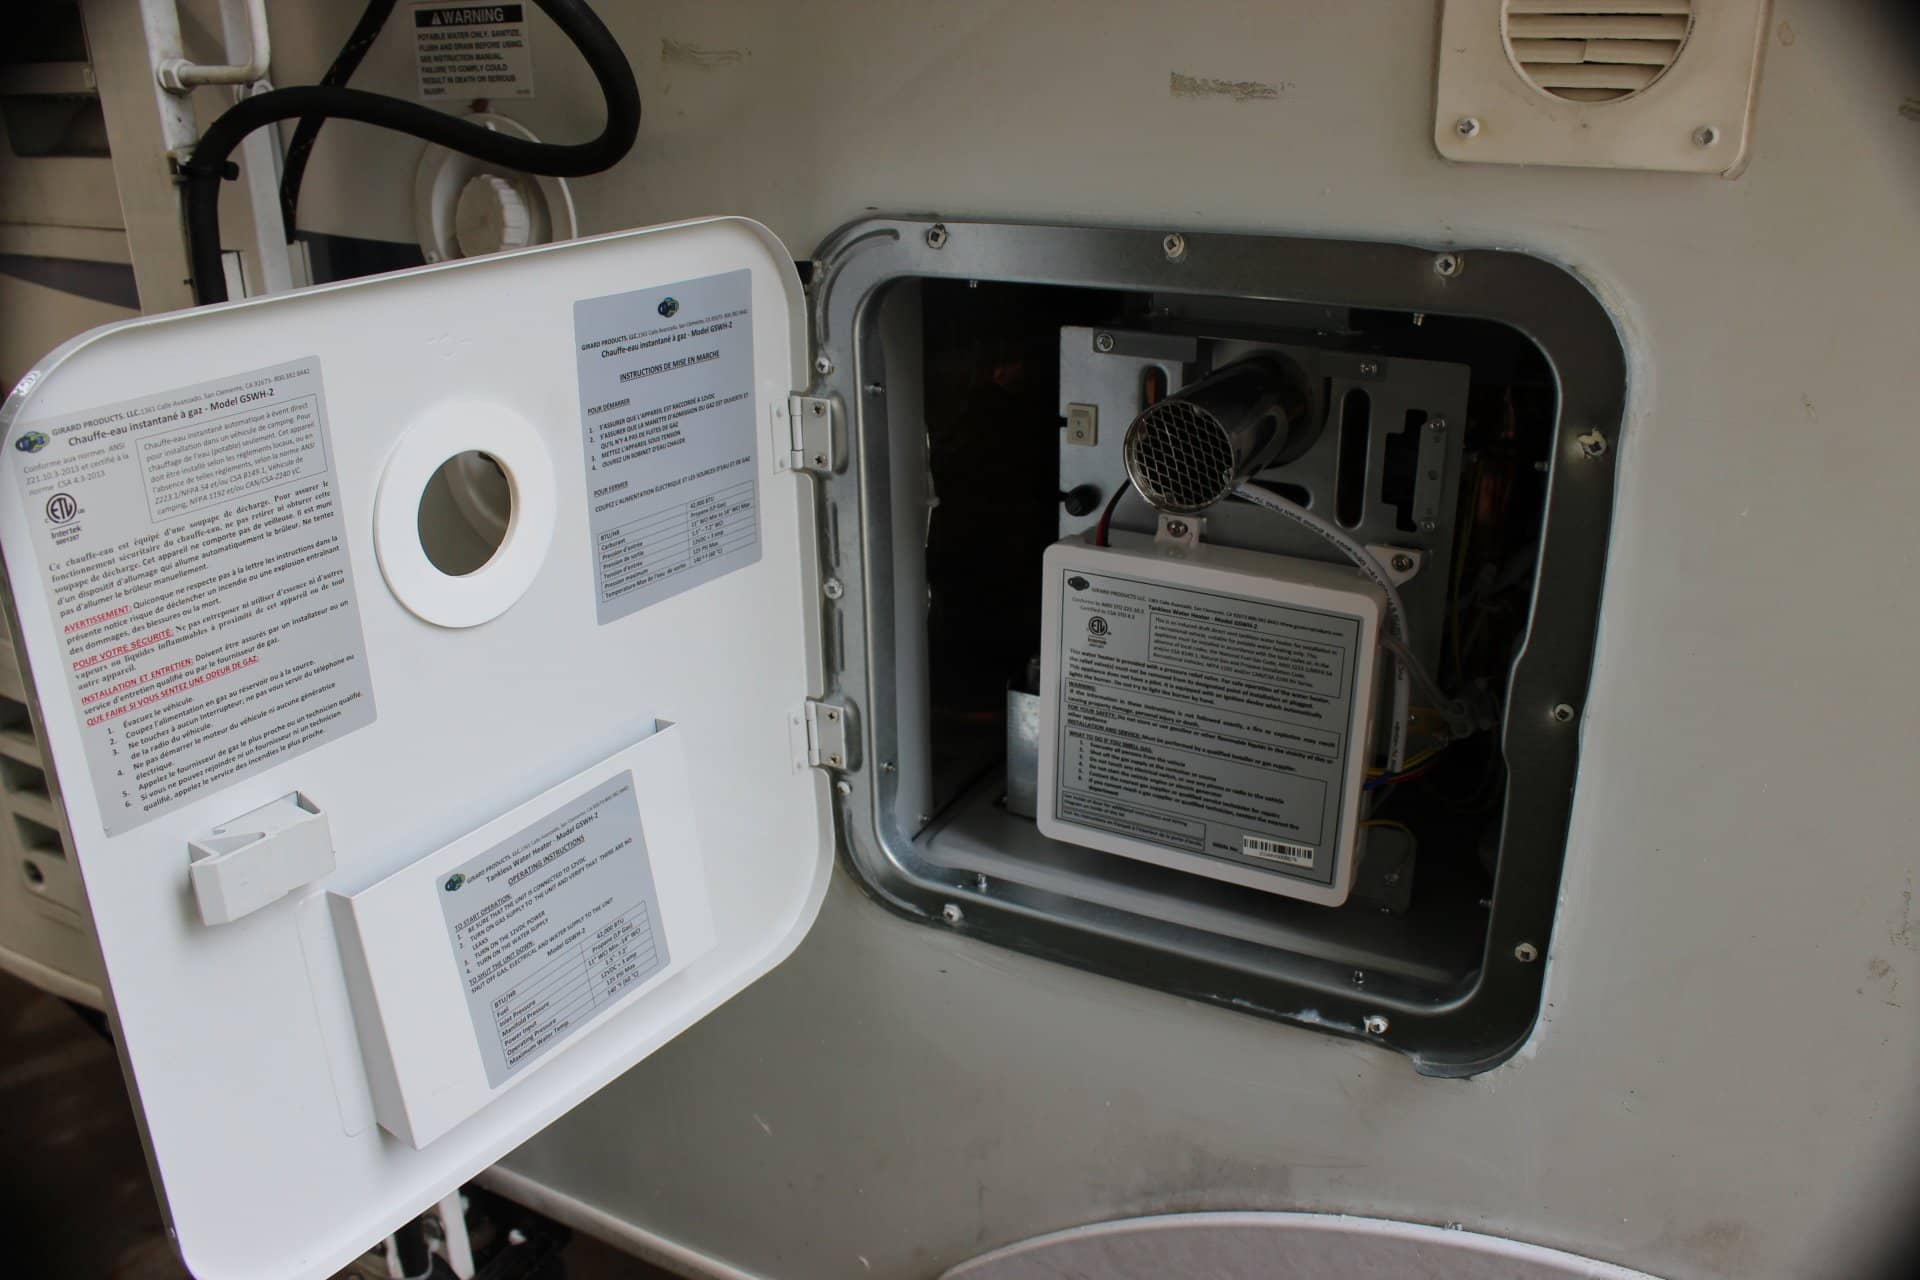
At first glance you can see that the two units are exactly the same dimensions in front (image 1832 … the Suburban is on the left and Girard is on the right) but that the Suburban is several inches longer (image 1863). A look at the back shows the connections for both units (image 1864). Whereas the Suburban has only the water hookups (top hot, bottom cold) on the back, the Girard has the water on the bottom left corner and the propane on the bottom right corner with the electronic/electrical wire right above the propane inlet (image 1865).
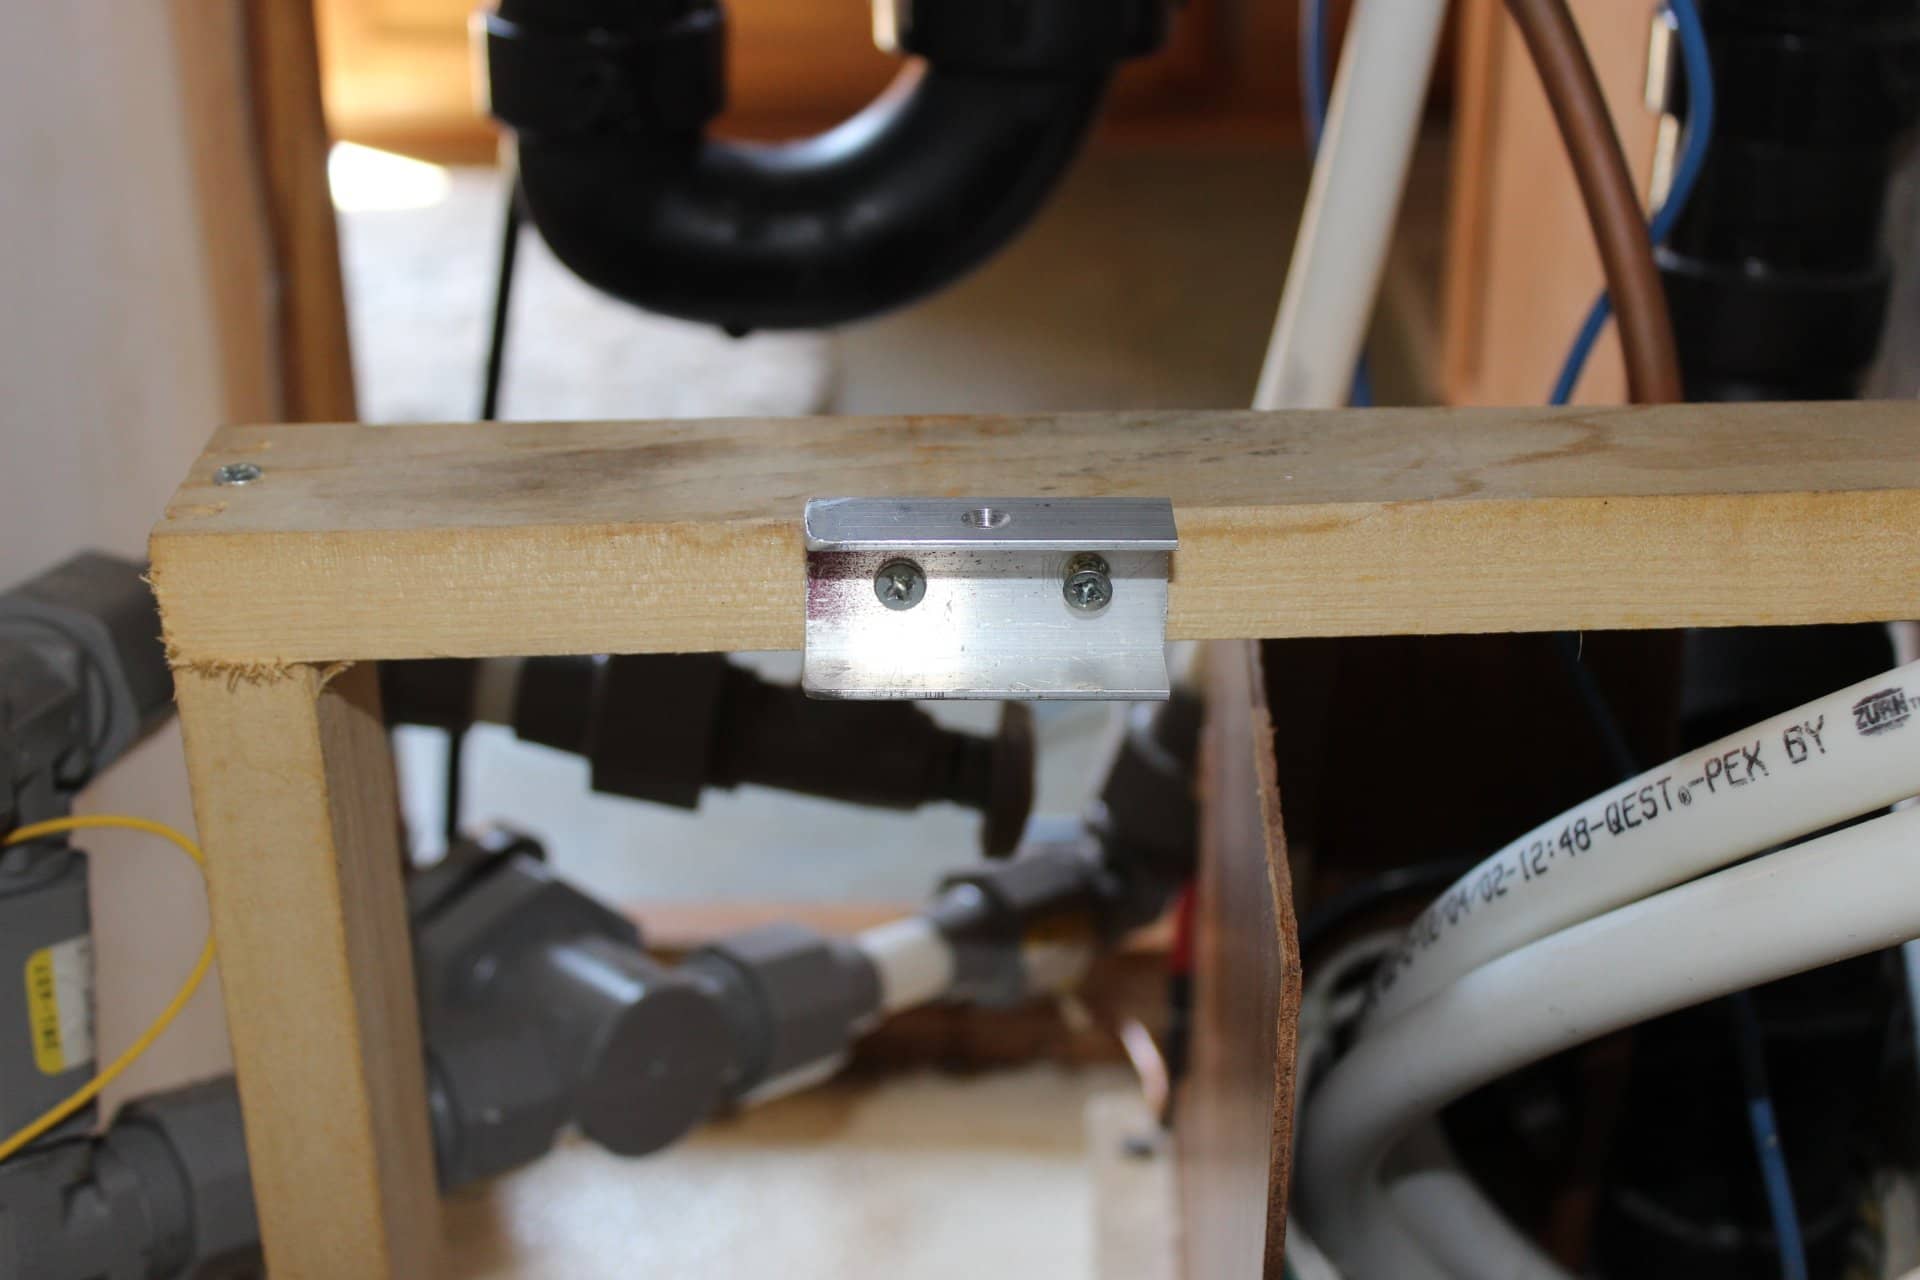
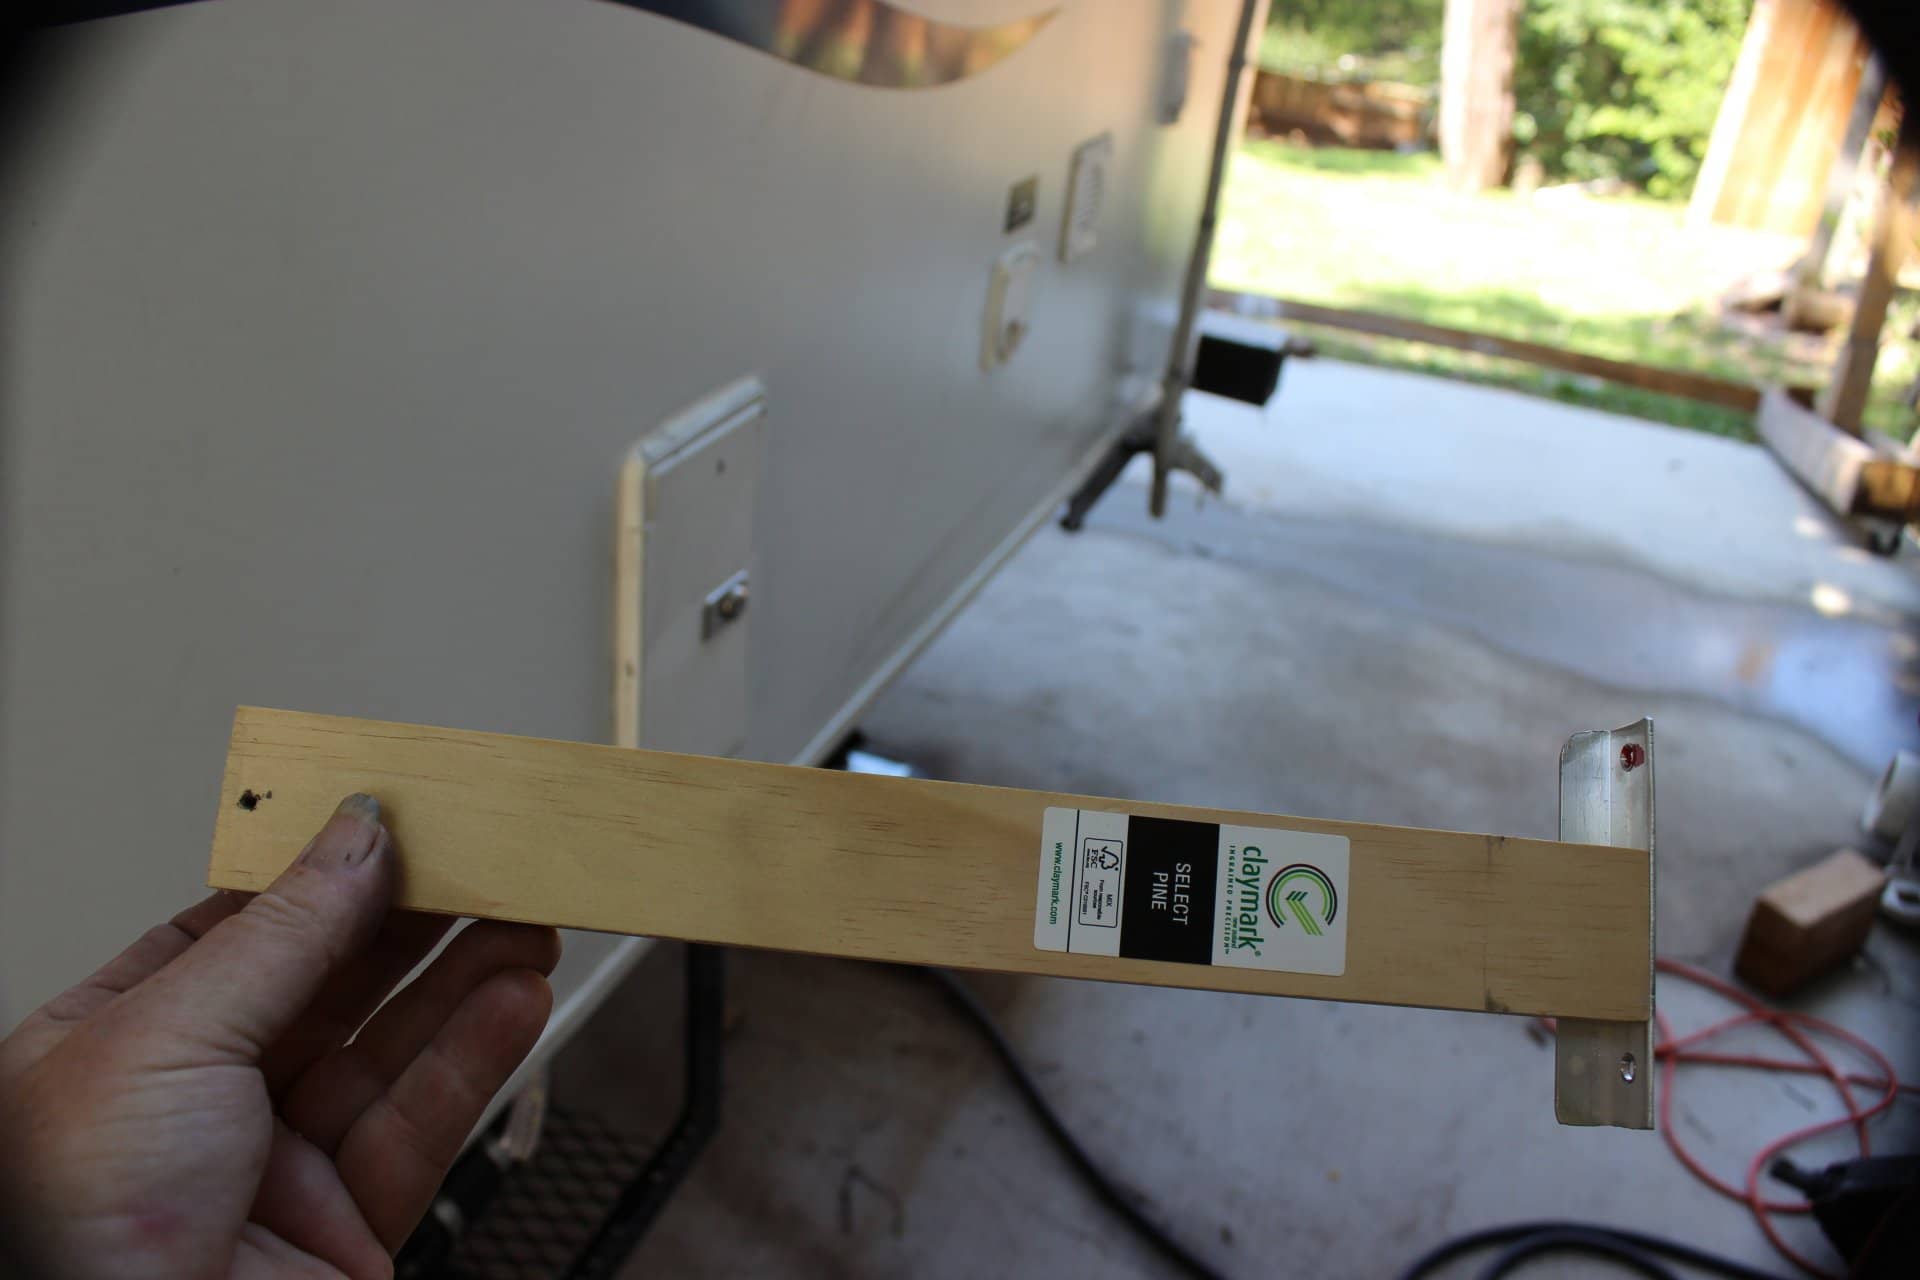
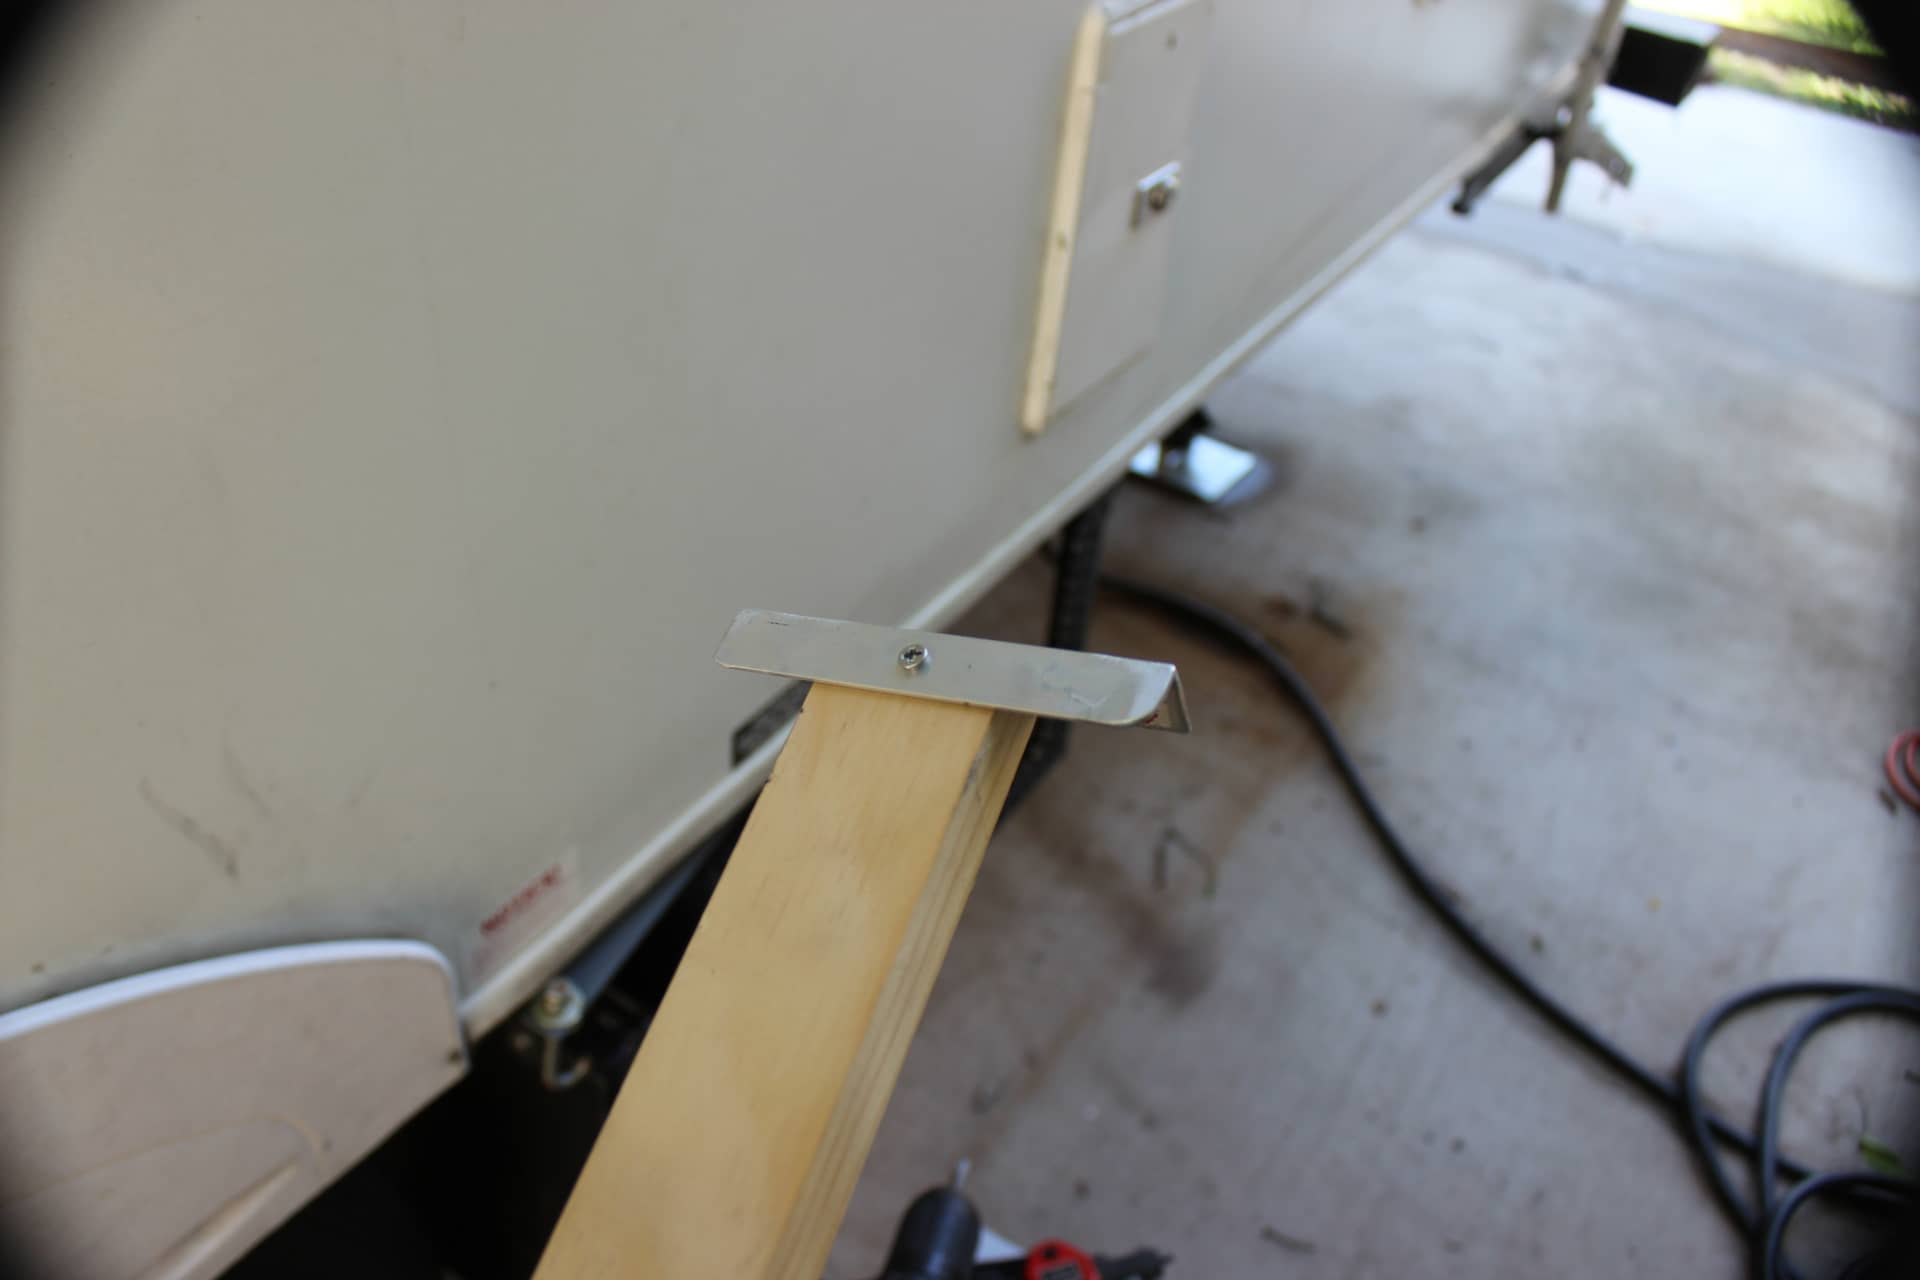
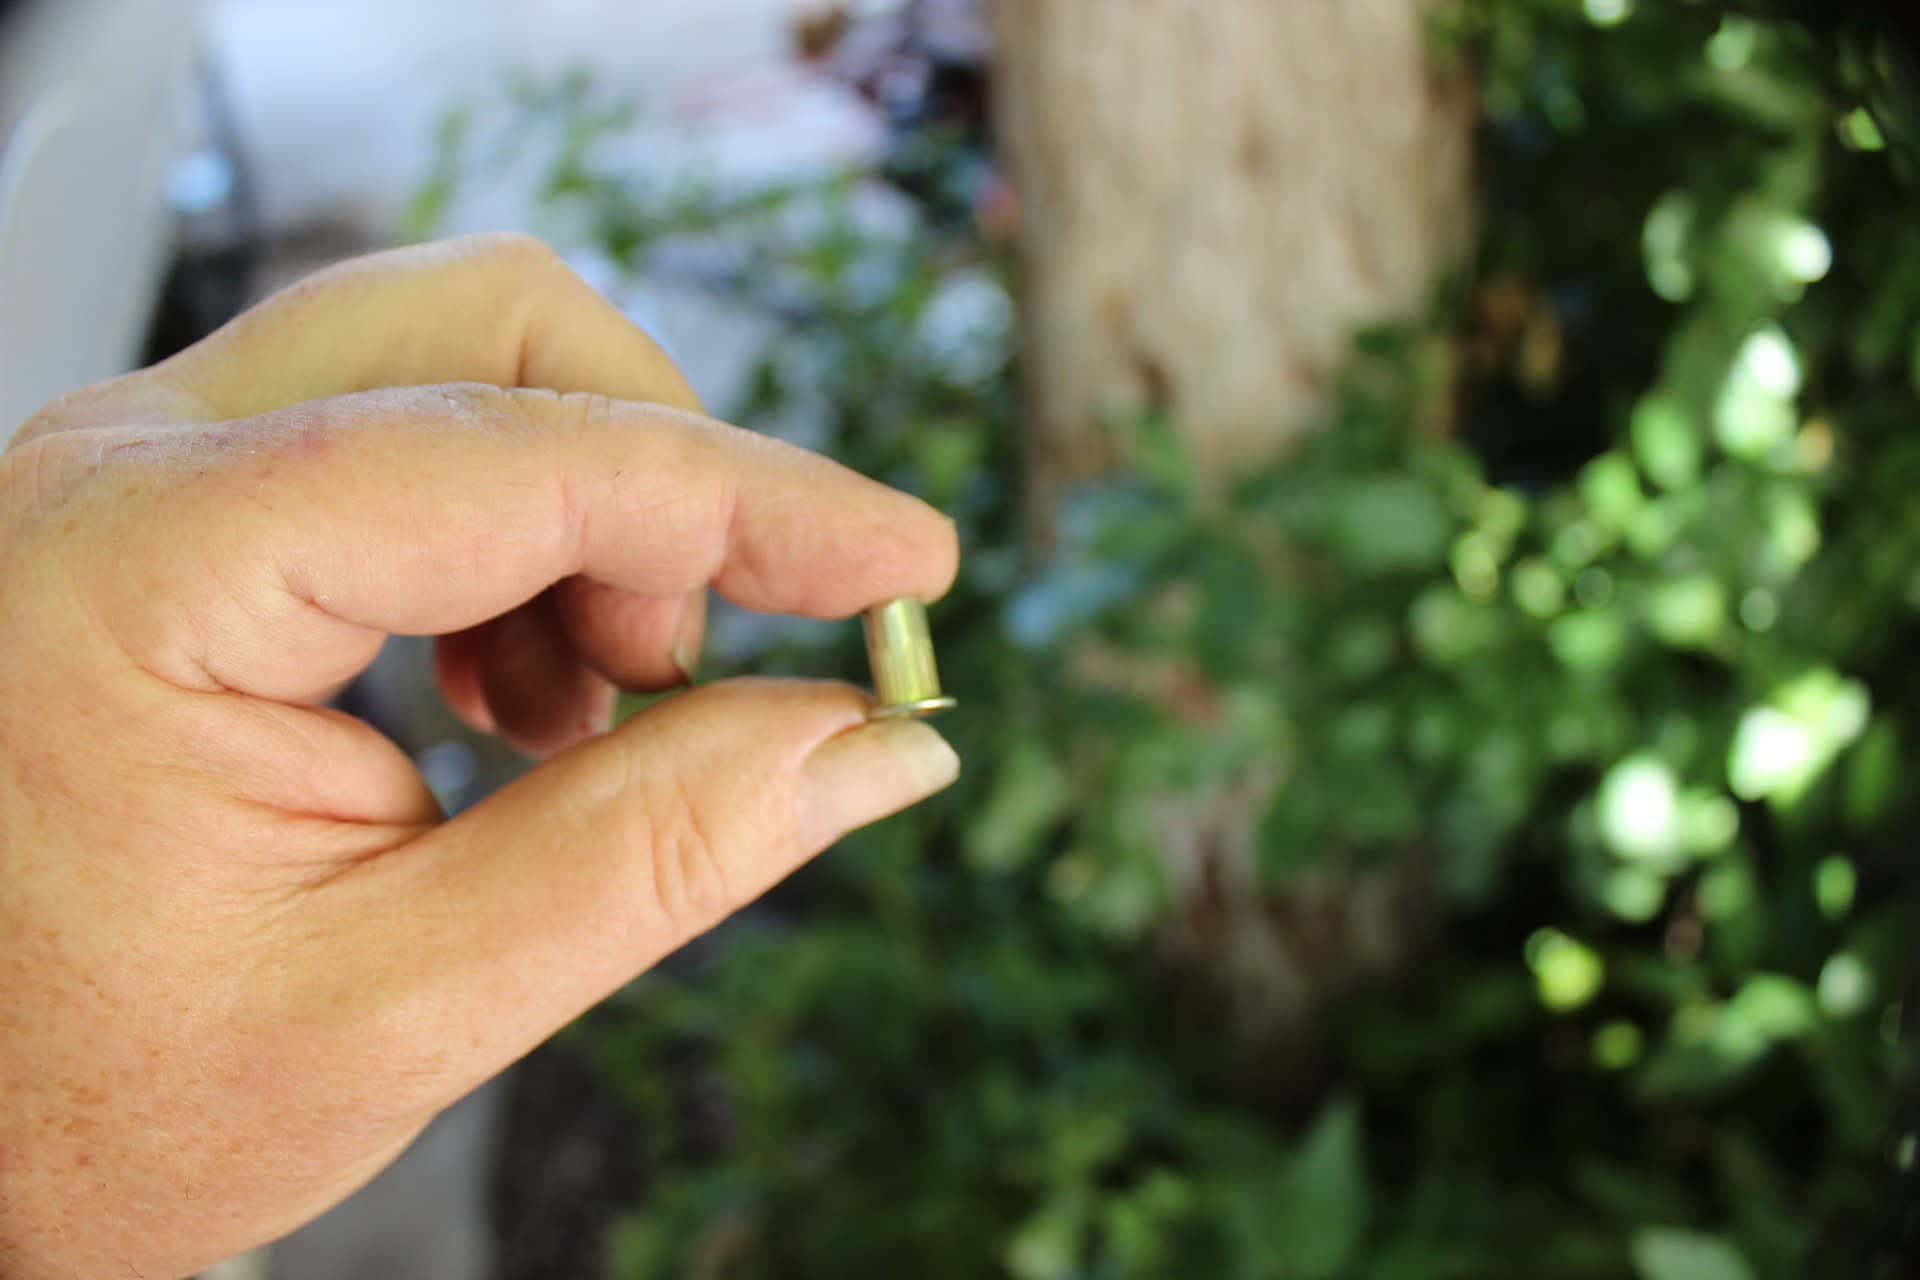
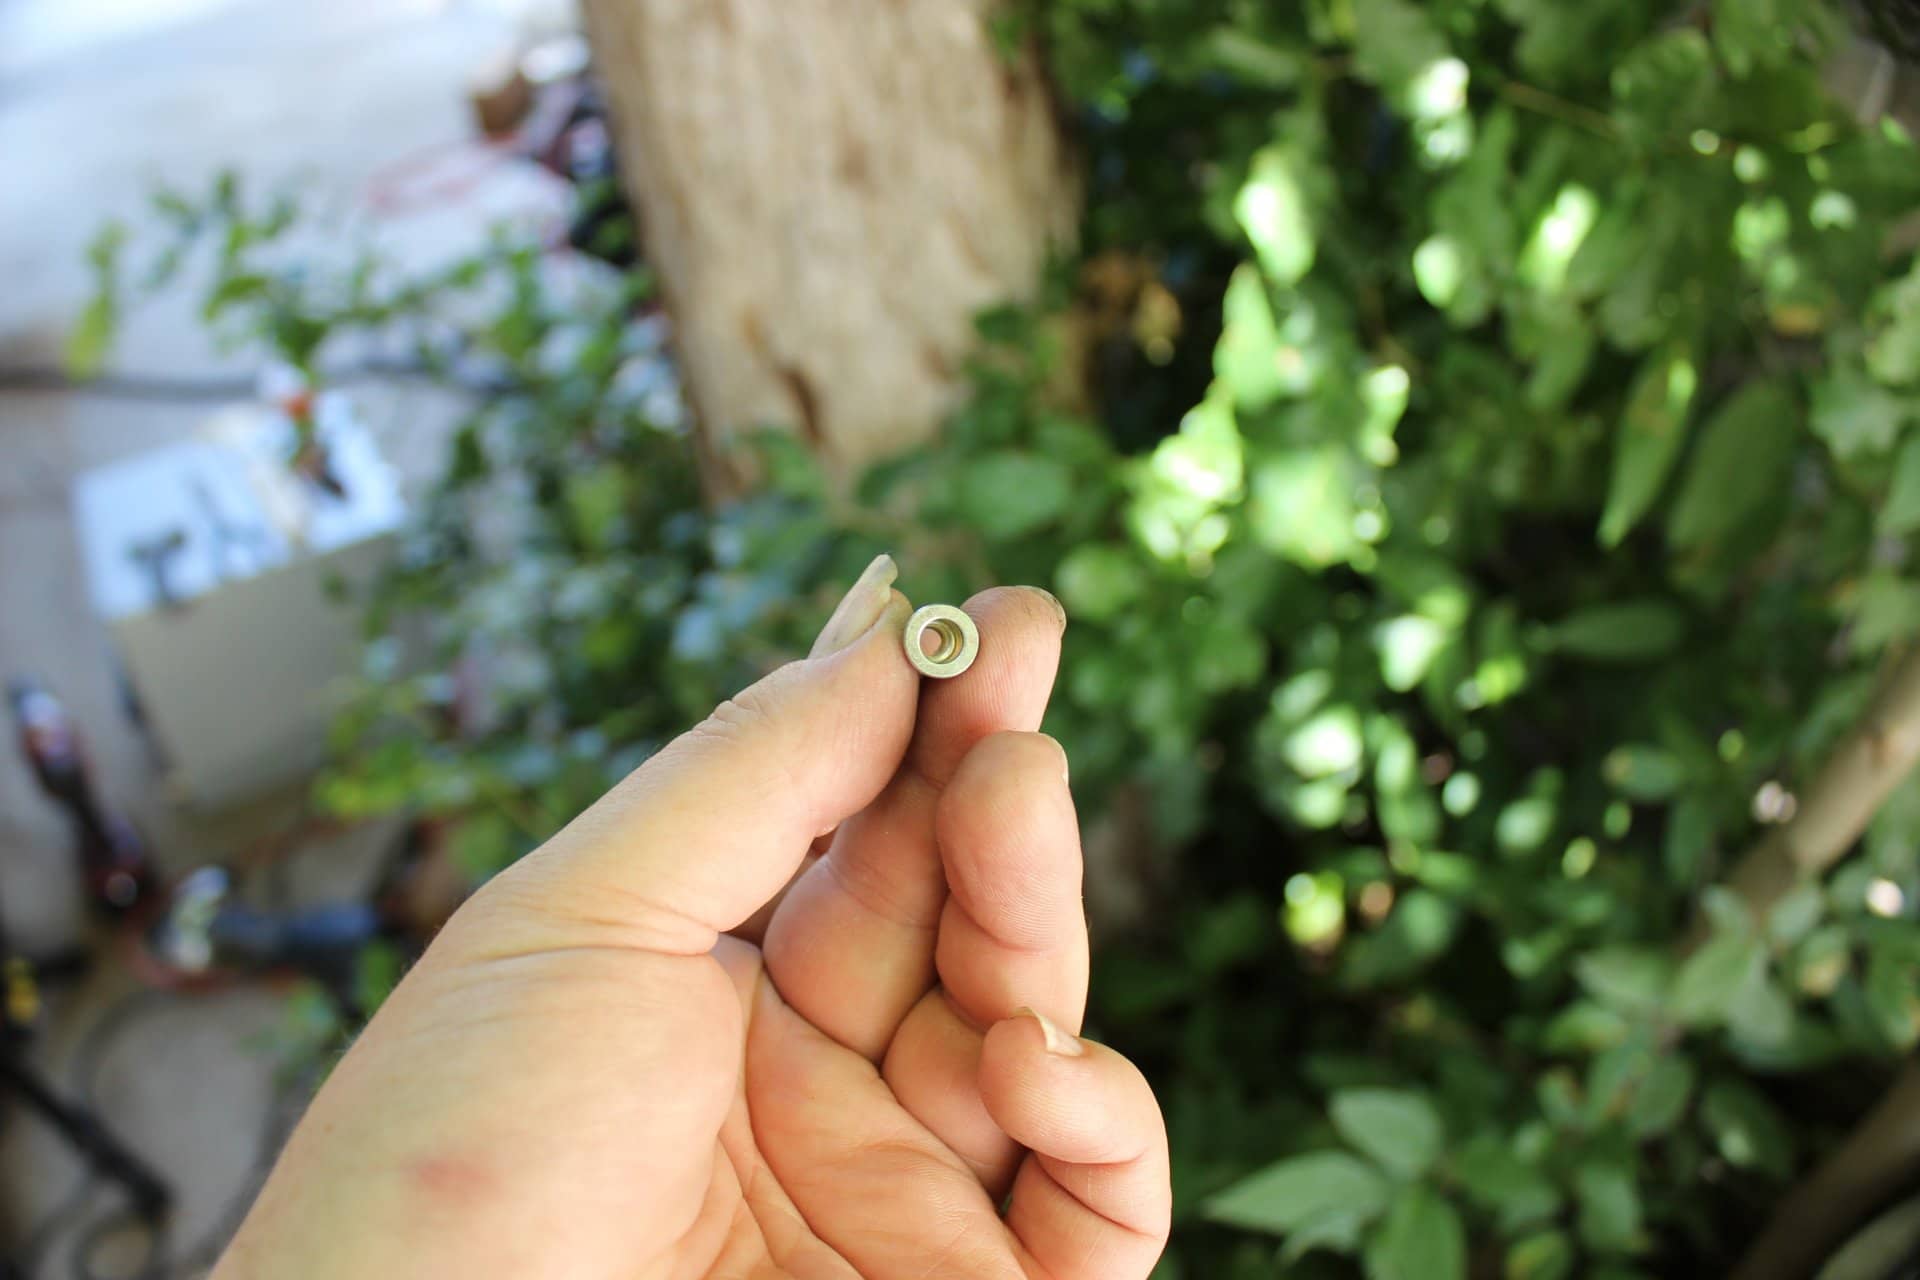
With the Girard being slightly shorter in length, I had to make a support for the bottom of the unit. I used the existing cross support for the old Suburban by attaching a small piece of ¾“ aluminum channel to the cross member edge (image 1866) where a piece of ¾” x 1” x 12 1/8” could fit into and placed another piece of the same aluminum channel on the other end (with one side of the channel cut off) with holes drilled thru it so I could attach it to the wall (image 1867) and a hole drilled to keep the brace from sliding around (image 1868). I chose to attach it to the outside trailer wall with #10 Riv-nuts (images 1869, 1870). Riv-nuts are great for the application of attaching to the aluminum sheet that makes up the wall. They are just like a pop rivets, but instead they leave a threaded hole to attach a machine screw into (#10). So after sliding the new brace for the Girard into the aluminum channel on the old water heater brace, I drill out two holes and screwed the new brace into the wall (images 1871, 1872). One small screw into the hole and the new Girard brace on the aluminum channel that is screwed to the old brace edge (this is to keep the new brace from sliding around) and the new brace is done.
Next was to install the flange to the water heater body. This is what holds the water heater to the side of the trailer and also the door to the flange. I went and watched a youtube video: https://www.youtube.com/watch?v=5BiTQ2lGn48
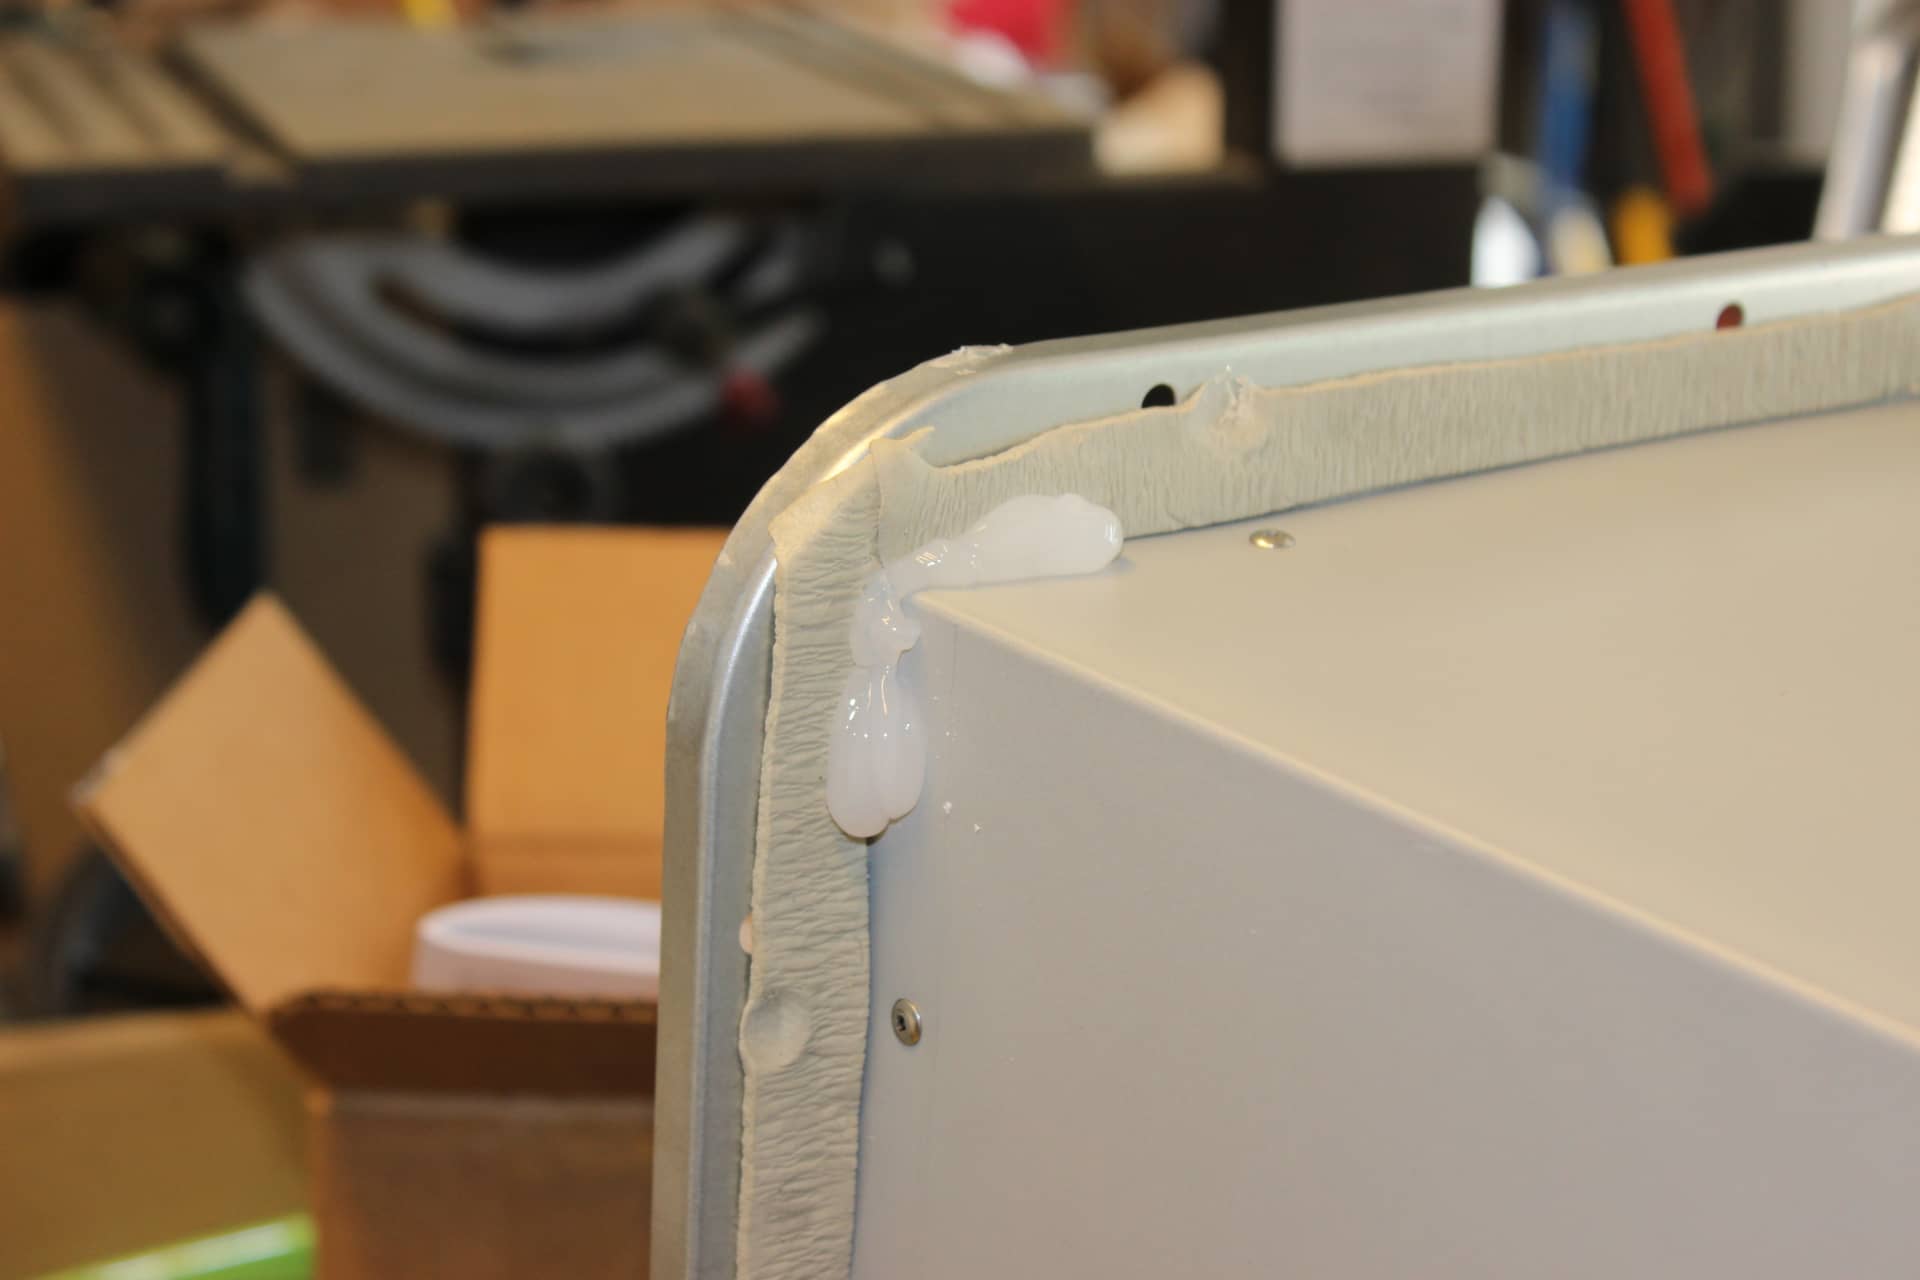
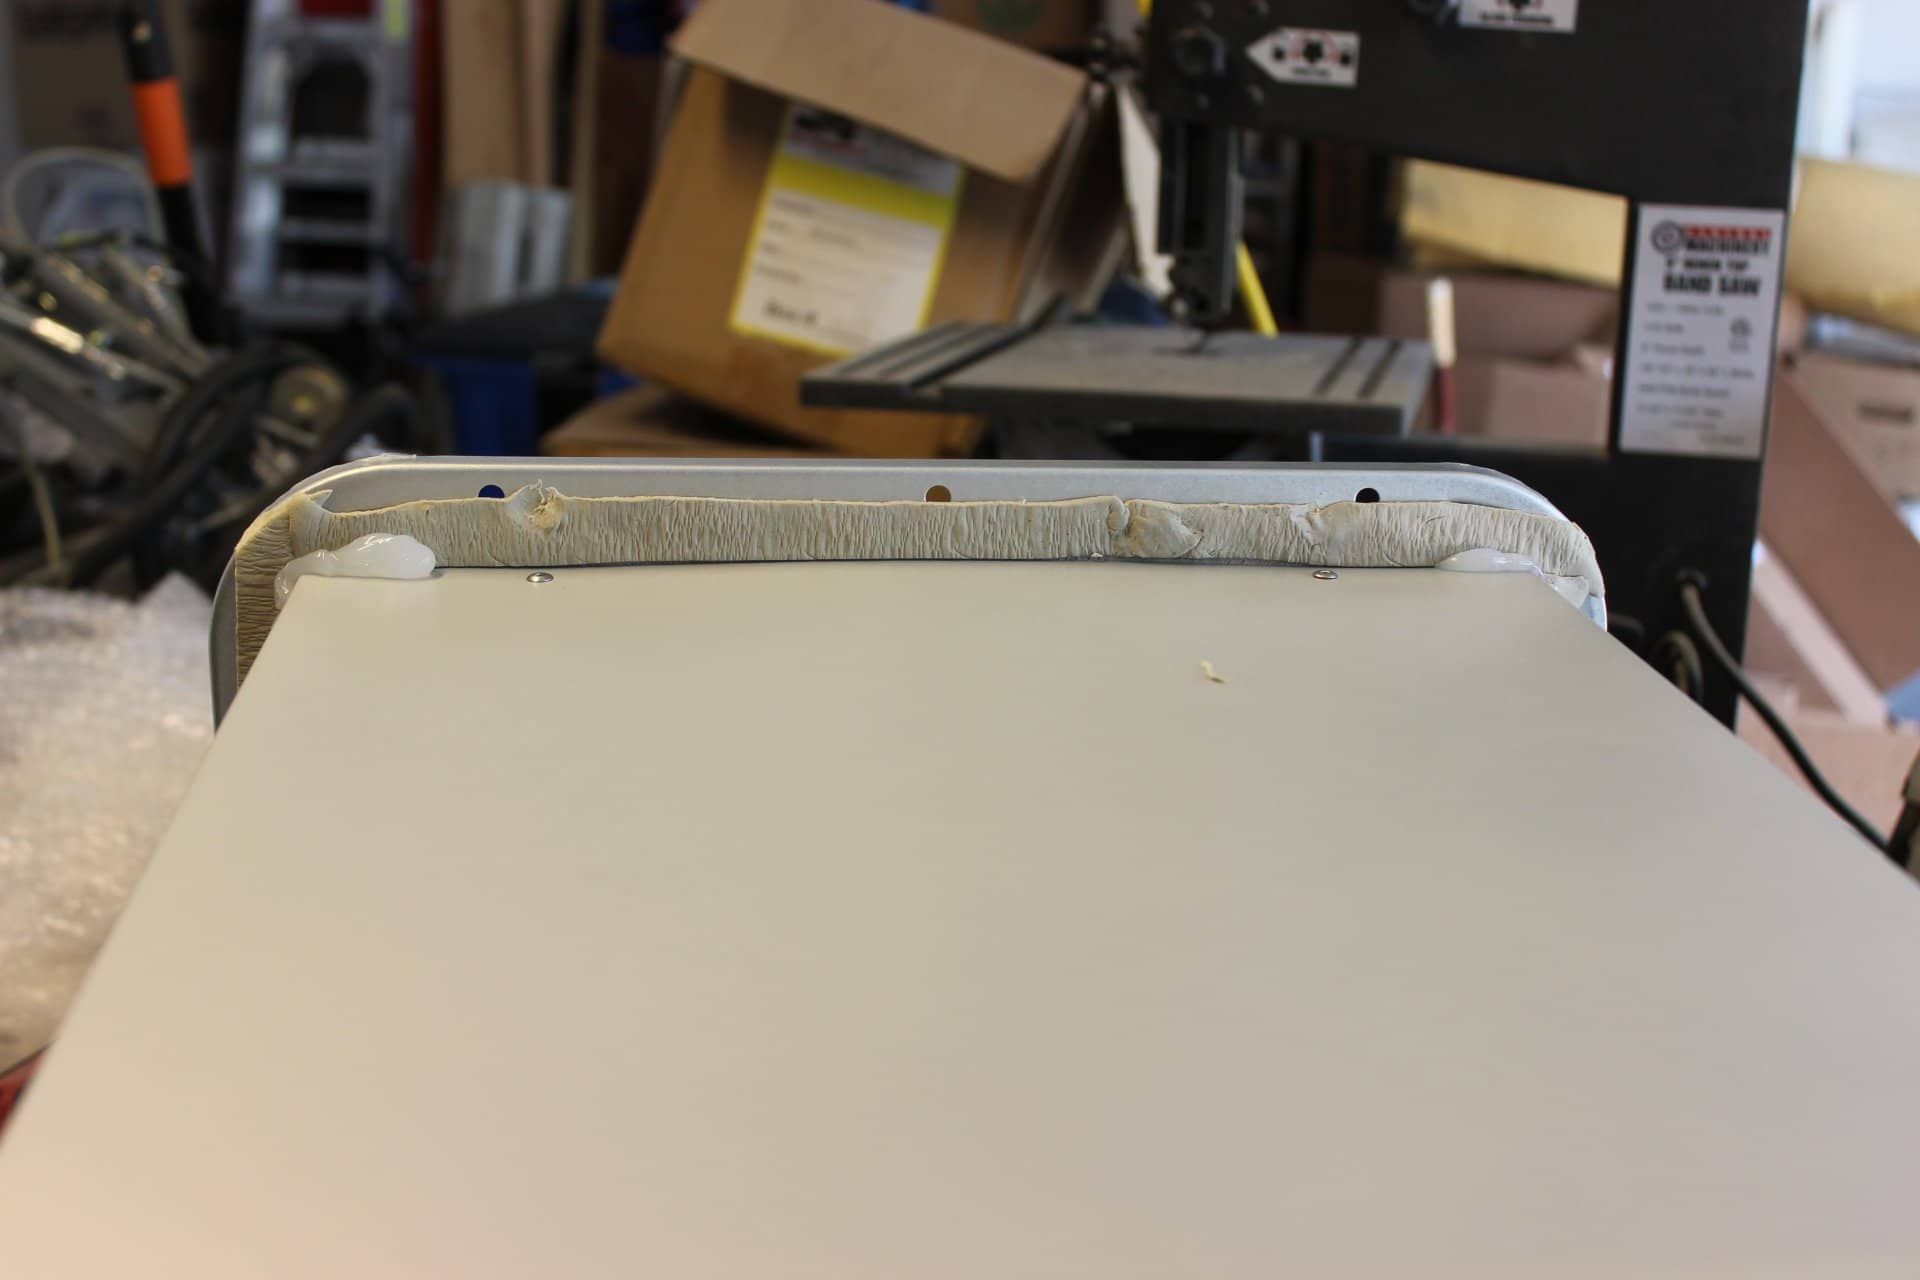
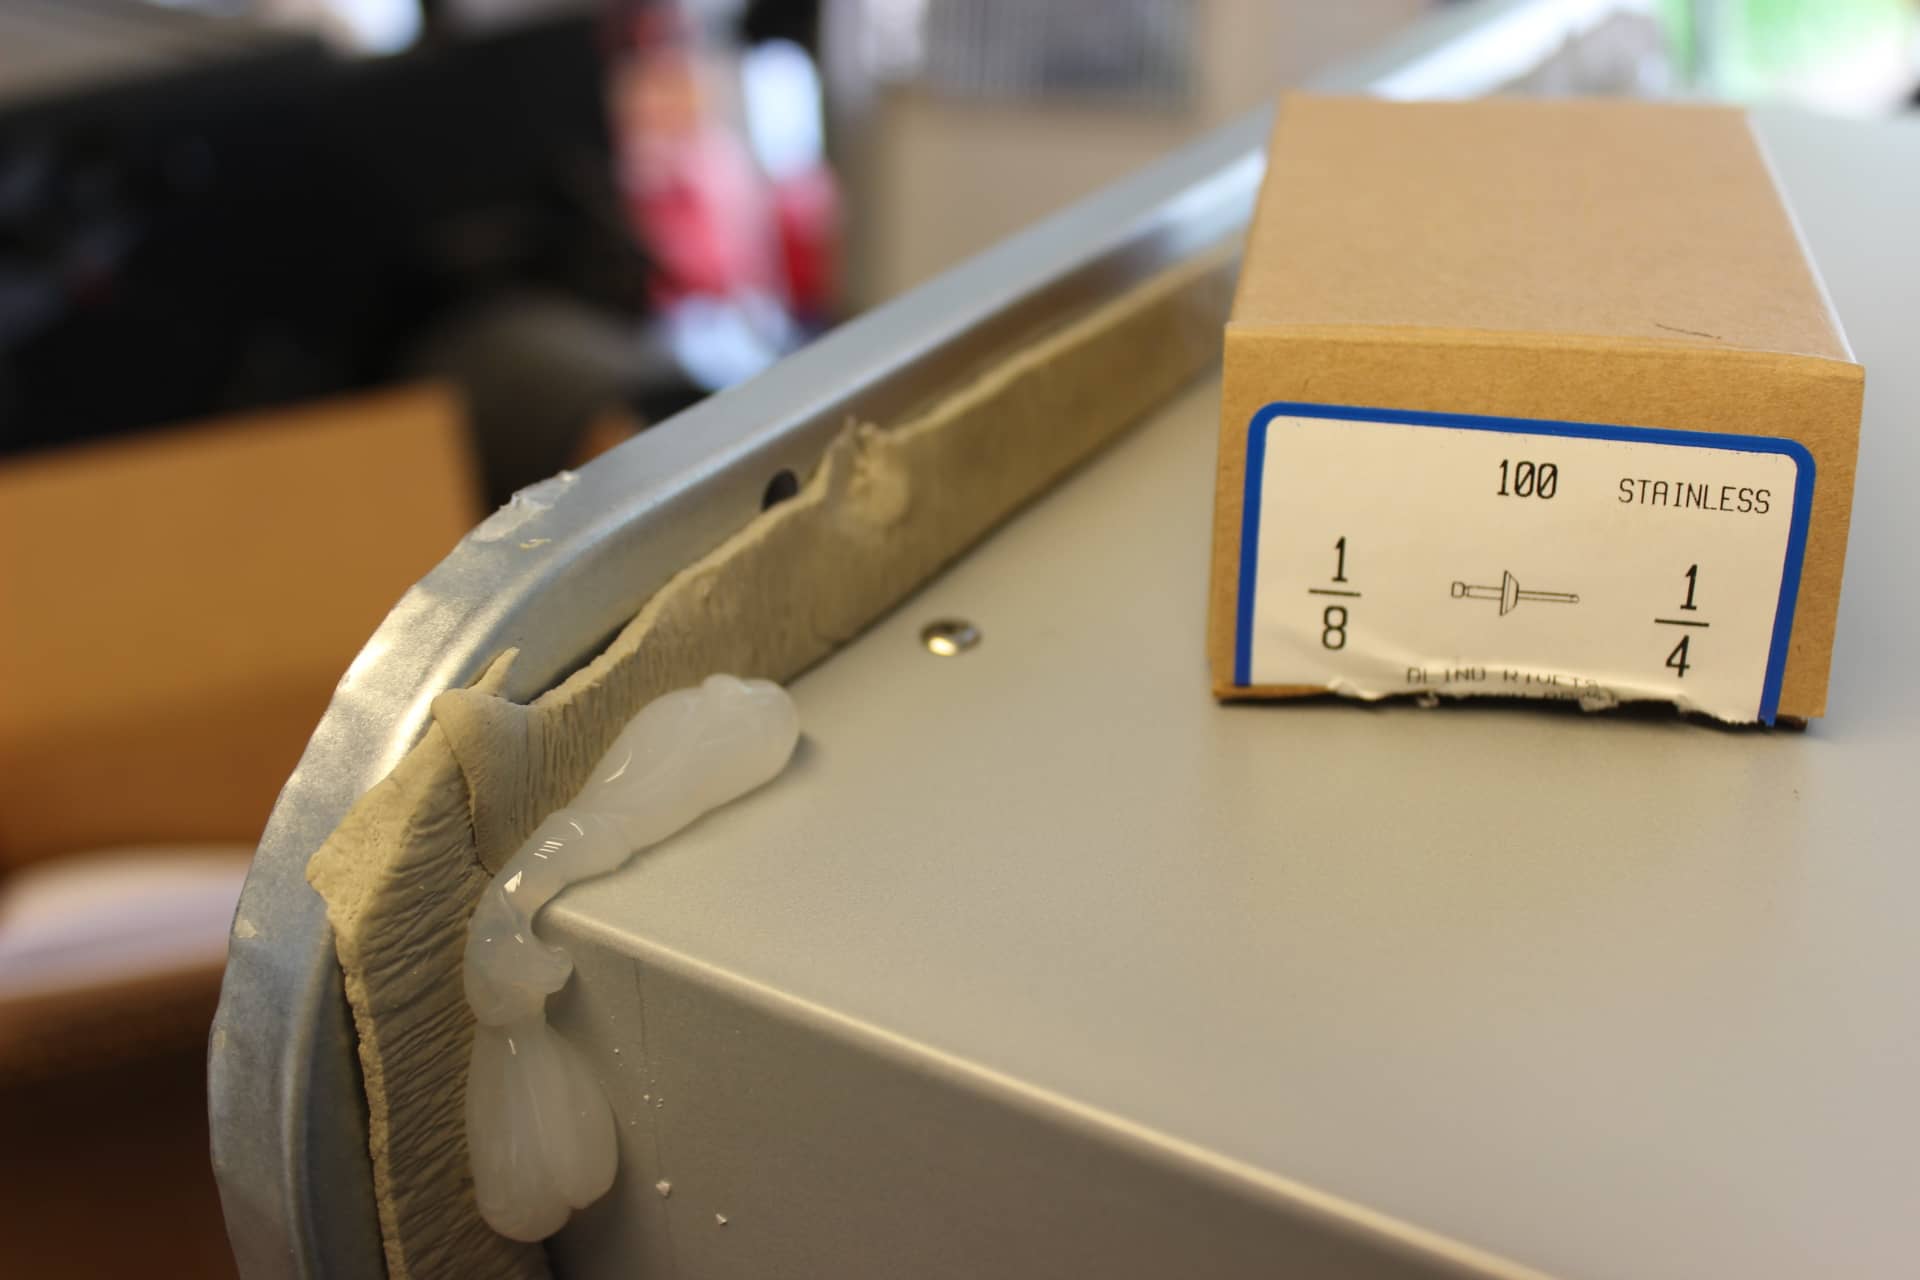
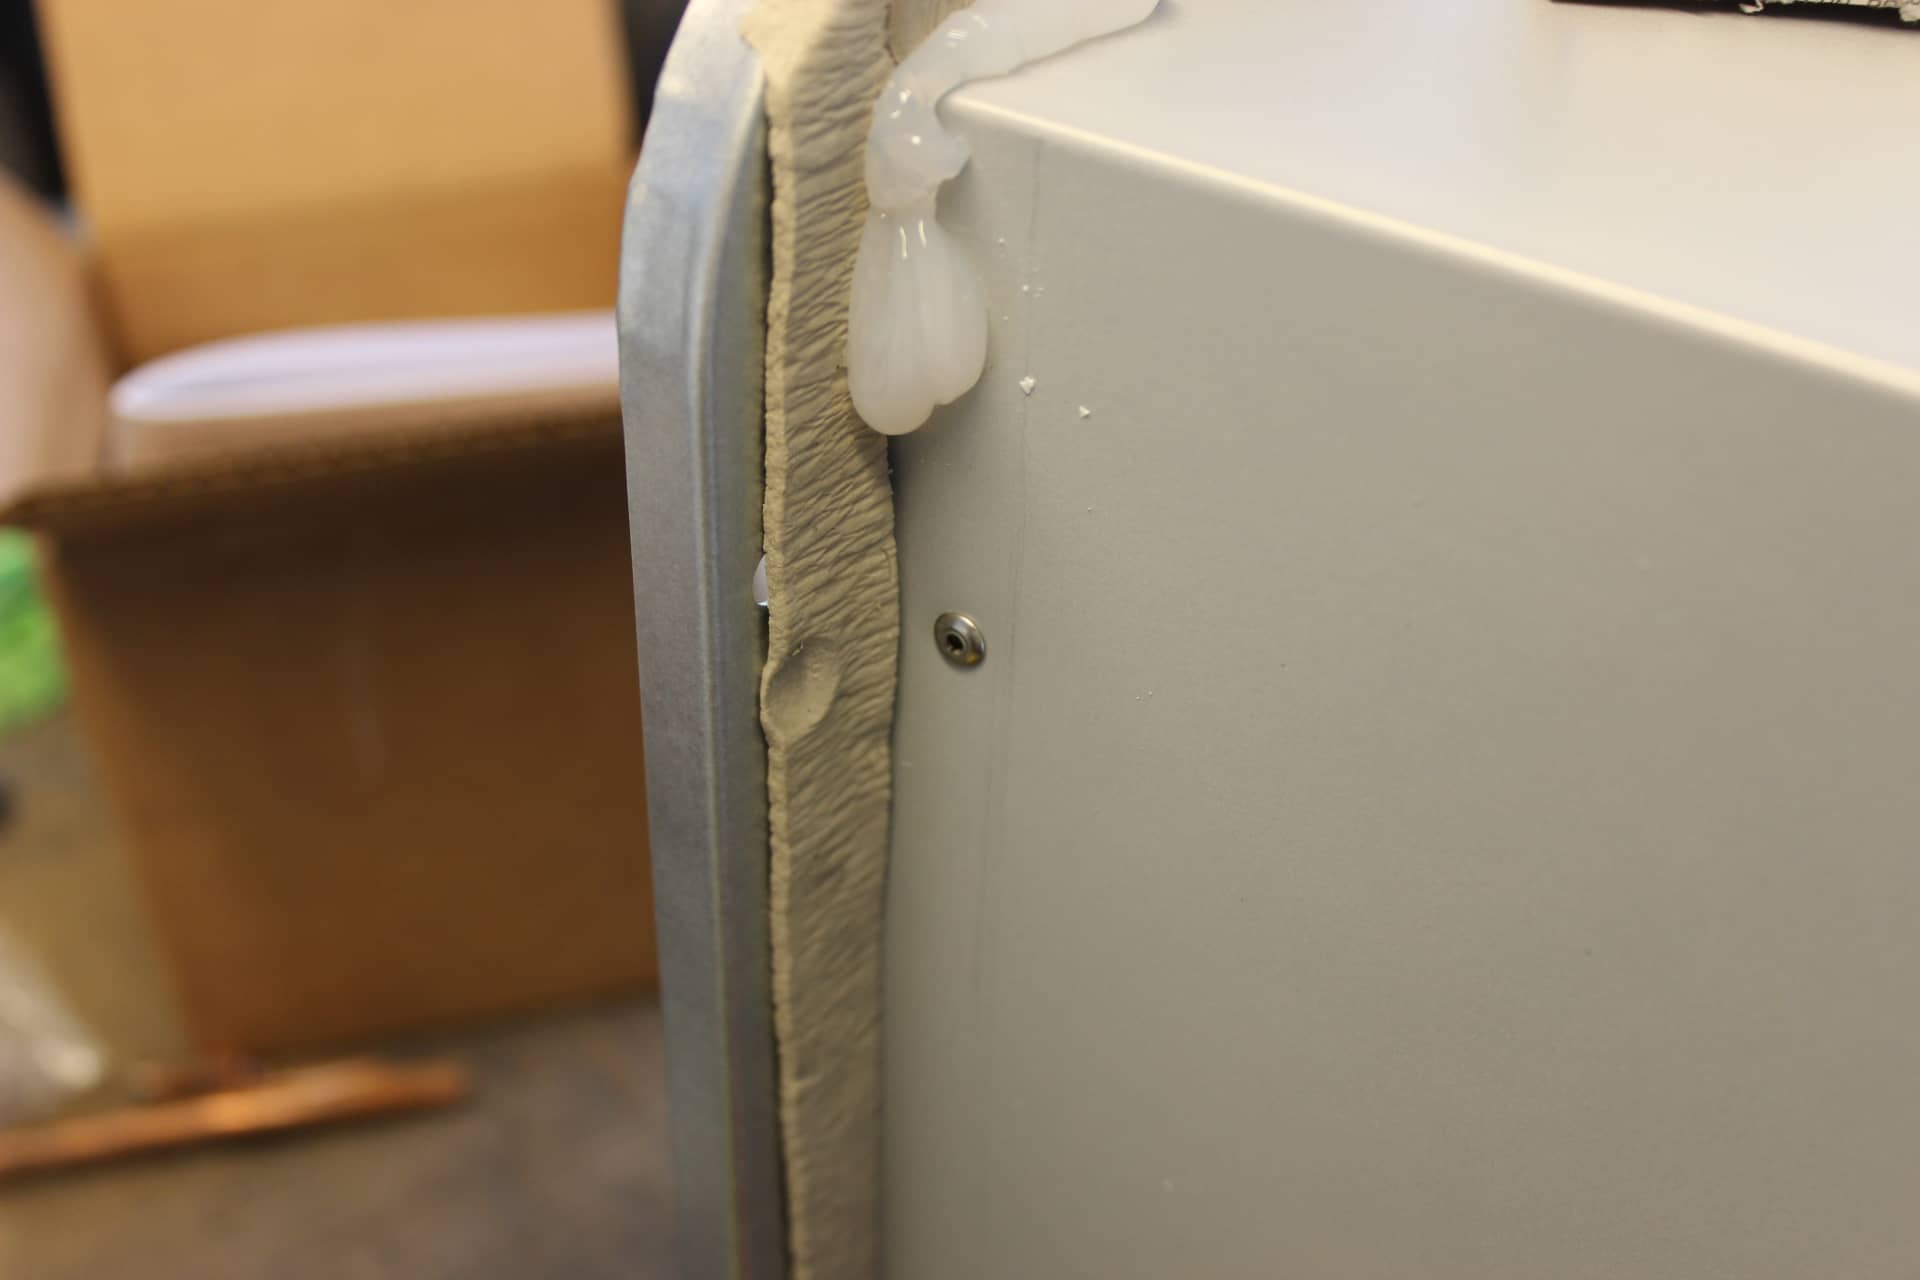
It’s about attaching the flange and door to the water heater. I suggest that you watch this too. Basically you use butyl tape (they don’t include this in the kit) to form a gasket between the flange and the trailer wall (I used putty tape) and that you put a big glob of silicone on each corner to seal that gap. You don’t want any carbon monoxide seeping into your trailer instead vent to the outside air… so you want to seal it up real good Images 1873, 1874). Next you pop rivet the flange onto the body of the water heater using stainless steel 1/8” pop rivets (not included either… image 1875, 1876). Now the flange is attached.
It’s now time to install the Girard.
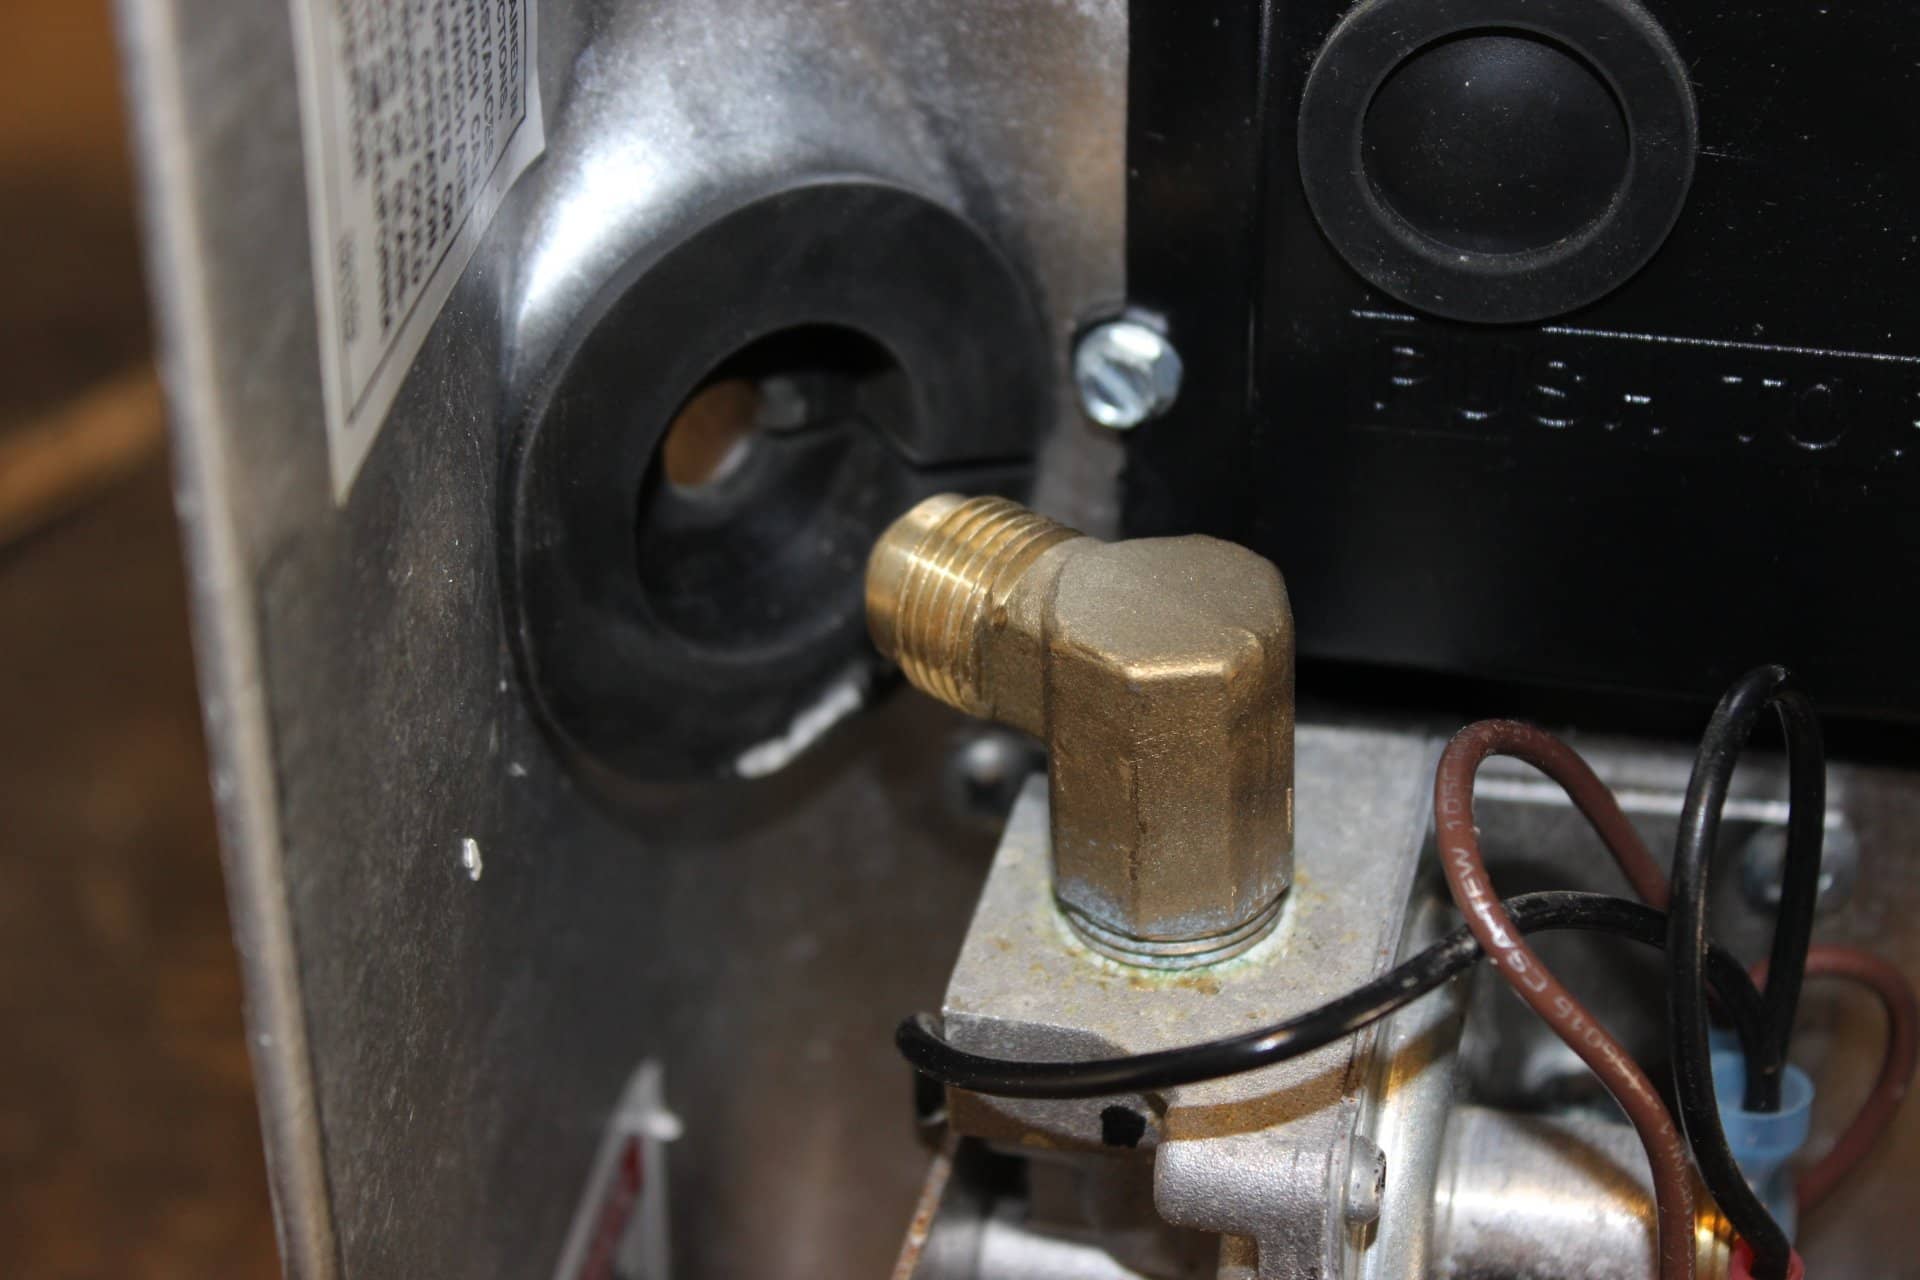
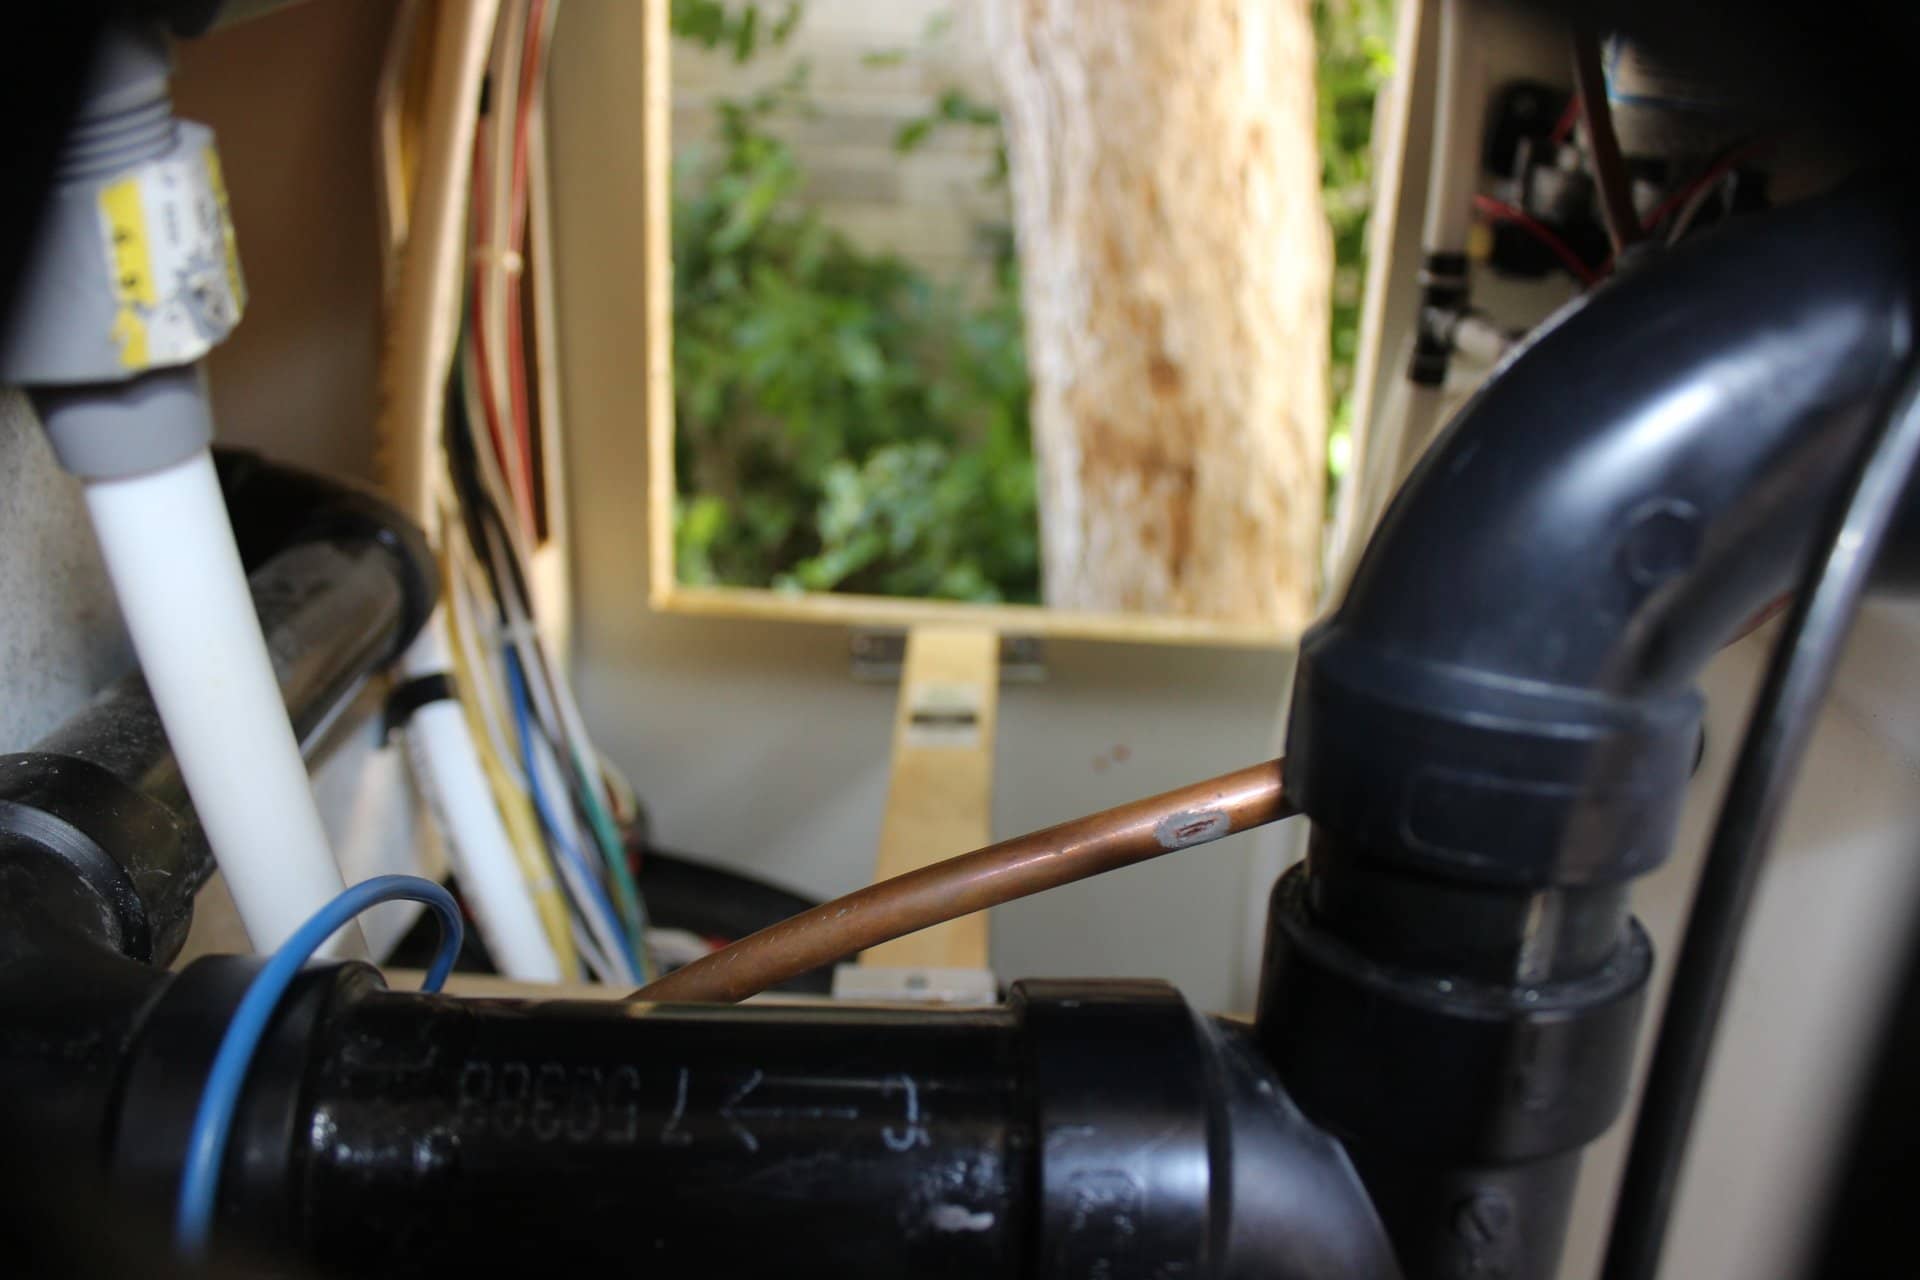
You will have to cut 12” off of the propane gas line (image 1844) as it is too long. You will need a tubing cutter and a tubing flare kit for this job. I bought one at Harbor Freight for not much money. It worked great and has everything you need. So cut off about 12” and save the flare fitting. You will be slipping this back onto the cut tube to use in your connection BEFORE you flare the tubing! When using the flare tool, make sure you have about 3/16-1/4” worth of tubing sticking up from the flare block (the two parallel bars that hold the tubing) before starting your flare. Once flared, you will be able to carefully bend the copper tube so you can start screwing on the flare cap to the propane flare fitting on the hot water heater (images 1865, 1880 … be sure and use two wrenches, one on the water heater fitting and the other on the copper flare fitting when you tighten this down!).
In order to get this to slide in properly into the side of the TM, you will have to make sure that the wiring and the Pex tubes for the water are moved to the side a bit. Just so they don’t snag on the corner of the Girard (it’s best if you have a human helper). From the outside set the water heater in the cut-out hole for the water heater and push gently. If it gets caught, go inside and clear the obstruction. Eventually (with a little firm pushing) it should slide into place. I ran a thick bead of silicone around the entire unit between the flange and trailer wall just to be sure of a good seal and to keep water from leaking to the inside. After I got it flushed up against the trailer wall, it was time to insert the screws into the flange and tighten them down. As it turned out the Girard flange screw holes were exactly the same as the flange screw holes on the Suburban. So no drilling was required. After I got it screwed tightly to the trailer wall, I wiped off the excess silicone from the edge of the new flange and attached the door. It fit perfectly and closed like it should the first time. The outside part is now done.
Going back inside, it was now time to hook everything up. I started with the propane. Gently bending the copper as to NOT cause any kinks in the line while aligning it to the flare fitting on the water heater and screwed the flare cap on the copper line to the fitting making sure NOT to cross thread it. Once tightened down with two wrenches, I went and turned on the propane. With a spray bottle containing soapy water, I sprayed all around the propane fittings to check for leaks. If it starts to produce bubbles of any kind, you have a leak. Either your flare on the copper isn’t big enough or done properly, or you need to tighten the line fitting a bit more. Just be gentle….and with the propane turned OFF! I tested mine and NO bubbles appeared….YEAH!
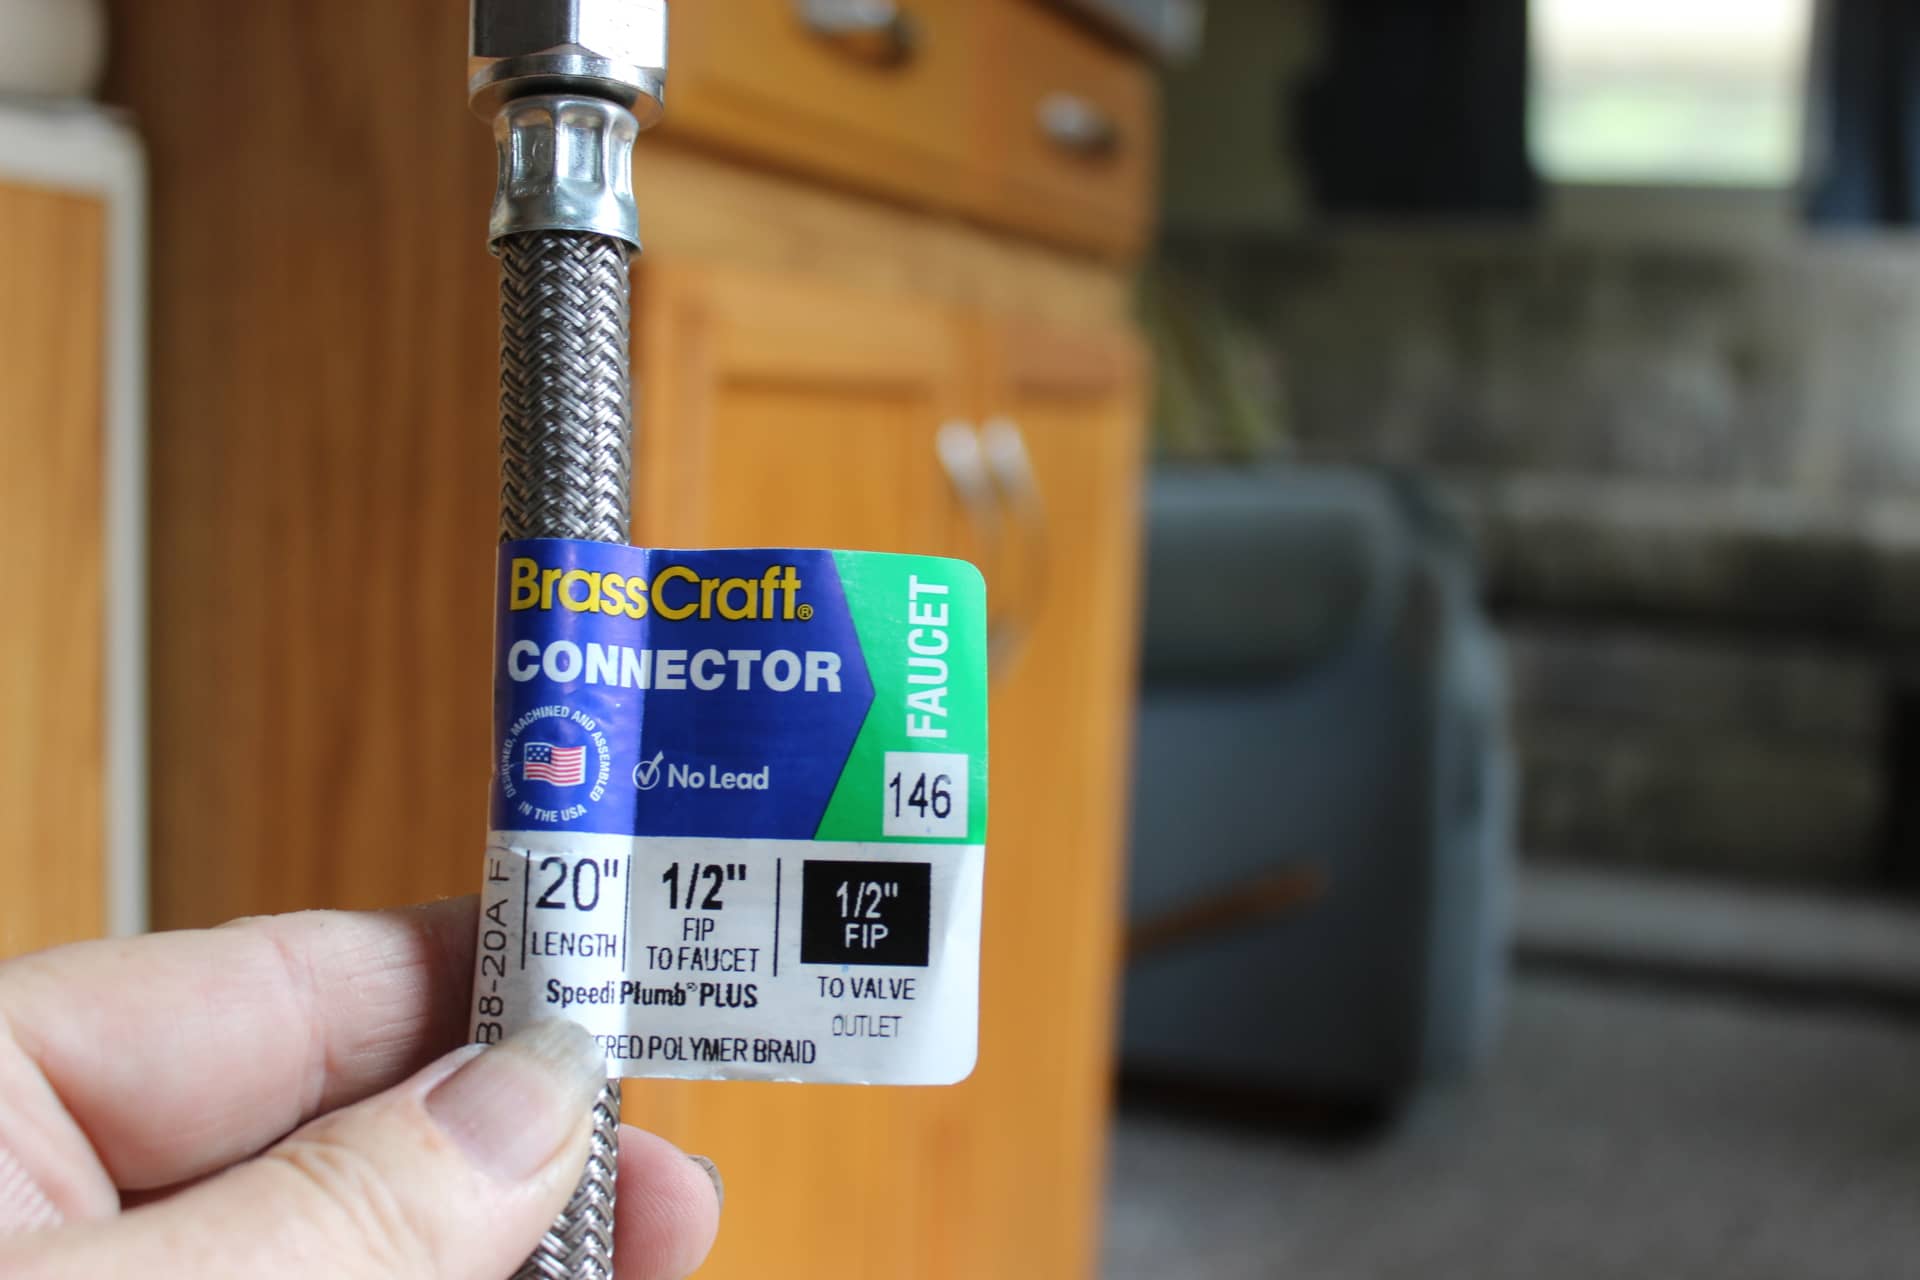
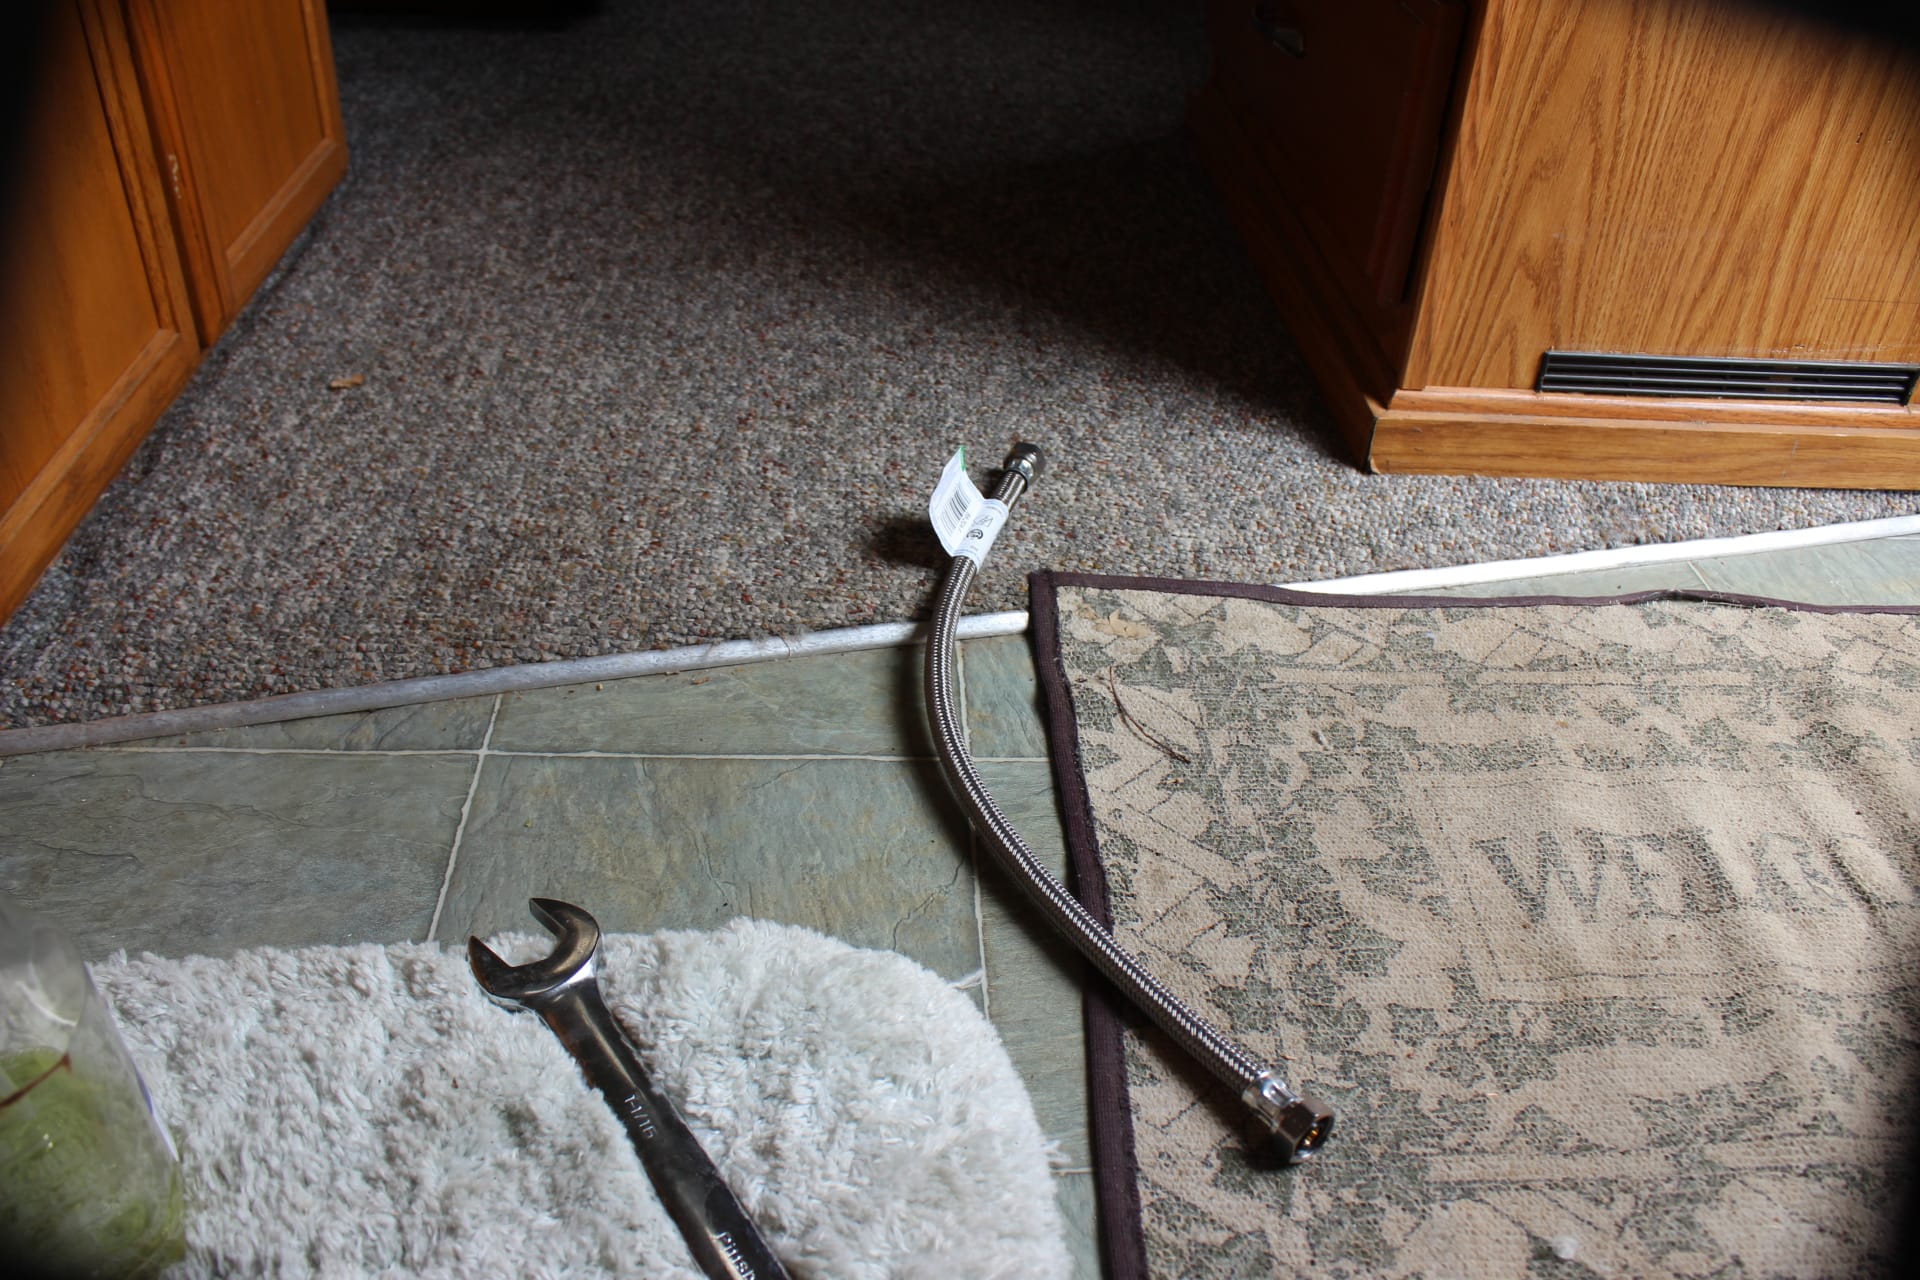
Now to the plumbing. I don’t know about yours, but I would say the bottom line is the cold water and the top one is the hot water coming out. On my plumbing, the previous owner had installed a by-pass line for winterizing this TM. It had faucet line valves installed on it so hooking up the water was a snap for me. I just used Brass Craft faucet lines from Home Despots (like on your home’s sinks … images 1877, 1878). I got one 20” long (although I could have used the 16” one) for the hot water out and a 12” long one for the cold water feed. They screwed directly to the valves and then onto the heater fittings. Since they all have gaskets on the fitting connections there was no reason to use Teflon tape either (image 1879).
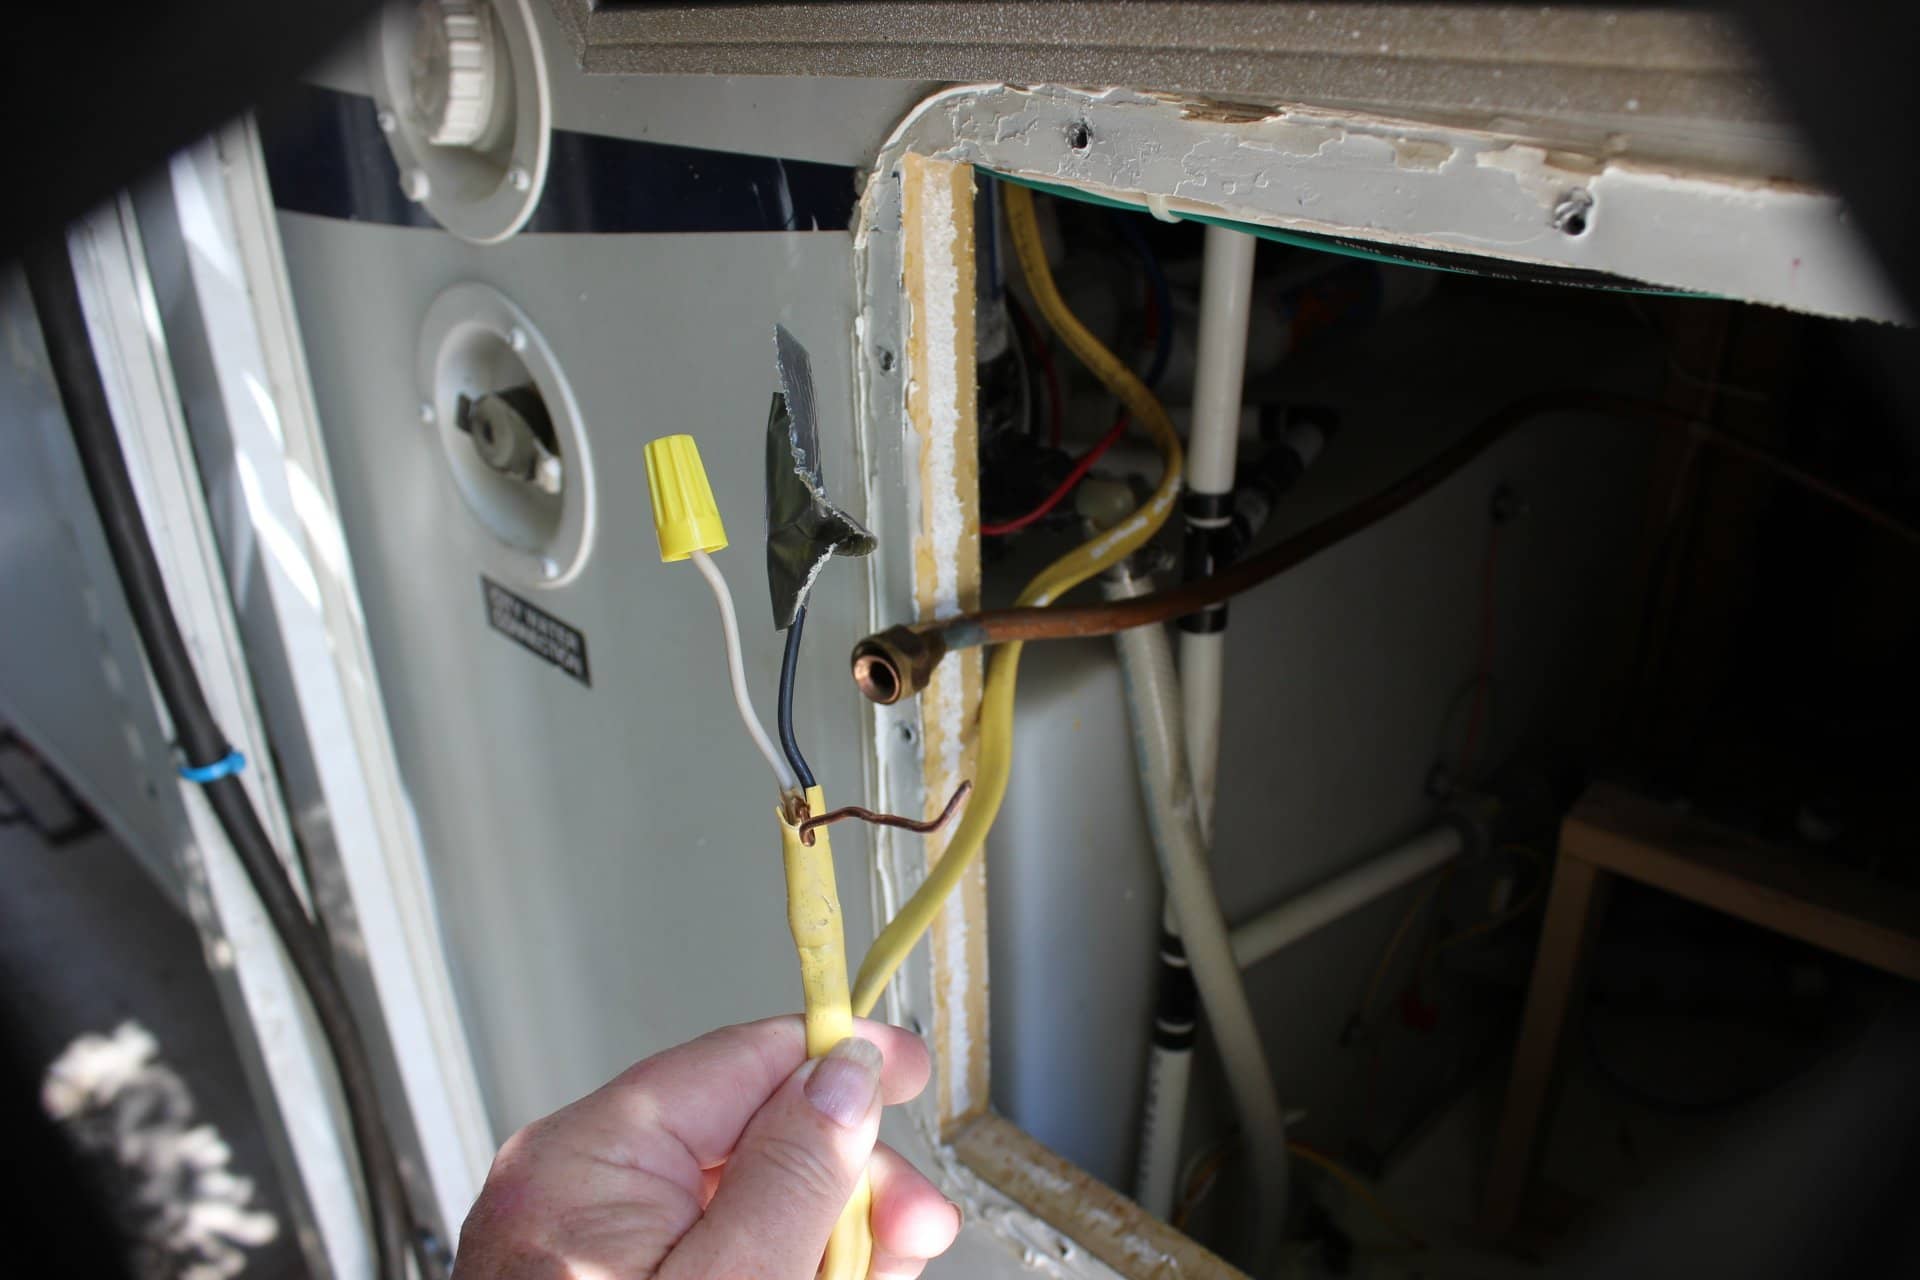
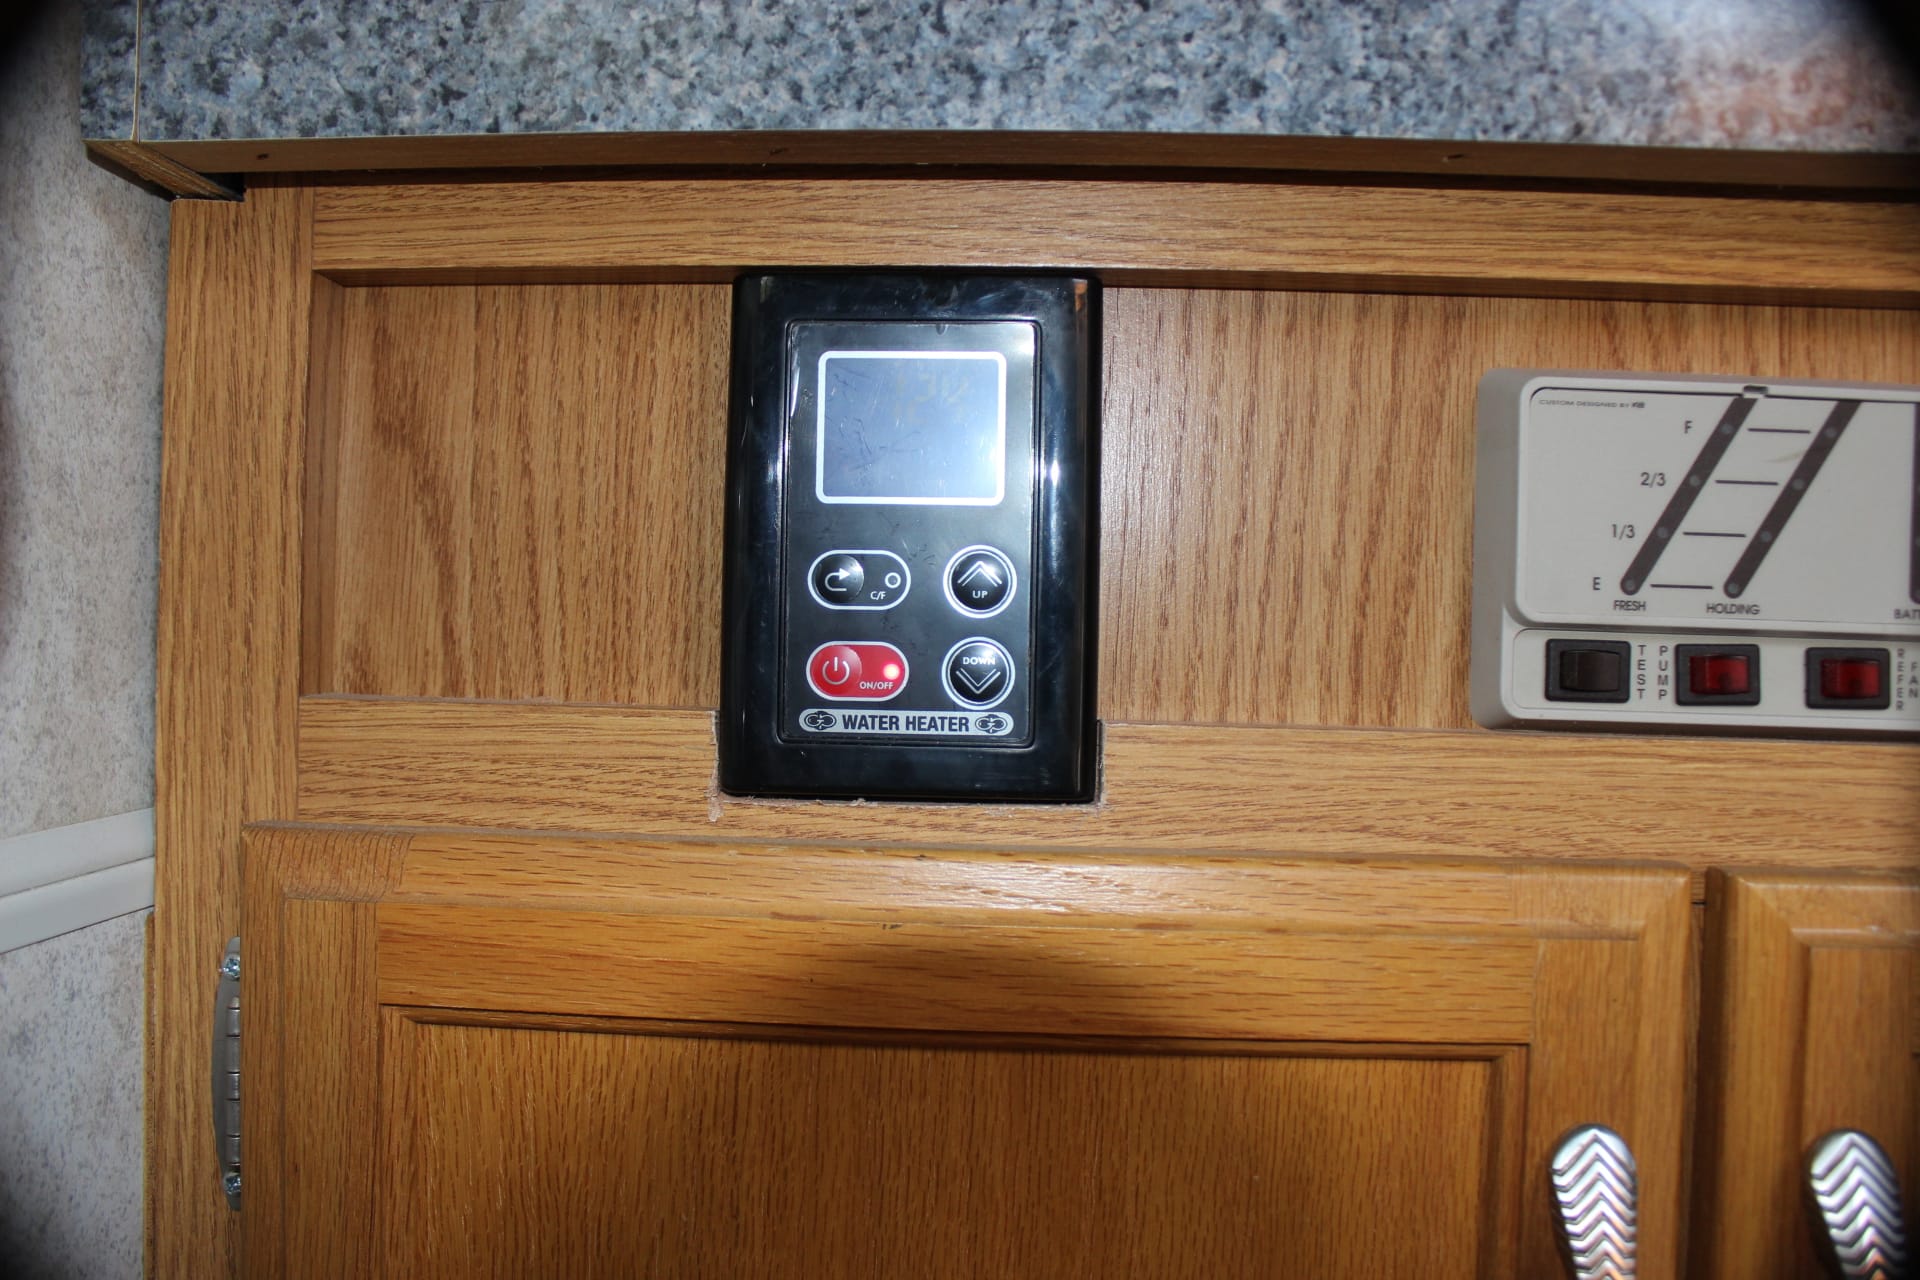
Next it was time for the user control panel to be installed. I decided to put it where the old Suburban propane switch was. The Girard UCP was a bit taller than the old propane switch, so I took my multi-tool and plunged cut a slot out of the molding so the UCP would fit nicely (image 1883). Putting this here also covers up the hole were the old switch was. Connecting the wires was easy as well. The power wires for the Girard are labeled “+” (red) and ” – “ (black) 12v DC . The other two wires are blue and they hook up to the two wires coming off the UCP. It doesn’t matter how or to which blue wire is hooked up whatever blue wire, so that makes that simple. It was suggested that you hook up the UCP blue wires first before hooking up the power and ground wires.
For the + power wire I used the old power wire from the old Suburban propane switch. This was the light blue wire from the switch and I spliced it to the red “+” wire on the Girard. You can ground the black “ – “ wire anywhere, but I used the white wire that was on the indicator light on the propane switch panel. It was hooked together with the ground on the old Suburban (or two wires joined together with a spade connector). I just spliced the black wire from the Girard to that white ground wire. I would suggest that you use a volt meter and check all these wires out and make sure you have 12v DC on the light blue wire and that the white wire is indeed a ground wire. To splice all these together I used insulated male and female spade solderless crimp on connectors. That way if I ever have to remove the hot water heater I can simply unplug the wires.
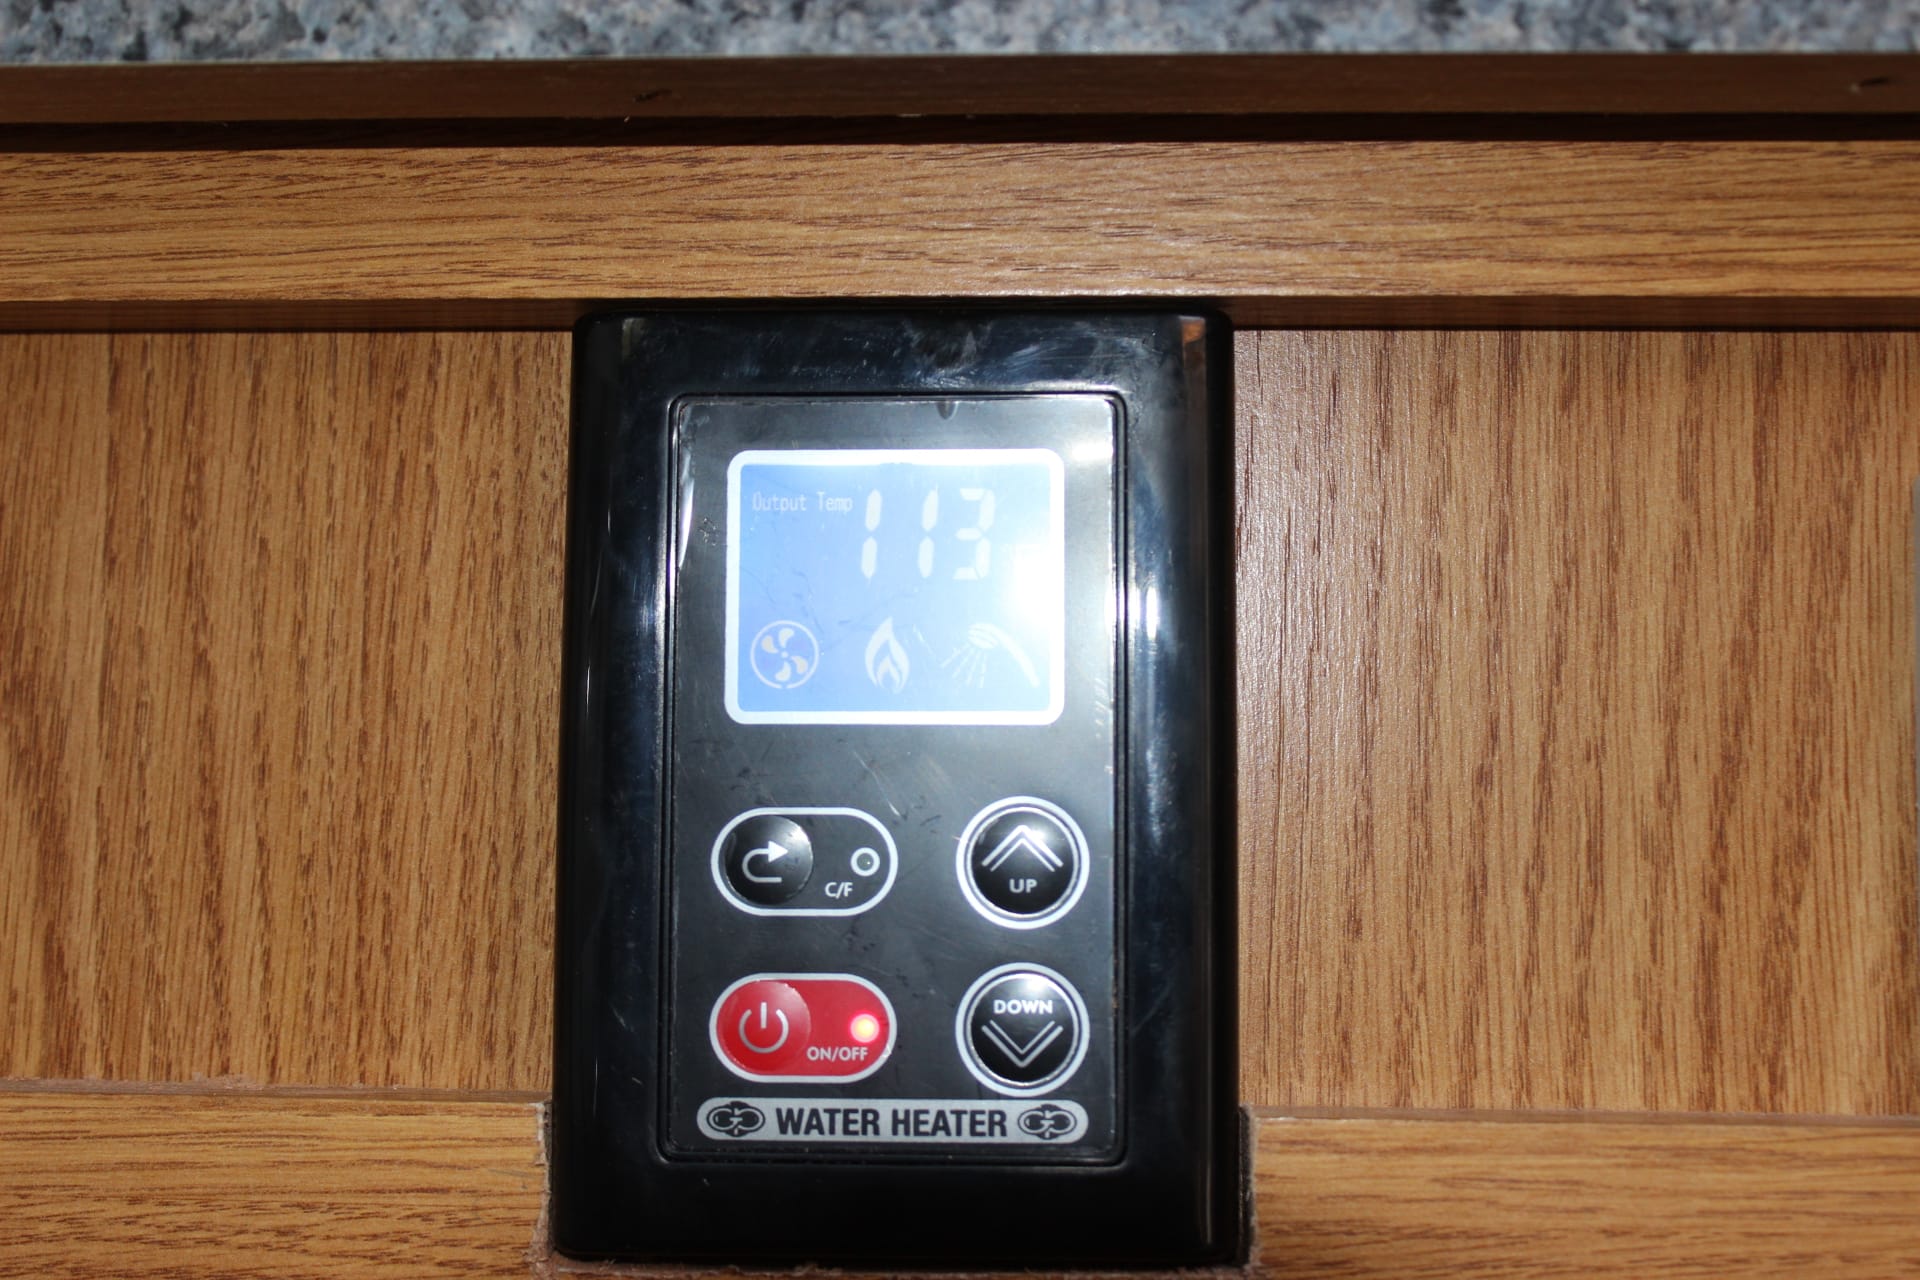
Now the moment of truth…..I turned on the propane….I went inside and pushed the button on the UCP…and turned on the water…and nothing! The water ran but the UCP didn’t light up and the water did not get hot. Then I remembered that there is a master power switch inside the Girard on a panel (image 1882…. a white rocker switch just to the left of the exhaust pipe on that panel). So I went outside, opened the door and flipped that switch. When I got back inside the UCP button was glowing red. So I pushed that and the UCP came on (image 1884…you can see the red LED glowing). Then I turned on the hot water faucet and the UCP showed that the systems were working and running (image 1885). It showed the water temp setting in F°, the blower fan for the propane flame was on, the burner was lit and that the water was flowing (the little shower head icon). With the faucet right there next to the hot water heater, it took about 3 seconds for the water to get hot! I left it running and went back outside to see if I could hear it going and there was very little sound, even with the blower motor running. I closed the door (image 1881) and went back inside and checked the temperature of the water and it was hot alright. So turned off the water, the panel turned off and the heater turned off….everything turned off but me….I was turned ON!