Wheels and Tires


By having a single axle trailer, there is nothing more critical than the tires. All but one Trailmanor model (to my knowledge) has a single axle. The largest model has two axels on it and therefore requires 4 tires instead of the two on my trailer. In some ways I wish mine had 4 tires and two axels and in others, I’m glad that I have the one I have. It’s a 3124 which is the largest Trailmanor made with one axel.
I have learned a lot about the subject of tires and axels over the past year….and not by chance I am sad to say.
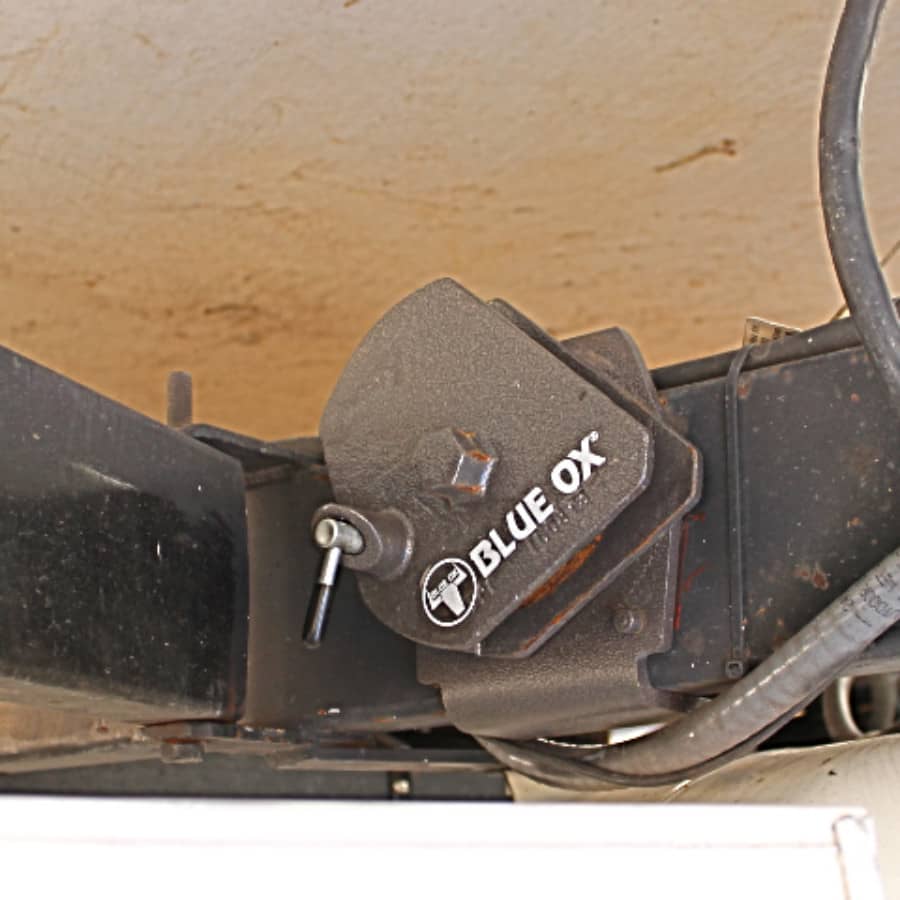
Last year I played a gig down in Port Aransas which is almost next door to Corpus Christi. It was Labor Day weekend. We played on a Saturday night and Linda and I came home the next day. But not without consequences. About half way between Corpus and San Antonio (we live in Austin, Texas) on Interstate 37 we suffered a blowout. Luckily for me, I had purchased and installed a Blue Ox Sway Pro weight distribution and anti-sway hitch. BOOM! It went and dropped like a rock onto the rim, but never for one second did I ever lose control or did the trailer ever sway one tiny bit and we were going 70MPH! Now I am impressed big time. I would suggest (no matter what size Trailmanor you might have) you get a weight distribution hitch and topping the list is the Blue Ox. OK …I don’t want to sound like a commercial here, but hey, the thing worked well and way beyond my expectations too! I had already had my mind set on getting a weight distribution hitch and did a lot of research into what was out there. The Blue Ox had some very nice features that the others didn’t. If you have read any of my stuff, you know that the word “hassle” is the worst word in my vocabulary. I’m all about E-Z! After watching many different youtube videos on weight distribution hitches, the Blue Ox Sway-Pro won me over. What I liked most was the ease of hooking and un-hooking up the hitch. First is the unique rotating latches (image 1566) that all you do is wrap the chain around the latch and turn it with this wrench that they provide. Very simple. Next, I liked the way the spring bars (the things that bear the weight) snap into the hitch head. You plug them in and give them a twist and they lock themselves into place. Twist, and they come out. I have heard that with other brands you have to grease the ends of these bars, but not with the sway pro. All the grease stays in the hitch head (which you give a squirt of grease into the grease cocks located under the spring bar receptacles now and then). These are the fastest in the biz! I like fast! If I were you I would go watch the video on youtube and see for yourself, it shows you the complete installation (which I did) and how easy it is to install, hook-up, and un-hook…………………………………… ( https://www.youtube.com/watch?v=aQ4asBLiBvg ). Next thing I liked was the anti-sway mechanism being built in to the hitch head. This means you don’t need to buy a sway control device because it’s already there! Lastly, and here again, I don’t really know a lot about weight distribution hitches, but Blue Ox says you can back up with the hitch still in place. The last thing I want to do is have to go and un-hook the weight spring bars and chains just to back up! Oh and one more thing, the spring bars come in different tongue weight values. From 350lbs to 2000lbs tongue weight. So if you have multiple trailers with different tongue weights, you don’t have to change the hitch head, only the spring bars and maybe the ball. Very clever indeed. Blue Ox Sway-Pro worth every cent spent!
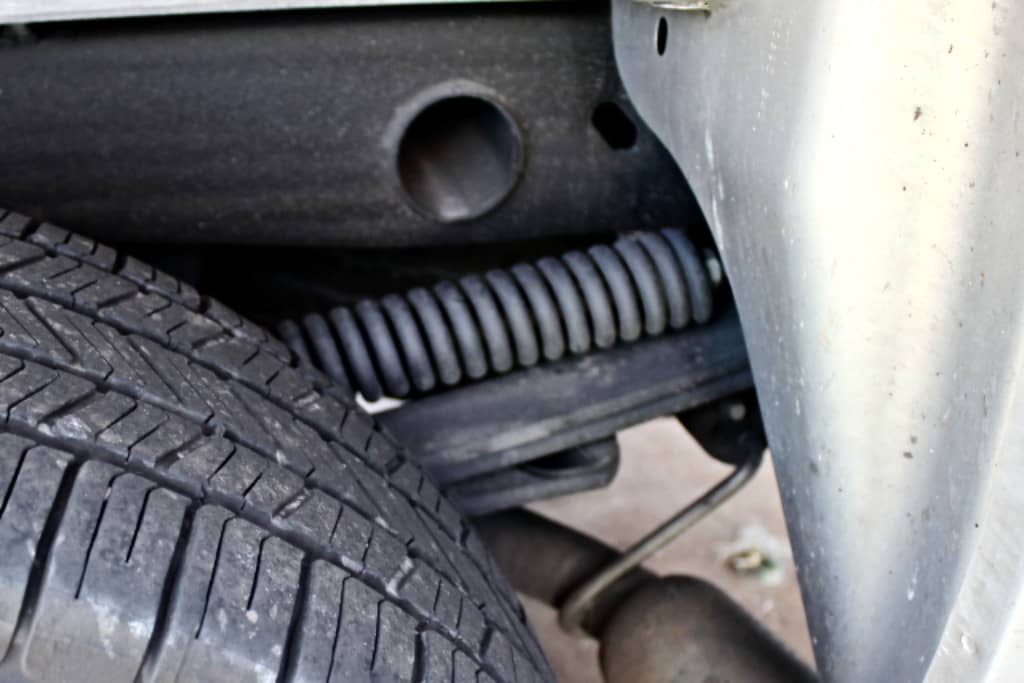
Complementing the Blue Ox Sway Pro is the Roadmaster Active Suspension system (image 1628 …you can see one, the horizontal coil spring, behind and over the tire and above the leaf spring….there’s one on each side). I installed these myself in about 45 minutes. They were very easy to do and I have noticed a vast improvement while towing. First, my truck no longer sinks down like it did when I first started towing my trailer. Second they really did help with body roll on my truck… towing or not. Lastly they do not make my truck ride rougher, because they only come into play when a load is placed on them. The best parts, once they’re on, you never have to fool with them, and, they will last a very long time….. unlike air bags.
Oh yeah, tires. When I first bought my Trailmanor from Spilmans in Bloomfield Iowa, the first thing that I did was put on a new set of tires before trying to drive back that 1500 miles to Austin. No telling how old and dry rotted these tires were, and I didn’t want to take any chances. I had done my homework before I left to go fetch the 3124 and found out that it had the “Blimpy” 225/75 R15 Marathon tires that were the OME. They are rated with a “D” rating (which will never do for Mr. Overkill). So I found these Commodore tires that are “E” rated (or is that Commode Door). Now the further down the alphabet, the higher the rating or the more weight they will handle. So “E” is better than “D” right. And so they were for a year or two…..until that fateful Labor Day Weekend when on a 100°+ afternoon…BOOM!!! Flop..flop..flop..flop.
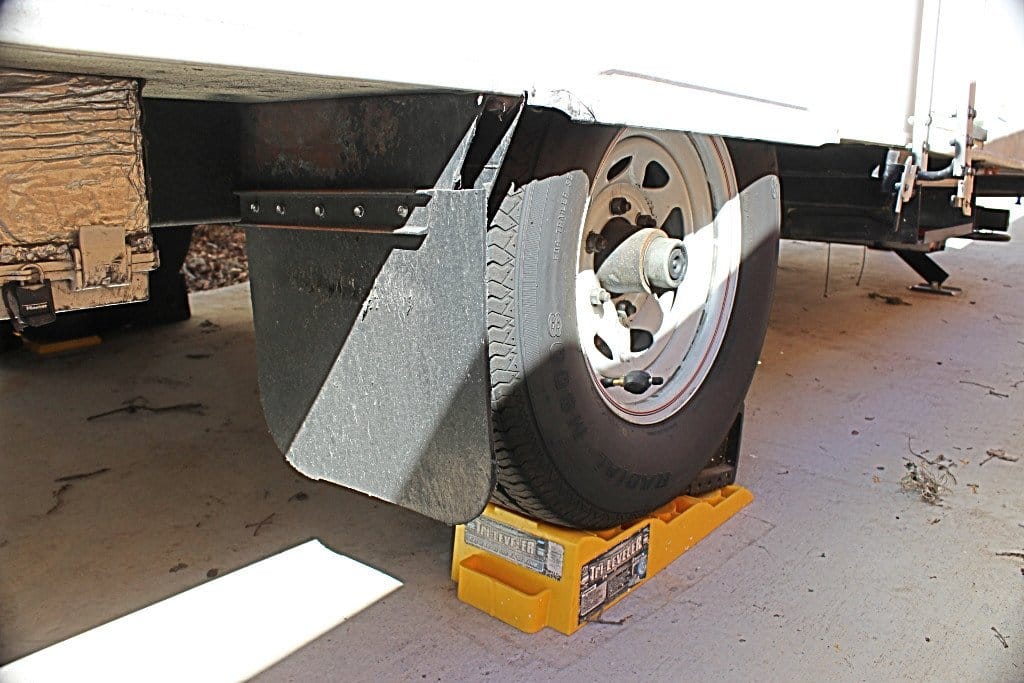
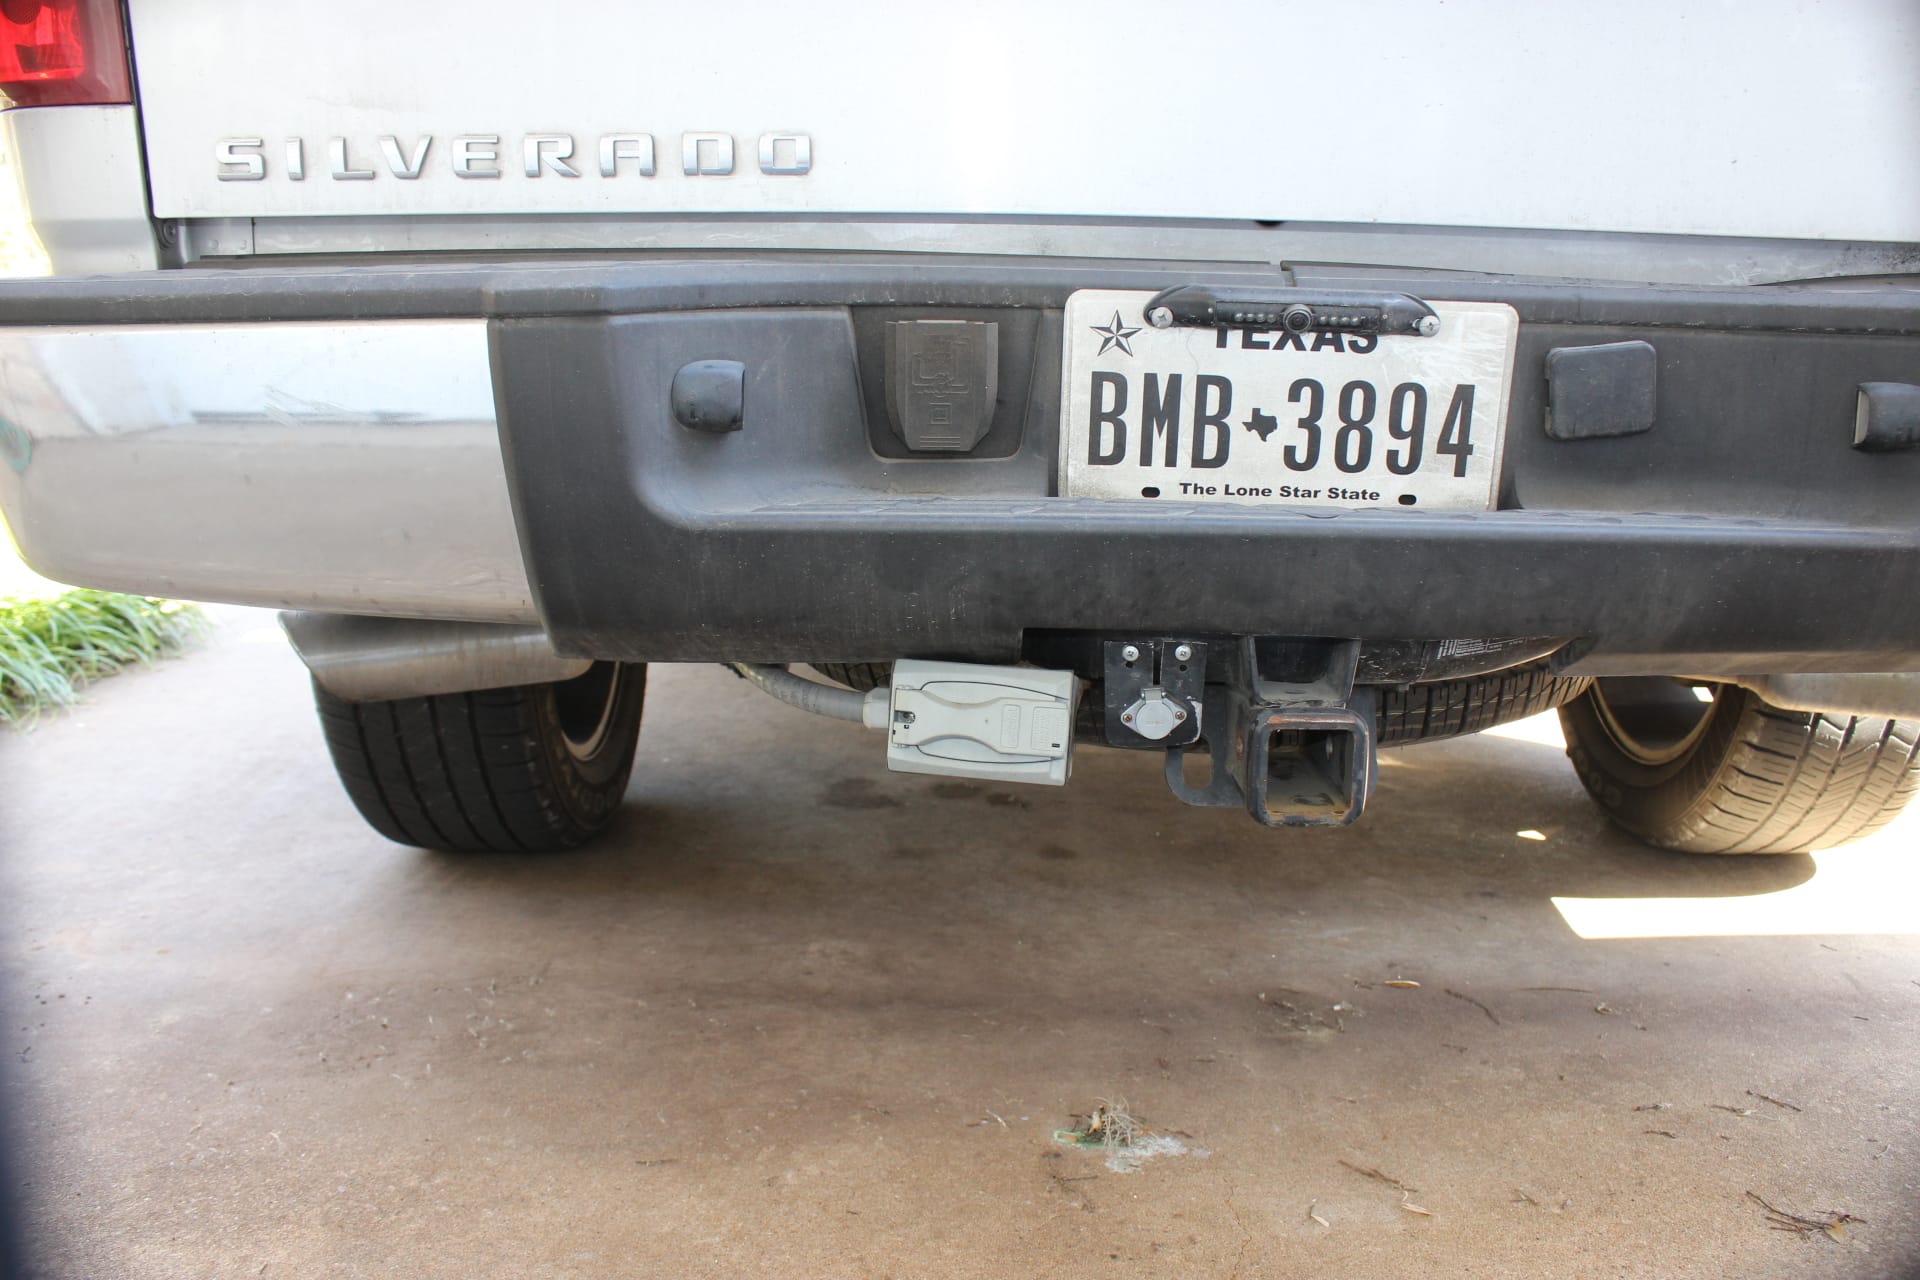
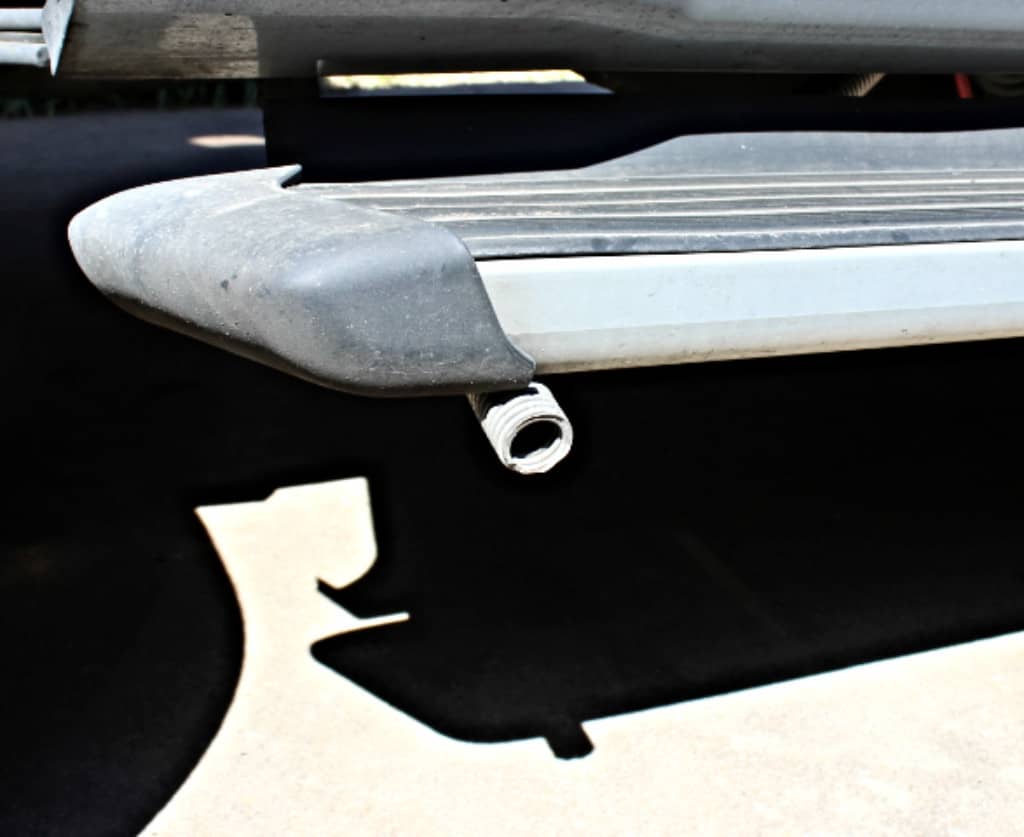
The same time that I bought the Blue Ox I also bought the “Tire Minder” wireless tire monitor with six “thru-air” tire monitors that screw onto each tire’s valve stem (in image 1507 if you look closely you can see the thru-air tire monitor sending unit on the valve stem). One for each tire on my truck and trailer. The “thru–air” monitors let you adjust the tire pressure while they are still attached to the valve stem. On most other wireless tire monitors, one has to un-screw the monitor off of the valve stem to put air into or let air out of a tire. Another hassle, so get the ones that are the thru-air monitors and save yourself some time and trouble. The Tire Minder is very helpful and tells you with an alarm beep when a tire is losing pressure, has gained too much pressure or over heated…but in this case there was no alarm because the tire lost all of its pressure in a New York Second! I’m still glad that I have this though. It’s good to know what your trailer tires are doing especially if you’re driving on just two of them. Tires that don’t have enough air in them will over heat. When that happens they fail! You don’t want this to happen …..believe me!
After airing it up, we changed the tire with the “Blimpy” spare at great hassle (one thing I hate is the fact that you cannot change a tire without OPENING UP THE TRAILER!!! GGGRRRRR!!!!…because you can’t really get the skirt off without it being open and you can’t very well get the tire off or to all the lug nuts either. What a big shortcoming for Trailmanor!…I am planning on changing this by getting the Timbren Axle-less axles, they have some rated at 7000lbs GVW. I’ll be putting a piece of 2” square tube between the new axles and the frame thereby raising the Trailmanor up by 2” and also creating 2”s of extra clearance for the wheel and tire from the wheel well….oh and with that, also I am planning on going to 16” wheels and tires too). So we limped on home (at 65 MPH, which is all the Blimpy is good for).
So what caused that “Commode Door” tire to fail? Well…as it turns out, I don’t think it was the tire at all. Not only are the tires rated but the rims as well. That is, rated for the maximum psi they can handle. How was I to know that? I didn’t find this happy fact out until later, right before my trip to California (the land of the fruits and nuts) when I put new tires on my trailer once again. As it turns out, the OME rims were only good for 65 psi, which is what the “Blimpys” are rated to. Since the Comode-Door tires were rated to 80 psi, I was running them at 70-75 psi…fat dumb and happy….until whoooosh BOOM! Clunk…scraaaaaaapeeee! The rims failed to hold the tire pressure, it dropped super-fast, the tire went completely flat in a second and exploded into shreds of flying flapping steel belted rubber whips!
So I bought new rims that will hold 100 psi, and new tires too, the Maxxis tire with an “E” rating, again good for 80 psi., able to handle a maximum load weight of 2,830 lbs. per tire. Times two, that’s 5,660 lbs. GVW! Quite a bit above what my trailer weighs. Everything I read about the Maxxis tires were very positive with no complaints about their performance. I even contacted the Maxxis people and talked to them about their tires. They were very helpful providing me with the information I wanted. Now tires also have a speed rating too. Me, I don’t want to slug it on down the road at 65 MPH when the speed limit is 80 MPH and people are passing me like I was standing still. Nor do I want to only go so far a day. Time is precious and when traveling I want to get there ASAP and start relaxing and you can’t do that if it’s going to take you an extra day there and back…..so….it’s important to know what that speed rating is and how that works. Here is a web site that explains the speed rating and on there is a chart at http://tires.about.com/od/understanding_tires/a/Tire-Speed-Ratings-Explained.htm …. So the speed rating on my Maxxis 225/75 R15 is “N” or 87 MPH.
Now it’s my understanding that if your trailer weight is 5800 lbs. GVW or less your tire pressure would be 65 psi . (see this chart at http://www.maxxis.com/trailer/trailer-tire-loadinflation-chart ). This chart shows what the tire inflation pressure or PSI should be, cross referenced with the tire size and next to the tire size is the weight you are running on your trailer. However, if you were to put another 10 lbs. of pressure in your tires (75psi) with the same weight, you could drive 75 MPH instead of 65MPH without any problems (a reliable source at Maxxis told me this). This is what I did on my last trip out to California. As long as I monitored the tire pressure with my “Tire Minder” and made sure they did not go over 75psi, I was in good shape to hit 75 MPH without them overheating. In order to do that though you have to start with about 65-68 psi in your cold tires before you hit the road because once you have traveled some distance your tires will heat up. When they do get warmer, the tires expand because the air expands when it heats up and thus the psi goes up as well. The target here is to never let the tires get over 75 psi. Do this and you can (if you choose) drive all day at 75 MPH! What a difference just 10 MPH makes when you want to get there. If you need to find out what all those numbers and letters mean on the side wall of your tire then go to http://tires.about.com/od/understanding_tires/a/How-To-Read-Your-Tire.htm this will explain a bunch…..
Well I have told you about my trailer and all the stuff I have done to it, so it is only fair that I include my tow vehicle…my truck, Sam Silverado. Sam is a silver (why anyone in their right mind would by a black vehicle living in Texas is beyond me….WHAT???!!! Is it not hot enough for you??? I guess they failed Physics!) 2013 extended cab Texas Edition Chevrolet Silverado 1500, with a 5.3 liter V8 engine. Not only have I “tricked” my Trailmanor, but my truck as well.
The first thing I did was fix it so the engine could breath. I installed a throttle body spacer which helps to boost the low and mid-range torque and help with the fuel economy (well actually everything I did to the engine was to help the gas economy).
Next I bought a Borla “cat back” dual exhaust system and had it installed.
I then installed a Volant Cool Air Intake system that has an air scoop that goes down the engine compartment and out underneath the front bumper. That way it’s pulling the intake air directly off the road in front of the truck where it is the coolest instead of in a hot engine compartment. One nice feature with the Volant unit is that the air filter itself is rated for 100,000 miles before it needs to be changed. Well I think I’ll change mine around 75,000 miles. Although it is a very large air filter, 100,000 miles is stretching things a bit. All in all, the changes I have made to the engine has given my truck a lot more pep and better mileage.
I believe the most critical component on a tow vehicle is the transmission. Now when I bought the truck I made sure it had the “towing package”. This included a nice stout trailer hitch with the six pin trailer wire hook up. It did not have an electric brake controller, so I had to have one installed for that. The tow package also included a transmission cooler….about the size of postage stamp! Now how much will that cool? Not diddly poop! So I got the Tru-Cool Max LPD 47391 low pressure drop transmission cooler. It’s the biggest one that will fit in front of the radiator. So before I installed it, I monitored the transmission temperature (my truck has that ability) and it was running anywhere between 178° and 210° with normal (not towing anything) use. After I installed the Tru-Cool it runs anywhere between 115° and 130°! A huge difference. When I was on my way back to Austin coming from California, I went by way of Colorado Springs Colorado because I wanted to make a pilgrimage to the largest Trailmanor dealer in the USA, a place called “The Car Show”. I had ordered some parts and wanted also to show off my Trailmanor to Mr. Will Unrah the parts manager (Will has been invaluable when it comes to answering questions about Trailmanors) as well as to shake his hand in gratitude for all his help to me over the phone. He’s a great person! So anyway, we had to cross the Rockies and doing so my transmission never got over 200° climbing those steep grades. Way to go Tru-Cool!
When I went in and had my transmission fluid and filter changed for the first time (30,000 miles), I also took them an extra large capacity aluminum transmission pan that has cooling fins on it. The new pan and the Tru-Cool trany cooler added and extra 3-4 quarts of transmission fluid to my transmission. This will also help to make my trany run cooler as well as make the fluid hold it’s integrity. A win win for the trany. I just want it to last as long as it can and not leave me stranded in the middle of nowhere. Heat is the killer of transmissions I might add!
Now to go along with my transmission cooler I decided to do the same for my engine. I bought and installed a Derale 15800 Electra-Cool oil cooler. In order to install this I had to put a fitting that goes on the engine where oil filter screws onto. It allows the oil to circulate out from this fitting to the electric fan cooled oil cooler and then back to the fitting before going thru the oil filter and finally back into the engine. That way the engine is getting very cool oil. This system not only cools down the oil and the engine also, it increases the oil capacity by about 3 quarts (which makes the oil last longer and stay cleaner). The cooler has a thermostat (purchased separately) that turns the fan on and off depending on the temperature of the engine oil. Here again….it works great and will surely make my engine last longer!
Now we will move into the back of the truck.
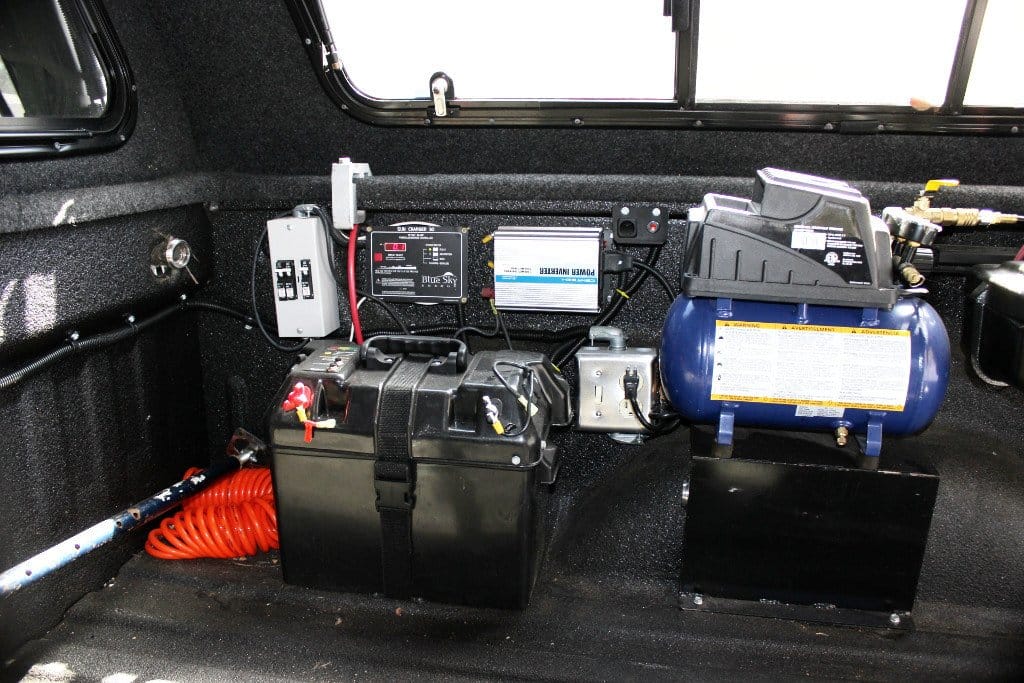
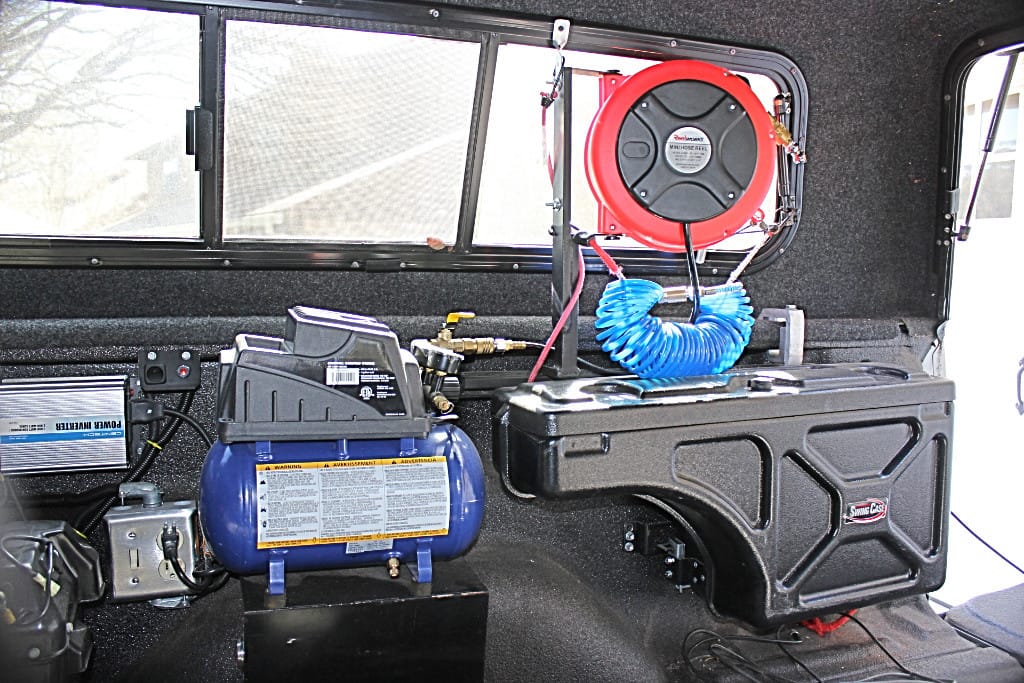
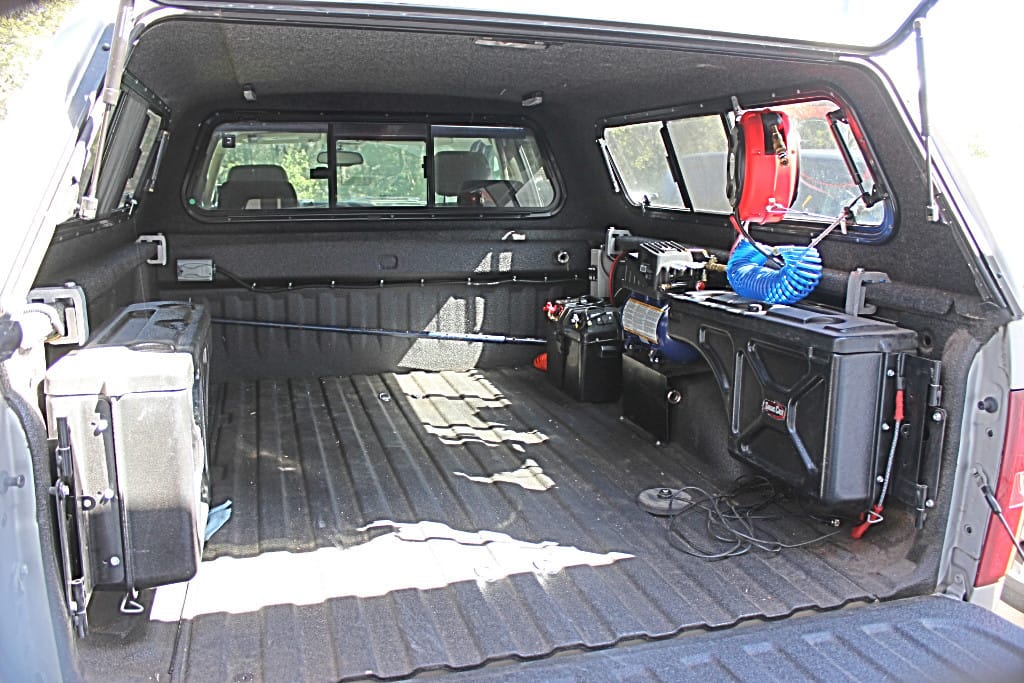
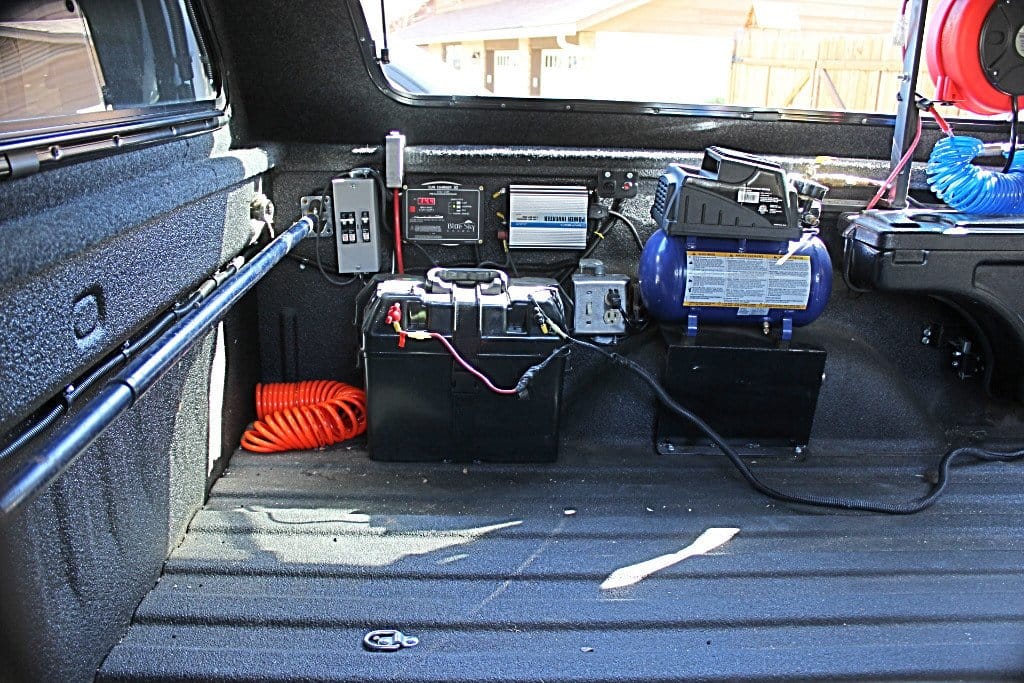
Being out on the road there often will not be a gas station or convenience store handy with an air compressor to fill your tires with. What if you’re leaving the campground (especially like a state park) and a tire is very low? If you have one of those little air pumps you’ll be ok…it’s just that it might take you 30 minutes or so to fill up a low tire. With that in mind I thought to add my very own compressor to my truck package. I found the cutest little 3 gallon Campbell Hausfield air compressor at Sears that is rated at 100psi and would fit just perfectly over a wheel well. I had a compact shelf built from steel with a flange on the top so I could screw it to the truck bed wall and one sticking out about an inch at 90° from the bottom to secure the shelf to the truck bed floor. To this I mounted (with some small rubber shock absorbers with threaded studs attached to them) the little compressor. It fit like a glove. Next I built a frame to mount a small 45’ air hose reel that I got from Northern Tools for $50 (it can reach any part of my trailer or truck with the side/ back windows folded up and open) I hooked it all up with a ball valve to keep the air inside the compressor tank when it’s not in use. When we had our blow out, this earned its keep. As the spare Blimpy tire was very low and had to filled-up before rolling on it. Right then and there it paid for itself! (image 1618 …you can see my mobile air station)
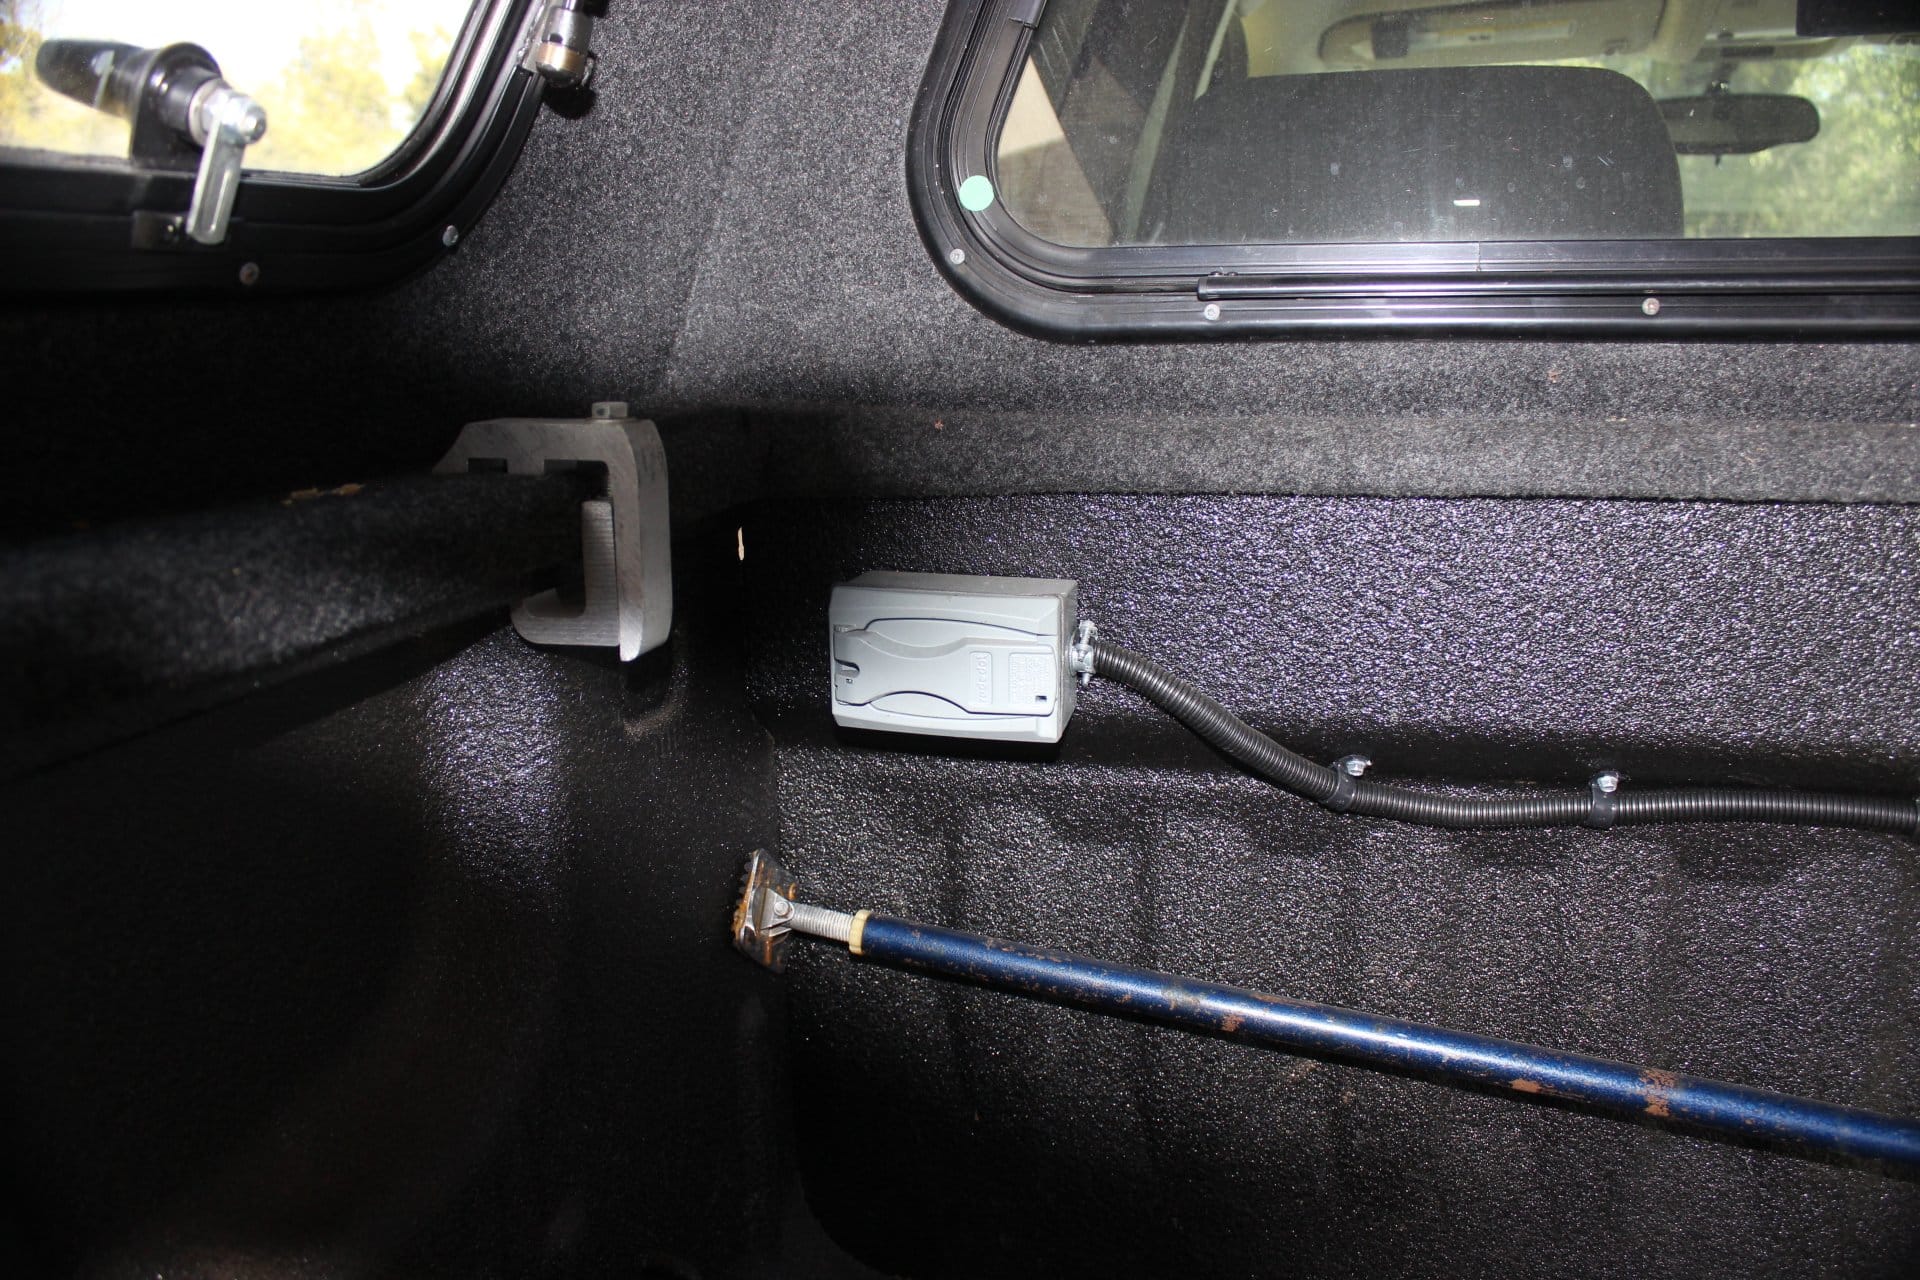
Completing all this is a bed topper shell on the back (that topper is essential, I am a professional Bassist and need to keep my equipment out of the elements’… plus it helps to secure anything I might have in the back of my truck from sprouting legs!… images 1629, 1626). I sprung for the fancy windows on the sides that fold out and up so I can get into my truck from the sides using the running boards so as to access things. These really come in handy when trying to find tools and what have you, not to mention working the generator! I also bought the front fold down window between the shell and the truck cab window. This really comes in handy too when running the generator. By having this folded down it allows the heat from the generator to dissipate while the sliding windows on the side windows allow for cool air to come in, all the while keeping my generator where I left it. That fold down window also helps when cleaning the glass between the shell and rear window of the truck. These options are worth every penny I think! Here again, they make life a little bit easier. MY AXIOM!
I believe the 5.3 gives me the most bang for the buck. It has plenty of power and was rated with the best fuel economy for that year. I like the extended cab because I don’t carry around many extra passengers to warrant the crew cab and the fact that the crew cab eats up my cargo space in the bed area. That extra 6 or 8 inches makes a big difference, and like me, I can really use that extra length in the bed area!
So I decided to outfit my truck to facilitate traveling with a trailer.
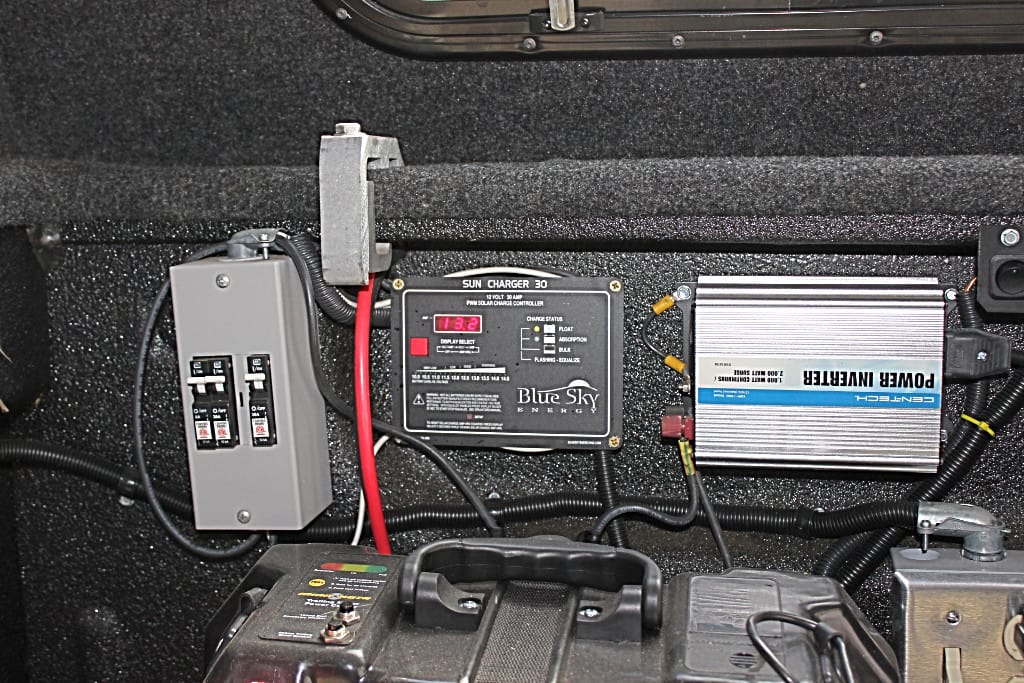
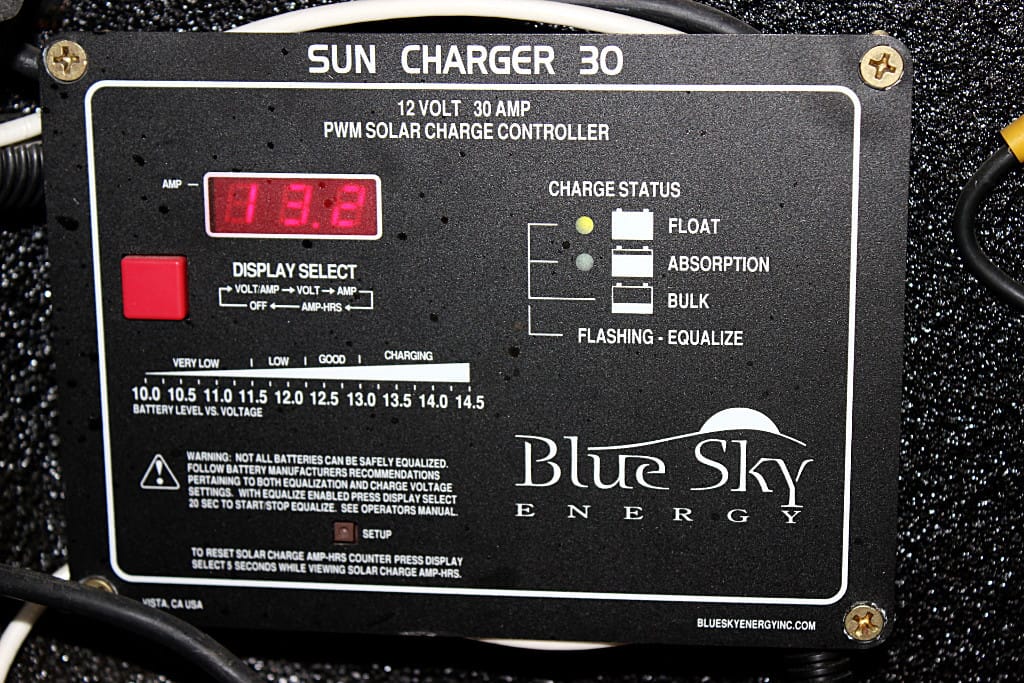
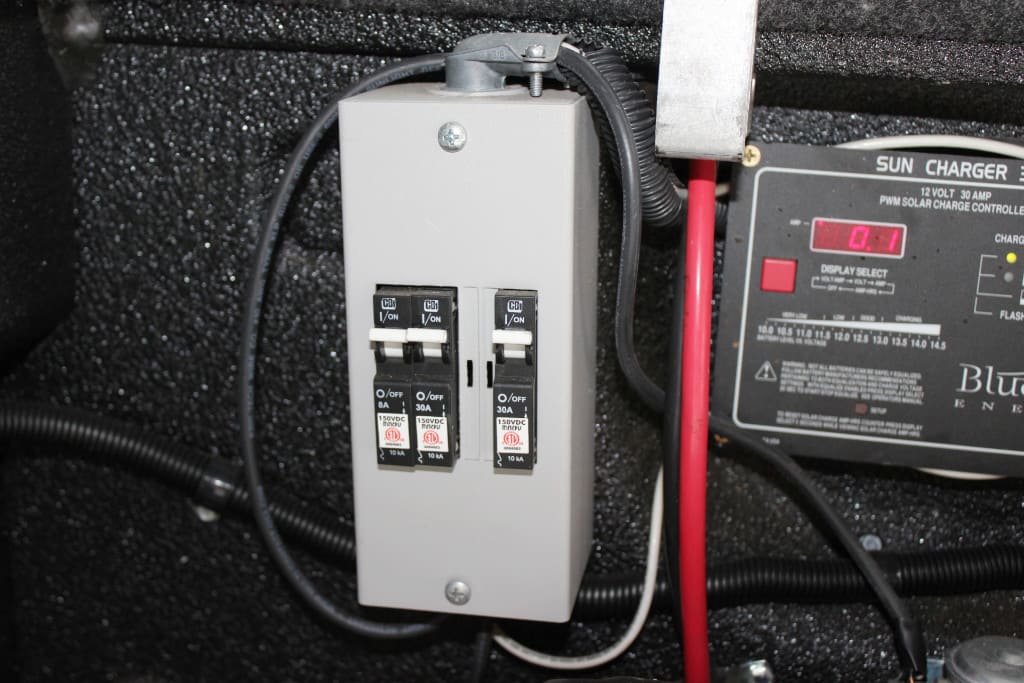
When I first bought my trailer I knew it didn’t have a battery in the back (and you need that battery to work the brakes if your trailer decides to try and pass you up). So I bought the biggest, baddest battery on the market. It was a combination starting/deep cycle battery with a huge reserve running time. So when I got my four 6 volt deep cycle golf cart batteries for the trailer, I put this battery I originally bought for the trailer in a marine battery box that has extra poles on the outside for the deep cycle part of the battery (actually so you can hook up a trolling motor) and secured it to the bed of my truck (image 1614) and hooked it into my trucks battery and charging system. When I bought my two 100 watt flex solar panels for my trailer, I got an extra one to put on the top of the camper shell of the truck. This way my two batteries in my truck would always be topped off and stay hot at all times. I put in a Blue Sky solar controller (image 1621) and a breaker panel (image 1622) to control the solar panel and controller box and a power inverter. (image 1616 ….the major components with the power selector switch)
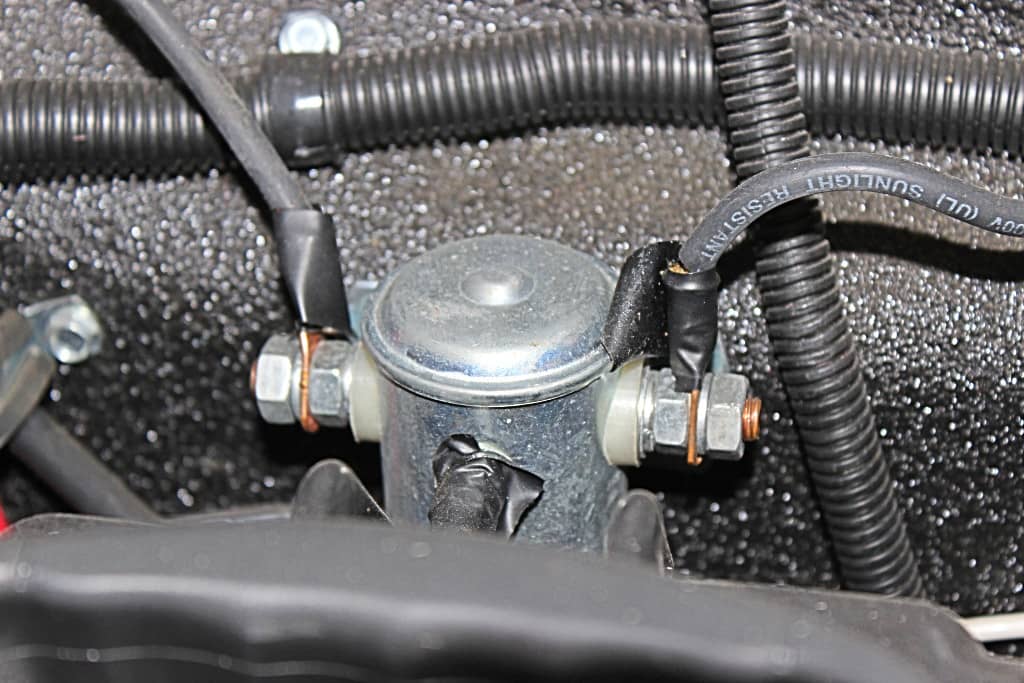
And speaking of batteries….the 6 pin truck trailer wires have a 12 volt feed that goes back into the trailer to the batteries there. That way you can use the charging system and batteries on your truck to charge the batteries on your trailer while tooling down the road. The only problem is that as long as the trailer wires are hooked up, it will ALWAYS be on. Which means that if your trailer battery is low and you stop somewhere for an extended amount of time (like going to some excursion or restaurant), you run the risk of having the trailer battery suck all the power from your vehicle battery and you will not be able to start your car/truck. The answer to this problem is a battery isolator installed on that 12 volt feed wire to your trailer. It only allows current to flow when the ignition switch on your vehicle is in the “ON” position. That means when you stop and turn off your car/truck. You turn off the wire to the trailer battery. Get one and have it installed. It will save you a headache!
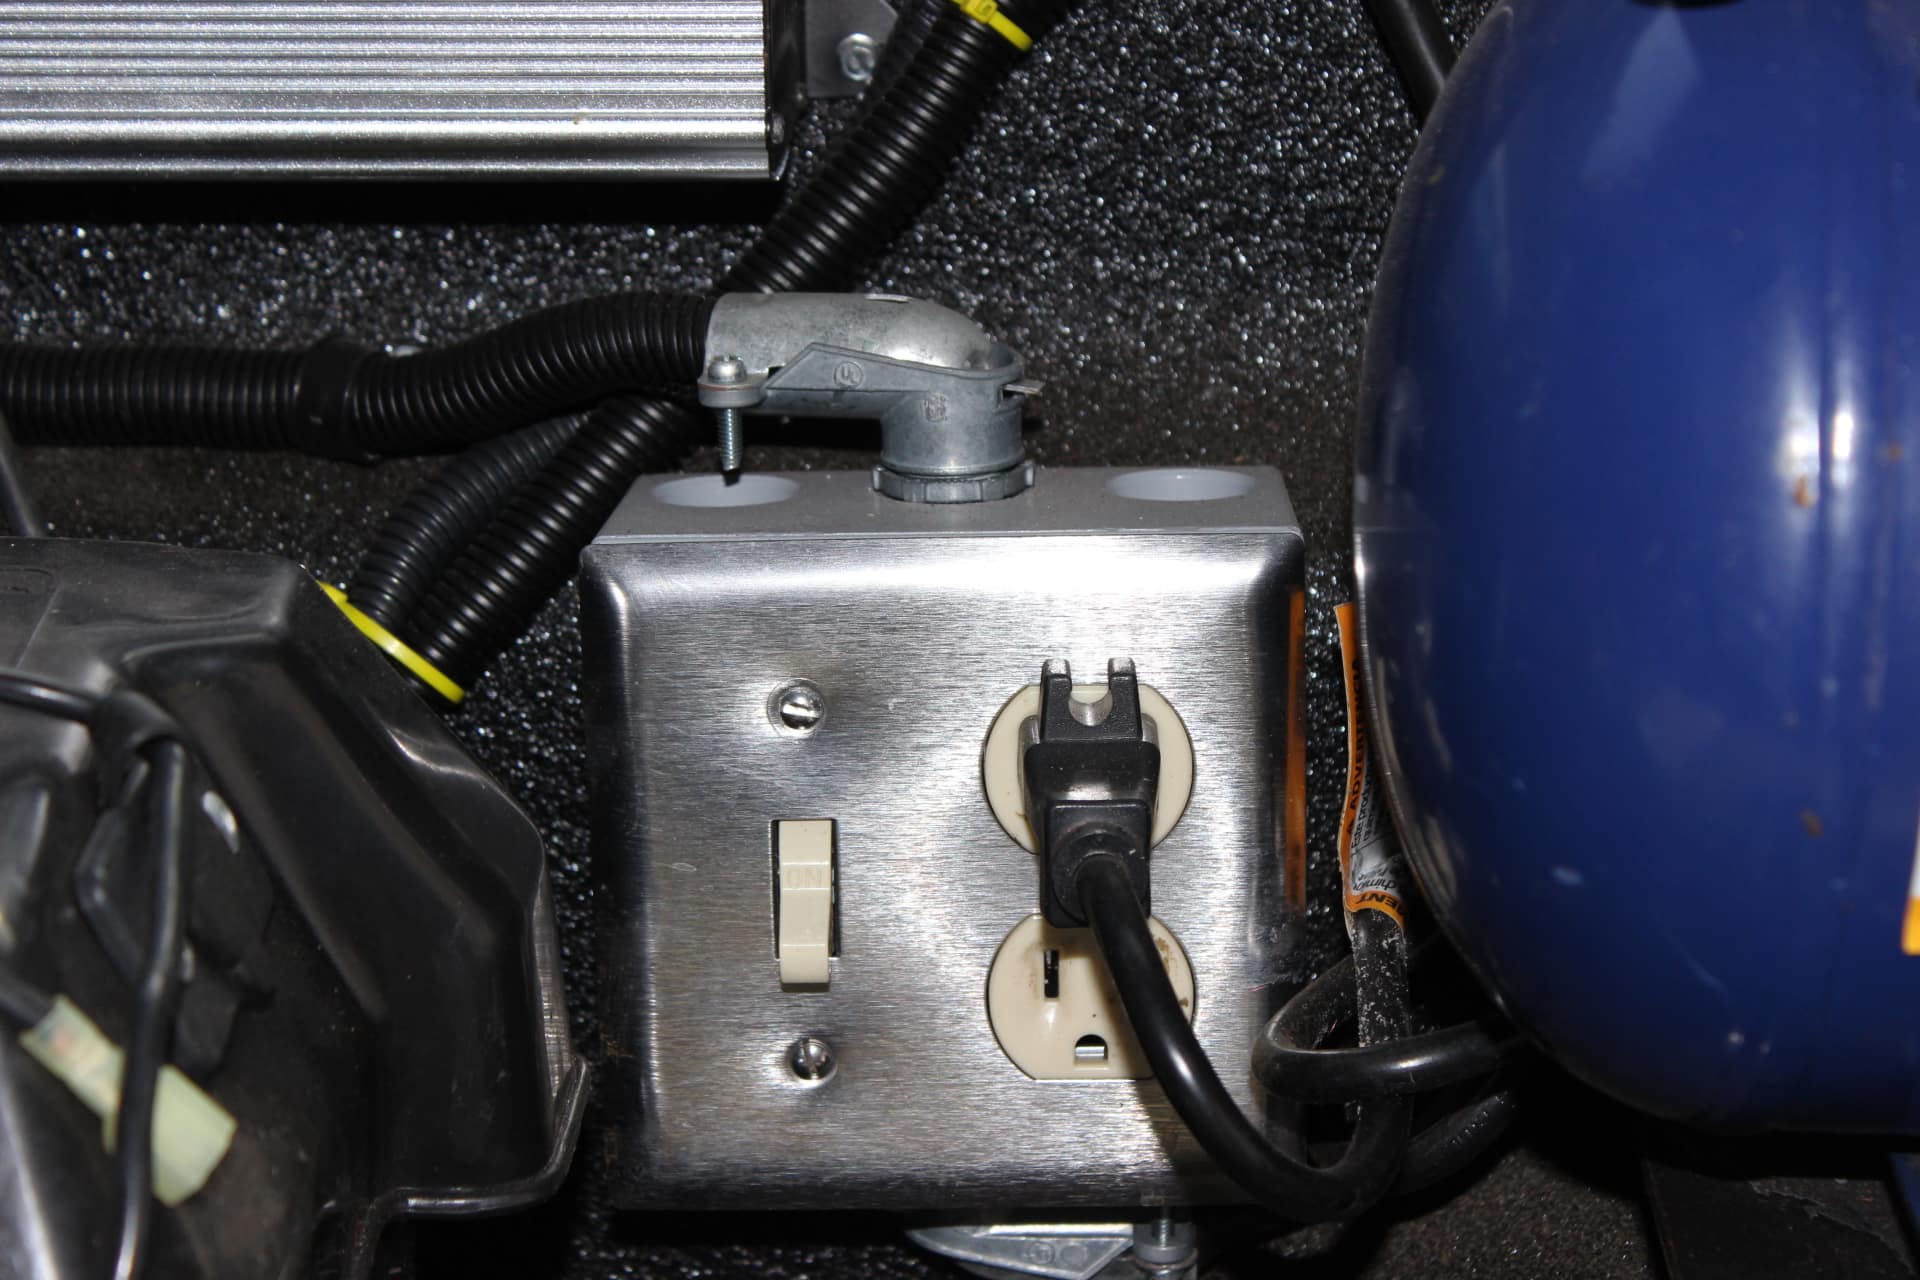
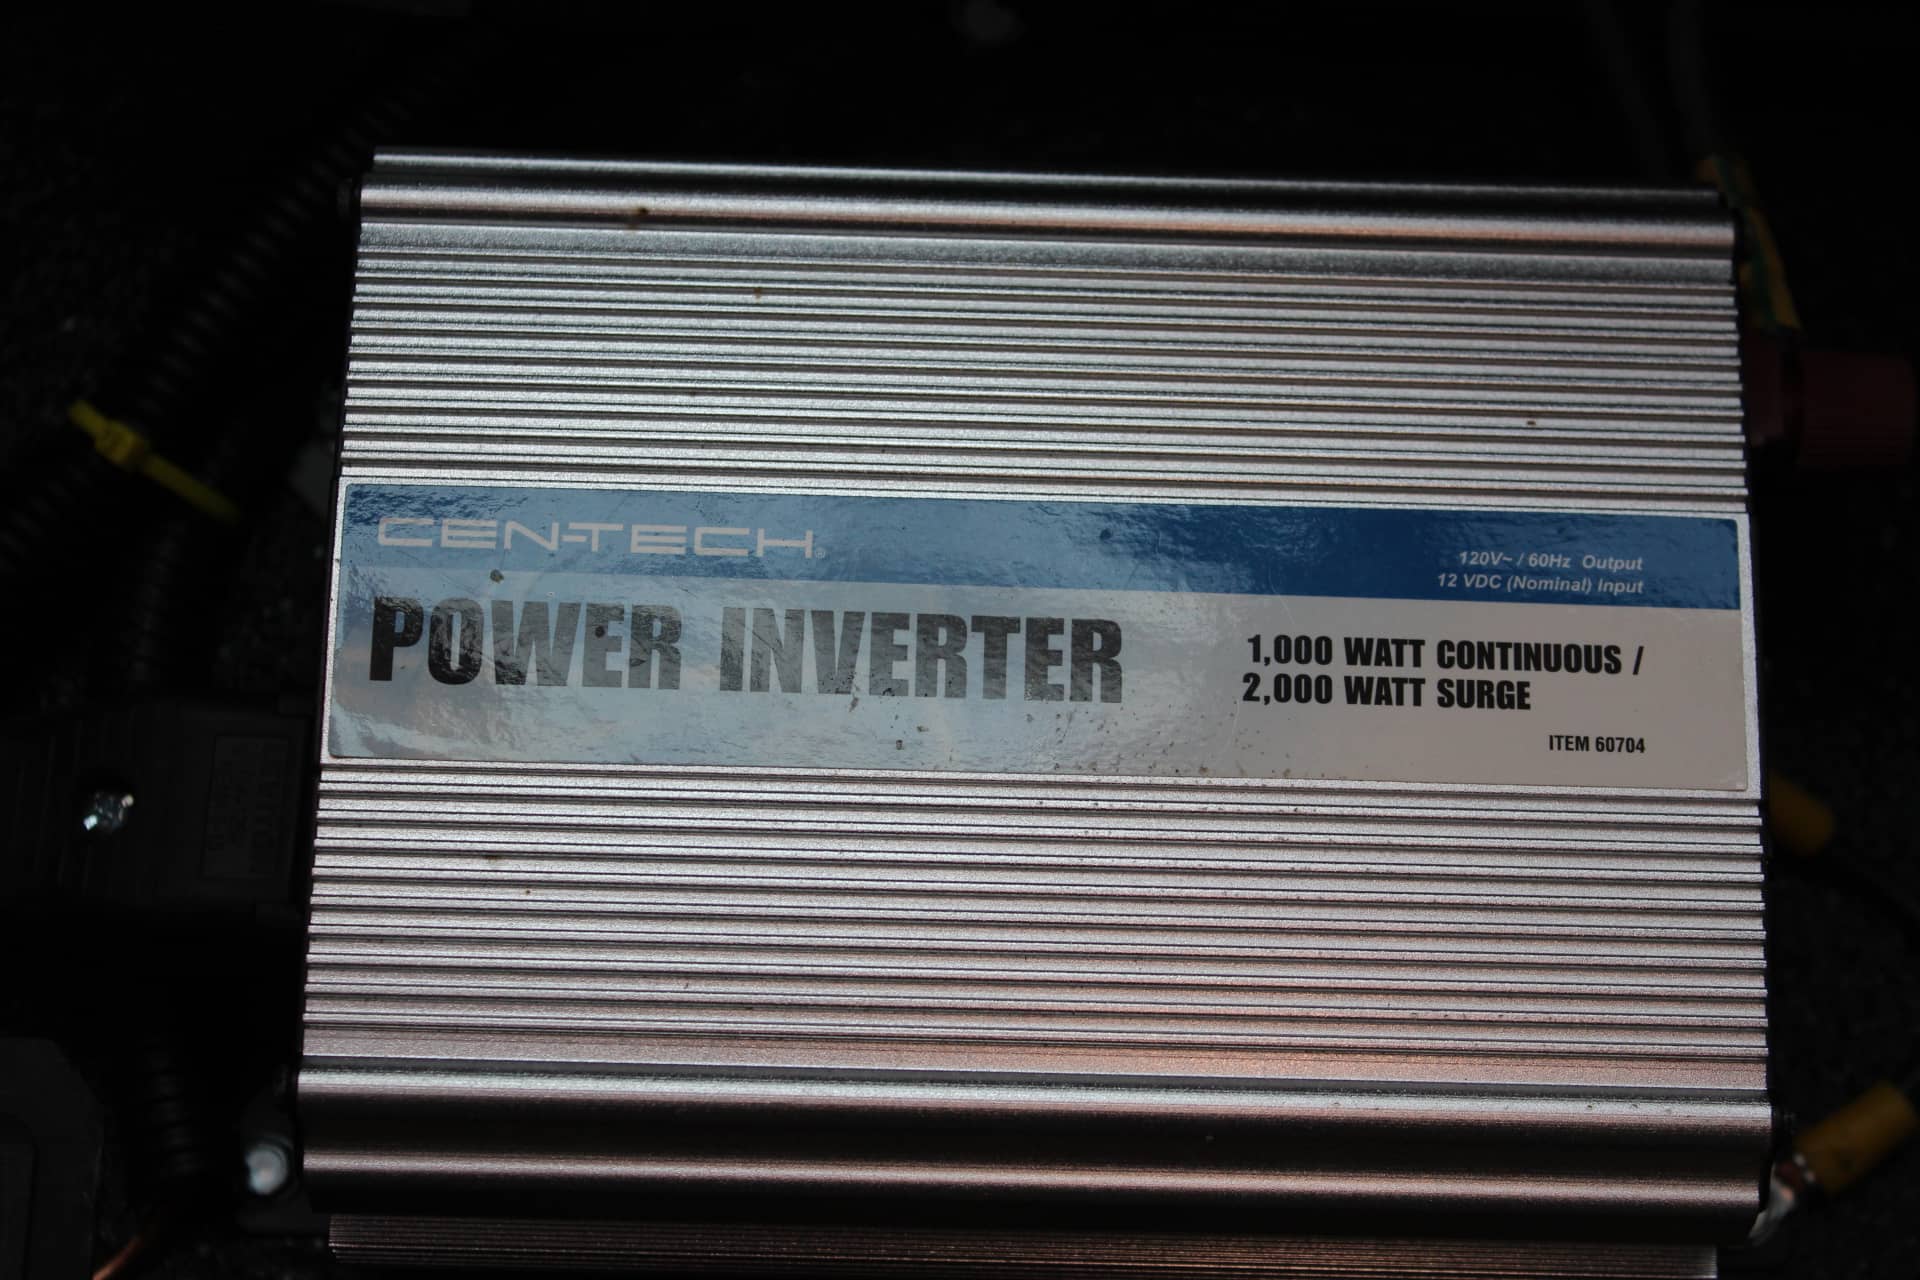
Next I installed a double gang switch/plug receptacle box with a double pole, single throw power selector switch (image 1617) which enables the plug to be powered by the battery thru the power inverter (which converts 12 volt DC into 110 volt AC … image 1624) or (when switched) by 110 volts AC (from either a generator or from a power pole at the campground/my home).
The 12 volts from the battery is run through a relay (image 1620) that is connected to the ignition switch in the truck and will only turn on when the ignition switch is turned on. This way it goes off when you turn the ignition key off and can’t be left on accidently. The 12 volt power then goes from the relay to the breaker box, then to the power selector switch and finally to the inverter to provide 12 volt DC to 110 volt AC to the plug. However I also wired the inverter directly through a by-pass switch (image 1623) in the bed of my truck for times when you are working in the back of the truck and the ignition is turned off. I got a switch that has a light to tell you when it’s on. That way the little light will help to remind you that “you left the switch on DUMMY!). From this plug box you can run any type of 110 AC appliance you wish, providing you don’t exceed the wattage limit of the 1,000 watt inverter. This is where the air compressor gets its power. I also have a small refrigerator, the same size as the one in the trailer. We use it to have more refrigerated storage space. It runs on 12 volts from the battery while the truck is running and can be switched to 110 AC thru jumper wires that run from the back of the truck to the front of the trailer (these jumper wires are normally for the generator power to the trailer, but can be used the other way around to bring 110 AC into the back of the truck and to the plug box….see next section) when we are parked at a campground. Even with the truck stopped, the fridge will stay cold for quite a while if you don’t open it up.
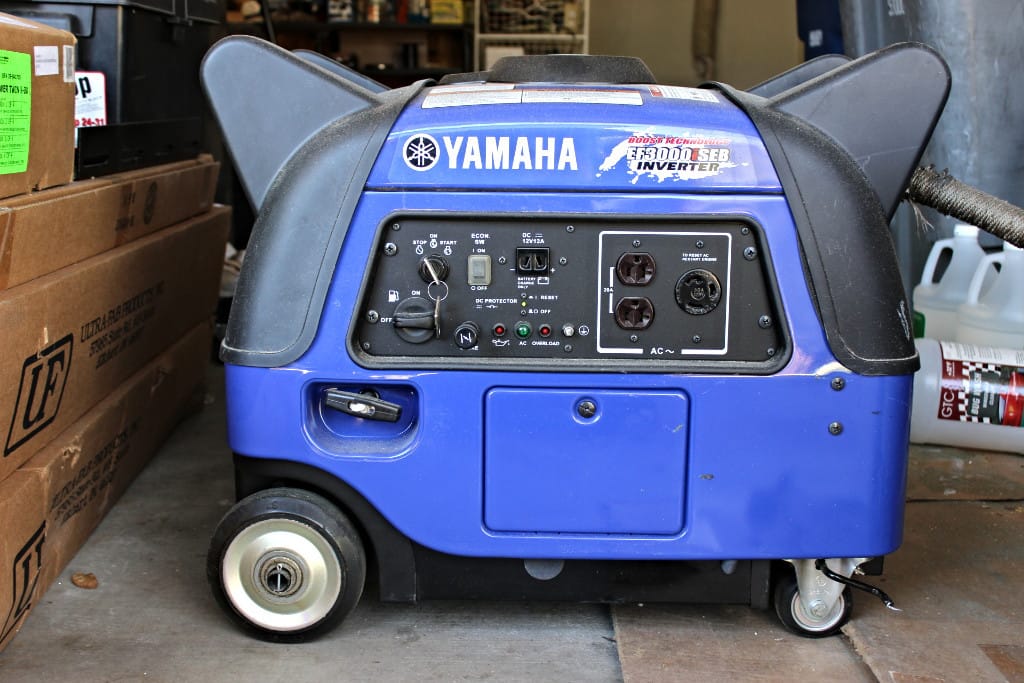
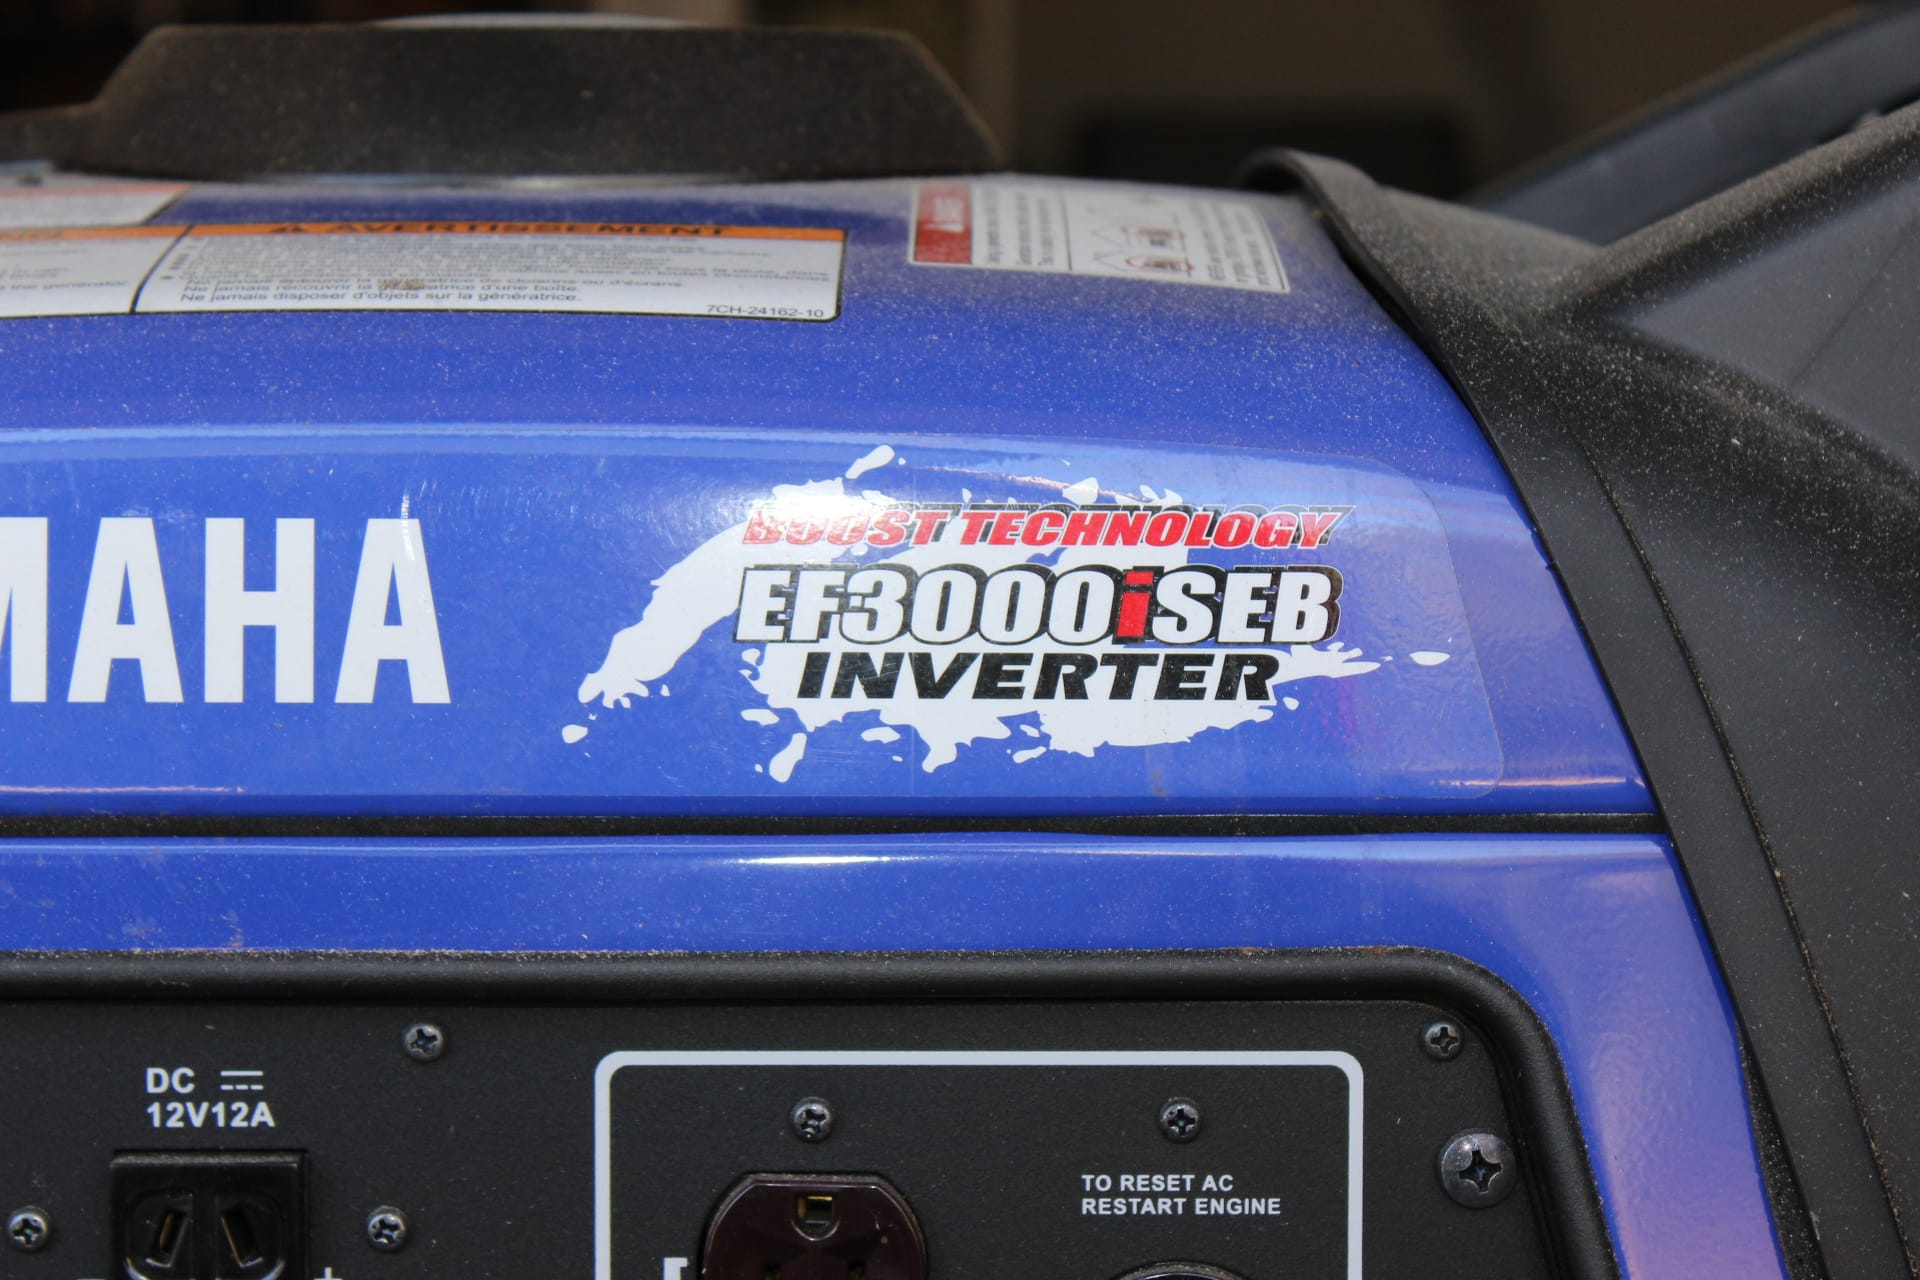
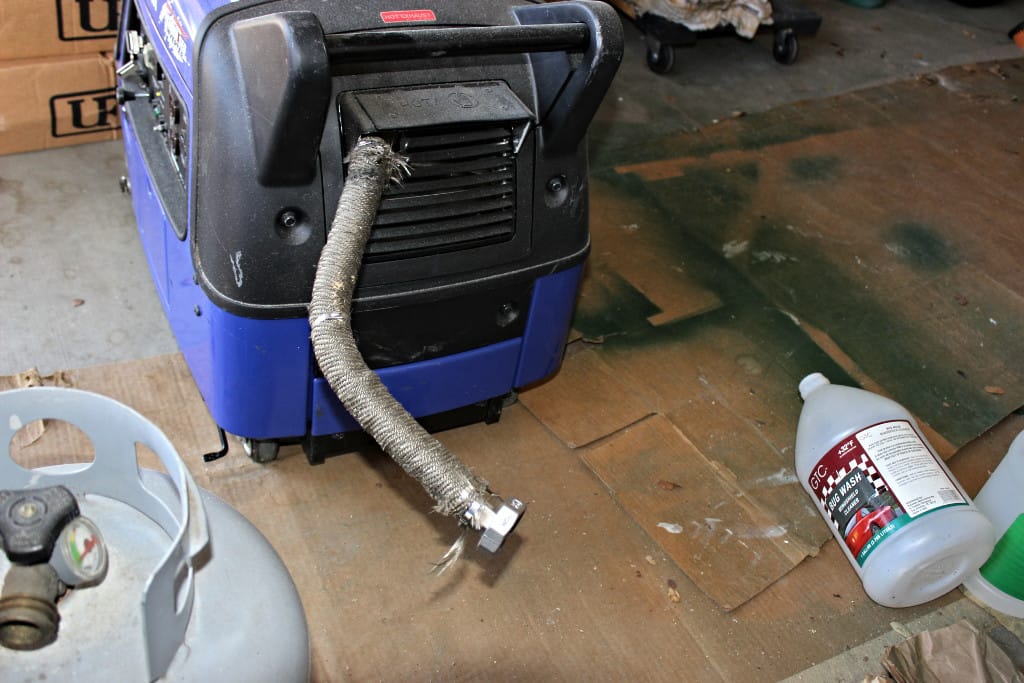
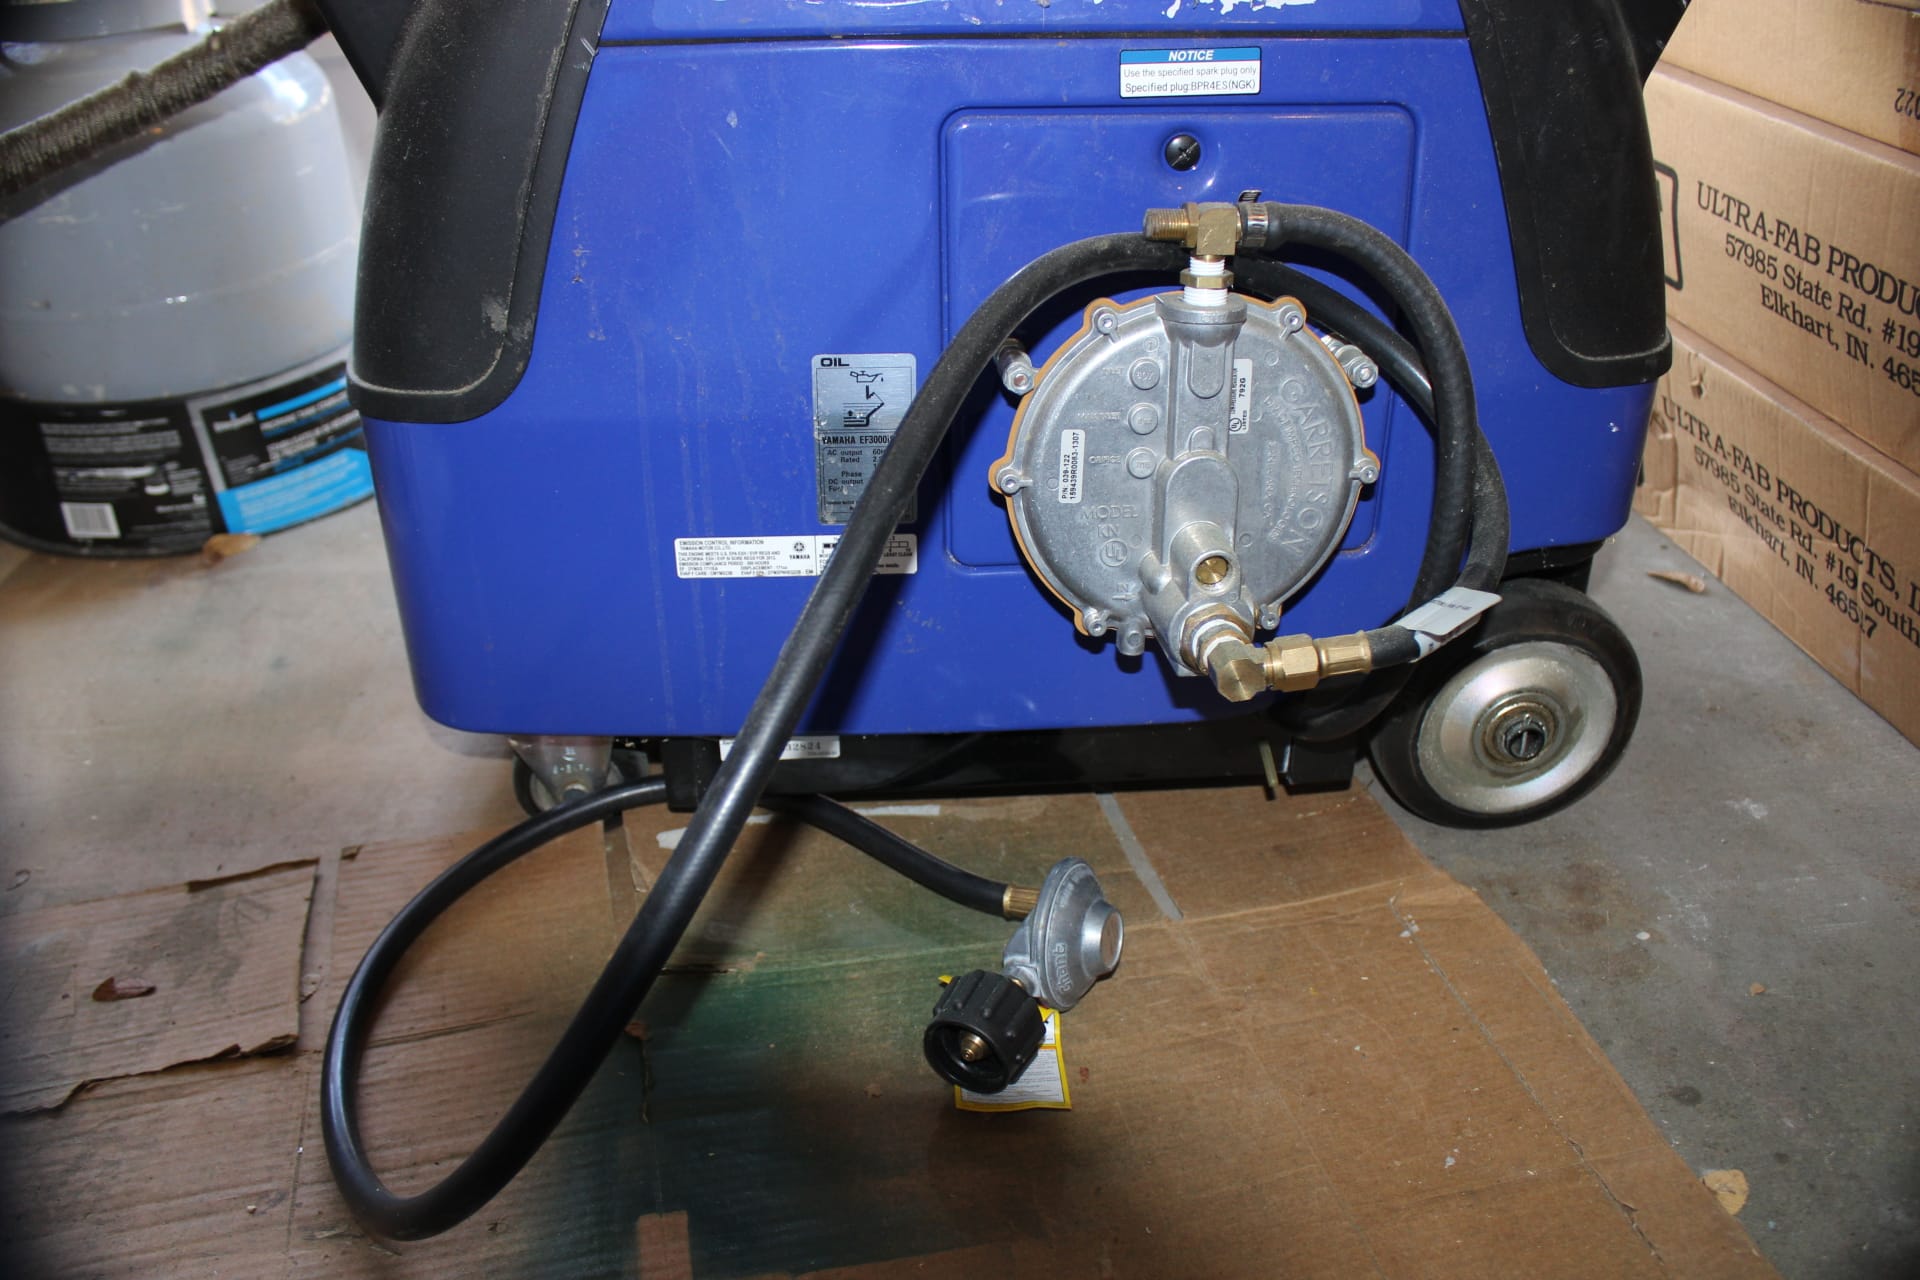
OK….if you have a trailer, chances are that it doesn’t have a generator. This was my first consideration when I first got my Trailmanor. After doing extensive research I decided on the Yamaha, electric start, EF-3000iSEB inverter generator (images 1630, 1631) which can add an extra 500 watts using the generator’s battery. It really helps the A/C to start up fast and I like the fact that it was the quietest 3000 watt inverter generator on the market. Well if you know me I have to have the extra goodies, so I contacted a company in Maine called Central Maine Diesel (I believe that’s their name) who sells all sorts of generators. They modify existing generators so that they can run not only on gasoline but propane and natural gas. What you do is send them your brand new, never been run carburetor and a fee (I think it’s around $80) and they send you back another carb that has been modified plus the hook-up hose and regulator (images 1633, 1634). You have to install them on your generator, but after you do, it’ll run on three different fuels. If you want to run it on LP or NG, all you do is make sure the gasoline valve is turned off, turn on the propane/natural gas after you hook up the hose and push the primer button twice (located on the back of the regulator diaphragm) and start er up. That’s it! I believe Central Maine Diesel has a video on youtube showing this, it’s
( https://www.youtube.com/watch?v=3O7cWYWAD4Q ). I like the idea of running my generator on propane or natural gas because even if the electricity goes out, very rarely does the natural gas go off, which means I can power my trailer or parts of my home with natural gas if I need to.
I decided to locate the generator in the back of my truck because…that’s the ONLY place I could put it. With that in mind I had to figure out two things…how to get the power to my trailer and how to get the exhaust out of the back of my truck since it’s enclosed. I feel better about having my $3000 generator locked up in the back of my truck. You’d have to be Hercules to steal this baby because it weighs about 300 lbs. and you’d have to get it out of the back of my truck….that is if you can get past all the locks and such!
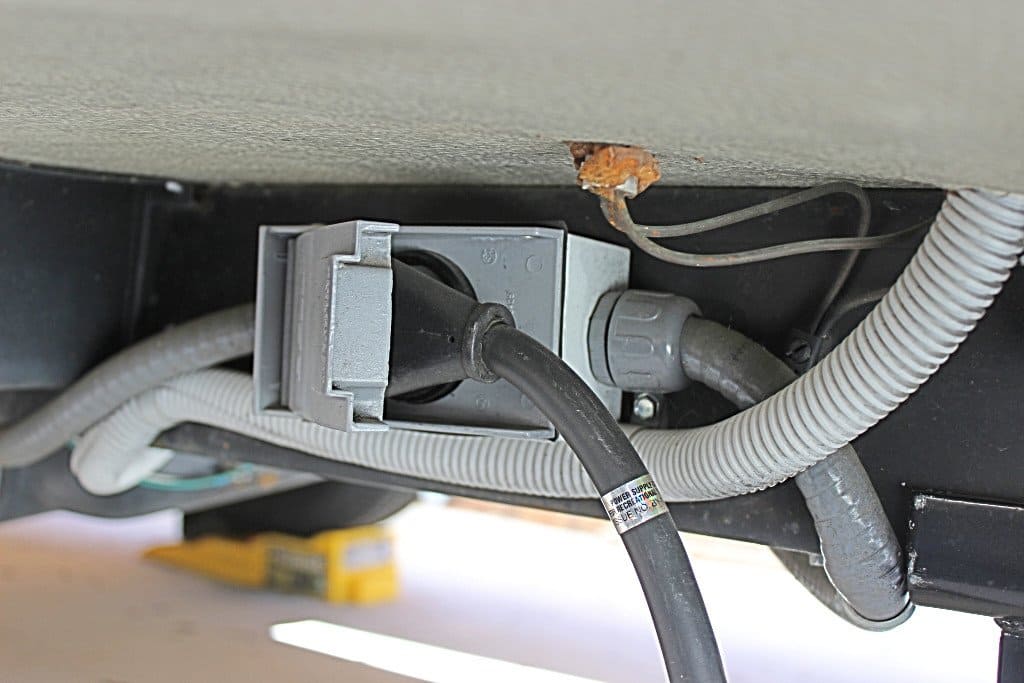
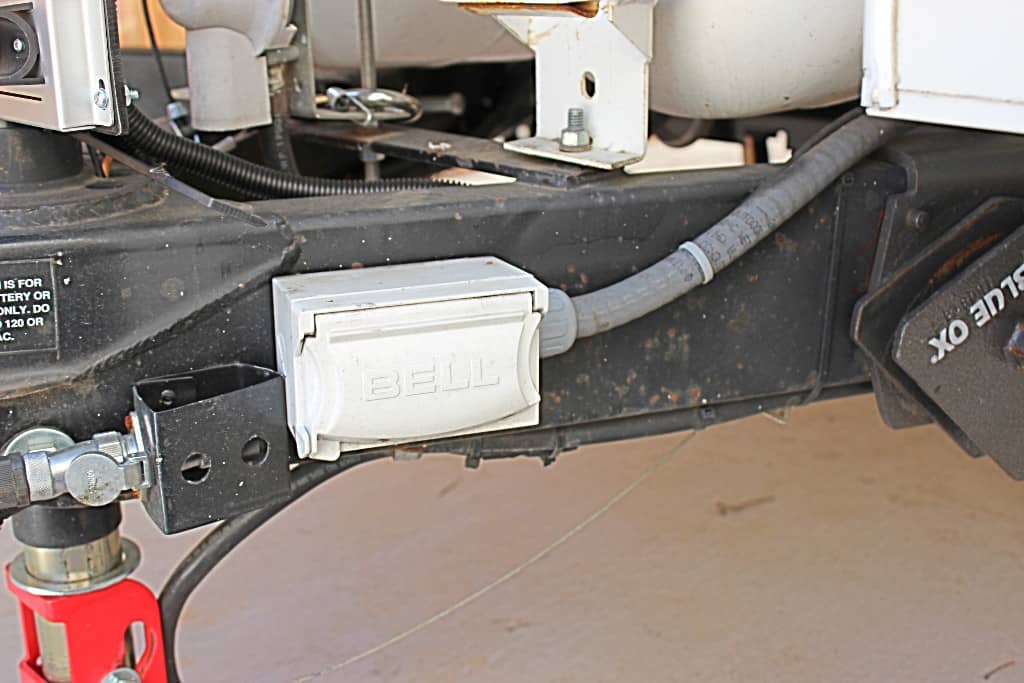
All-righty then….running the electricity to the trailer was easy. I installed another plug box on upper part of the bed of my truck on the bed wall of the driver’s side (image 1613). Behind this box was an oval rubber plug that I drilled a hole thru so I could run this gray weather-proof flex conduit. It runs from the back side of this box, thru the bed of my truck, then to the rear bumper of my truck. Both of these boxes have 30 amp “twist lock” receptacle (images 1611, 1612) mounted inside. I then run jumper wires from the generator’s 30 amp “twist lock” receptacle to the box inside the bed of my truck and then jumper wires from the outside box mounted at my rear bumper to another box mounted on the left front side of the trailer frame (images 1446, 1447). From there, it goes back all the way to another box (image 1445.. you can see that gray flexible weatherproof conduit running into the front and out of the back of this box) that is hard wired into the trailer’s surge protector (located underneath on the right side behind the tire…images 1503, 1505) and then to the main electrical panel. That solves getting the electricity from the generator to the trailer’s electrical system.
Next the exhaust gas from the generator itself.
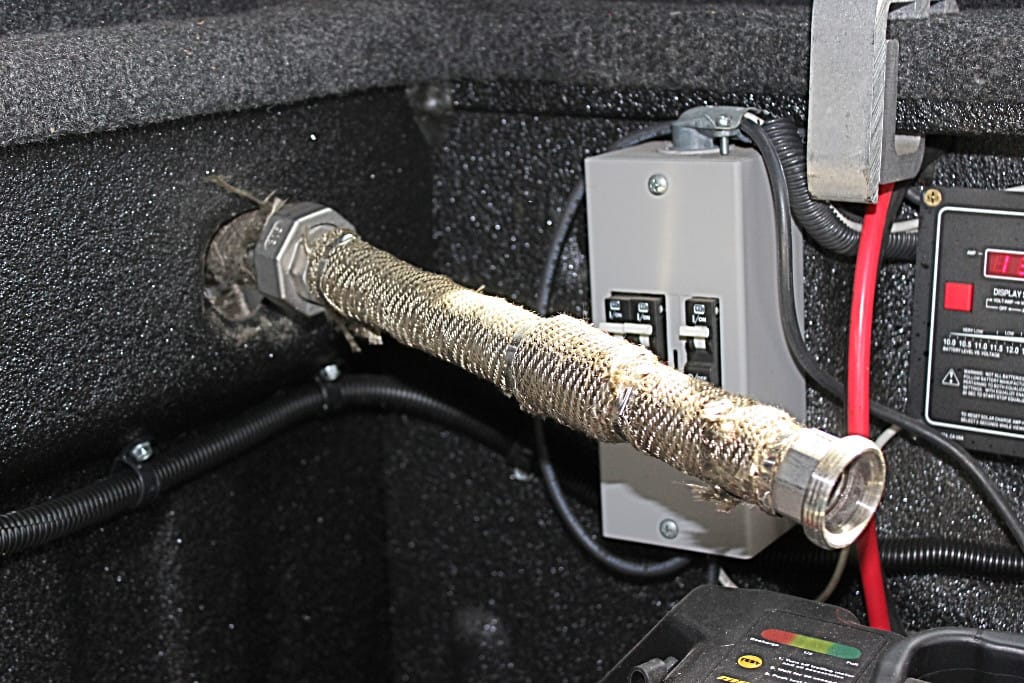
I found this 3/4“ID stainless steel flex pipe that was just the right diameter to match the exhaust port on the Yamaha generator. I cut a hole in another one of these oval rubber plugs which is located on the right side near the top of the truck bed. Then I ran the stainless steel flex pipe thru this hole to the outside. Before I ran the pipe, I wrapped the top portion of it with this fiberglass insulation. Then the pipe was threaded down the outside of the bed between the bed wall and the rear of the truck cab wall, underneath the bed on the right side and finally out and underneath the running board in front of the right rear tire of the truck (image 1627). With the other end sticking slightly out thru the truck bed wall and into the bed. To this end of the stainless steel hose I mounted one side of a stainless steel union (image 1615).
On the top of the generator’s muffler, is this 90° bent exhaust pipe that pushes the exhaust gases out the top and the end of the side of the generator. I ordered another one of these little 90° muffler chimneys from a Yamaha parts dealer and then had a piece of that stainless steel pipe welded to it. I then attached a stainless union on the end so I would be able to mate it to the exhaust pipe running to the outside (after wrapping it also with the fiberglass heat proof insulation …. image 1632). Unfortunately for me after I got it all done the pipe was too short to mate up properly….the answer was an extension pipe to go between the generator exhaust pipe and the exhaust pipe sticking thru the bed wall (image 1619). Onto this, I installed a union to each end of this pipe so it would mate to the other unions, and wrapped it all the way end to end. The last thing I want is a real nasty burn! Now once I have my generator in and all tied down and my exhaust pipes all hooked together, it will (and does) vent all of the exhaust gases out the bottom of my truck and away from everything. By the time the exhaust reaches the end of the pipe it has cooled down tremendously. So with the back somewhat closed up and locked up, one cannot hardly hear my generator running!
The latest thing that I have done to the truck is put in a CB radio and hook up my HAM radio as well (you can see the CB antenna in front with the HAM radio antenna in back on the roof of the cab…. Image 1629). I wish I would have had that CB when we were in Californication because ALL trailers, and that means even if you’re towing a Radio Flyer has a speed limit of….wait for it…… 55MPH!!!! No wonder everybody is moving away from that place! I guess they figure that if they make you tow at 55, no one will want to rent a Uhaul! If you do have to go there be sure and get behind some 18 wheeler that HAS a CB radio and you’ll be able to cruise better….that’s what we did.